
User Manual

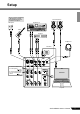
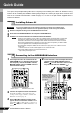


Table Of Contents

8
AUDIOGRAM 6 Owner’s Manual
Quick Guide
This quick setup and operation guide covers everything from installing the Cubase AI software to using
Cubase AI for recording and mixdown. While going through this section you might find it useful to also
refer to the “Controls and Functions” section on page 15, as well as the pdf manual supplied with the
Cubase AI software.
You are only permitted to use this software pursuant to the terms and conditions of the
“Steinberg Software End User License Agreement (EULA)” shown during the installation.
1
Start the computer and log on to the Administrator account.
2
Insert the included DVD-ROM into the computer’s DVD-ROM drive.
3
Follow the on-screen instructions to install the Cubase AI software.
• In order to have continuous use of Cubase AI, including support and other benefits, you will need
to register the software and activate your software license by starting it while the computer is
connected to the Internet. Click the “Register Now” button shown when the software is started,
then fill in all required fields for registration. If you do not register the product, you will be unable
to use the application after a limited period of time expires.
•To install on Mac computers double-click the “Cubase AI*.mpkg” icon or the “Cubase AI* Start
Center” icon.
“*” indicates where the version number appears in the actual icon name.
• Visit the web address below for the latest information on:
<http://www.yamahasynth.com/>
1
Turn all gear that is to be connected to the
AUDIOGRAM off or to standby mode (except
the computer), and set the LEVEL controls,
MASTER LEVEL control and DAW control to
their minimum settings.
2
Connect microphones and/or instruments.
For details on making connections refer to the
“Setup” section on page 7 and the “Controls and
Functions” section on page 15.
3
Set the MIC/INST switch according to the
type of device connected to channel 1 or 2.
Select MIC ( ) if a microphone is connected, or
INST ( ) if a guitar or similar instrument is con-
nected.
4
To use channels 1 and 2 as independent mono
channels set the MONO/STEREO switch to
MONO ( ). To use channels 1 and 2 as a ste
-
reo pair set the switch to STEREO ( ).
Step
1
Installing Cubase AI
Step
2
Connecting to the AUDIOGRAM interface
Important!
NOTE
LEVEL controls
MASTER LEVEL control
DAW
control
Be sure to turn the
PHANTOM +48V switch
on when using a phantom-
powered condenser
microphone.