NP-S2000_OM_G_cv1_4.
HiFi Began with Yamaha Yamaha’s involvement with and passion for music goes back more than a century, to when we built our first reed organ in 1887. Now we are the world’s leading producer of pianos and other musical instruments, and are involved with music in many other ways as well. We manufacture professional recording equipment, we design concert halls and we assist artists at concerts with set up and sound tuning. This knowledge and experience benefits our production of audio components in many ways.
Excellence in Audio Achievement 1922: We introduced a high-quality handwound phonograph. Since 1955, we have released many HiFi components, including turntables, tuners, integrated amplifiers, control amplifiers, power amplifiers and speakers. NS-20 CA-1000 NS-690 NS-1000M B-1 C-2 PX-1 NS-10M NS-20 Monitor Speaker CA-1000 Integrated Amplifier Featuring A-Class operation, the CA-1000 set the standard for integrated amplifiers.
CAUTION: READ THIS BEFORE OPERATING YOUR UNIT. 1 2 3 4 5 6 7 8 9 10 11 12 13 14 15 To assure the finest performance, please read this manual carefully. Keep it in a safe place for future reference. Install this sound system in a well ventilated, cool, dry, clean place - away from direct sunlight, heat sources, vibration, dust, moisture, and/or cold. For proper ventilation, allow the following minimum clearances around this unit.
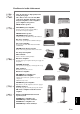
CONTENTS SUPPLIED ACCESSORIES .............................................................................................................. 2 GENERAL FLOWCHART ............................................................................................................... 3 SYSTEM STRUCTURES................................................................................................................... 4 Basic system..........................................................................................
SUPPLIED ACCESSORIES Check that you have received all of the following items. • Remote control • Batteries (AA, R6, UM-3) x 2 • Power cable • RCA stereo cable • TwonkyMedia server License Key brochure ■ Installing the batteries 1 3 2 ■ Note on transport tape Upon shipment from the factory, magnet feet are fixed with transport tape to this unit’s feet. Remove the transport tape before placing this unit. 1 Press the SELECT ENTER SOURCE LINK RETURN PUSH part and slide the battery cover off.
GENERAL FLOWCHART The following flowchart explains general setup procedures required to enjoy streaming music or Internet radio using this unit. Step 1: Deciding the system structure P.4 Decide the system to establish and check the requirements. Step 2: Connections P.7 Connect this unit to your PC system and audio system. Step 3: Downloading the dedicated applications P.8 From the website, download the dedicated applications required for your system. Step 4: Turning on this unit P.
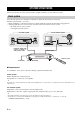
SYSTEM STRUCTURES This section describes two major system structure examples and what you can do with each system. Basic system The following figure shows a minimum configuration to utilize the basic functions of this unit. With this system structure, you can do... • Easily establishing a communication between your PC and this unit using the dedicated PC setup application.
SYSTEM STRUCTURES Full system The following figure shows a recommended configuration to take full advantage of the functions of this unit. With this system structure, you can do... • All features listed in “Basic system” ( P.
SYSTEM STRUCTURES Roles of each component Supported audio files This section describes rolls of each component in the system. This unit supports the following audio files stored on a PC or a NAS. This unit (NP-S2000) Decodes digital audio signals received from your PC network system and sends the signals to your audio system so that you can enjoy digital music stored on a PC or NAS, or Internet radio in high-quality sounds.
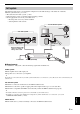
PREPARATIONS This section describes preparations required before operating this unit. Connections Depending on the system structure you want to establish, make cable connections of the system components.
PREPARATIONS ■ About the BALANCED OUT jacks The pin assignments for the BALANCED OUT jacks of this unit are shown below. Before connecting an XLR balanced cable, refer to the manual of your amplifier and verify that its XLR balanced input jacks are compatible with the pin assignments. Downloading the dedicated applications Visit the following website for information about downloading the dedicated applications. http://download.yamaha.
PREPARATIONS Turning on this unit If you have established all cable connections, turn on this unit and other system components. SELECT ENTER SOURCE PUSH RETURN LINK OFF Set the power switch to STANDBY/ON y When the power switch on main unit is set to STANDBY/ON, you can switch this unit between on and standby by pressing the power button on the remote control ( P.21).
COMMUNICATION SETUP This section describes the setup required on digital media servers (PC or NAS) and controllers (PC). 3 Check the “Share my media to” box, select the “NP-S2000” icon and then click “Allow”. 4 In the same way, select the icons for devices to be used as external media controllers (other PCs and mobile devices) and then click “Allow”. 5 Click “OK” to exit.
COMMUNICATION SETUP ■ Controller setup on PC 3 In this section, Windows 7 is used as an example. 1 Click “Search” to search the network players in the network. Click the “NP Search.exe” in the download folder to start “Network Player Search”. The “NETWORK PLAYER SEARCH” screen appears. Click 4 Select the model from the list and then click “Connect”. y The menu language is automatically selected according to the language setting on the operating system.
CONTENT BROWSING AND PLAYBACK This section describes how to browse contents and start playback from the PC browser (Internet Explorer 6.0 or later), mobile device or front panel/remote control of this unit. 2 Select a menu item until you find a desired content and then start playback. Operations from PC browser Menu screen 1 In the “Source” screen, select a source type. 1 2 y • The “Source” screen is displayed after following the procedure in “Controller setup on PC” ( P.11).
CONTENT BROWSING AND PLAYBACK Playback information screen Operations from mobile device 1 Full System By using the dedicated application “Network Player Controller” ( P.8), you can browse contents and start playback from your mobile device. 2 1 Tap the “NP Controller” icon on your mobile device to start “Network Player Controller”. 2 In the “Player Select” screen, select a network player to connect to. 3 4 5 6 7 8 1 Return Move to the previous screen.
CONTENT BROWSING AND PLAYBACK Remote control Operations from main unit or remote control RETURN NOW PLAYING HOME RETURN HOME NOW PLAYING y For details on the controls on the front panel/remote control, see “CONTROLS AND FUNCTIONS” ( P.20). 1 Cursor buttons/ ENTER Press SOURCE repeatedly to select a source type. SOURCE ENTER Cursor buttons/ ENTER Press / to select a menu item (or press / repeatedly to select from the gauge) and press ENTER to confirm the selection.
CONTENT BROWSING AND PLAYBACK Remote control REPEAT Presetting favorite contents DIMMER DISPLAY REPEAT SHUFFLE RETURN NOW PLAYING DISPLAY SHUFFLE y HOME For details on the controls on the front panel/remote control, see “CONTROLS AND FUNCTIONS” ( P.20). RETURN Playback buttons The preset function enables to make a quick access to your favorite contents (up to 20 contents) with the remote control.
CONTENT BROWSING AND PLAYBACK ■ Playing back a preset content 1 Press PRESET or / repeatedly to select a desired preset number. To switch between “1 to 10” and “11 to 20”, press /. Select: 3 1 2 3 5 7 y Preset locations not in use are displayed without numbers. 2 Within five seconds, press . ENTER y To clear all preset settings, execute “Initialize” in the advanced setup menu ( P.17). Make sure that this operation will reset all the settings of this unit to factory default.
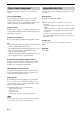
SETUP MENU You can configure the various settings of this unit using the setup menu. y For details on the controls on the front panel/remote control, see “CONTROLS AND FUNCTIONS” ( P.20). Setup menu operations ■ Operations from PC browser or mobile device 1 ■ Operations from remote control 1 In the “Source” screen, select “Setup”. Press SETUP to enter the setup menu ( P.18). To make the advanced setup menu items ( P.19) selectable, press SETUP while holding down RETURN (on the main unit).
SETUP MENU Setup menu list Available setup menus vary depending on the controller. Menu Submenu DHCP NETWORK Configuration NETWORK Information Settings (Bold: default) On, Off Controller Function Mobile device Remote control Select “On” to use the DHCP server to automatically configure the network settings of this unit or “Off” to configure manually. IP Address Specify the IP address when “DHCP” is “Off”. *1 Subnet Mask Specify the subnet mask when “DHCP” is “Off”.
SETUP MENU Advanced setup menu The following menu items are available only when you enter the setup menu by pressing SETUP (on the remote control) while holding down RETURN (on the main unit). Menu MAC Address Filter On/Off Settings (Bold: default) On, Off Function Select “On” to permit access to this unit only from the network components with the MAC addresses specified in the “MAC Address Filter” list. Select “Off” to disable the MAC address filter function.
CONTROLS AND FUNCTIONS Front panel 1 SELECT ENTER SOURCE RETURN 7 8 PUSH LINK OFF 2 3 4 5 1 Power indicator Lights up: This unit is turned on. Lights up dimly: This unit is standby. Off: This unit is turned off. 2 Power switch ( P.9) Switches this unit between on/standby and off. 3 Foot ( P.7) Remove the magnet foot to use the spikes. Also, you can adjust the height of each foot by rotating it. 4 Remote control sensor ( P.21) Receives infrared signals from the remote control.
CONTROLS AND FUNCTIONS Remote control 1 Remote control signal transmitter Transmits infrared signals. 1 2 3 4 DIMMER DISPLAY REPEAT SHUFFLE 3 DIMMER Adjusts the brightness of the front panel display. 4 REPEAT ( P.15) Switches the repeat mode (repeat all, repeat single, off). A B 5 MEMORY ( P.15) Turns this unit to the preset mode. MEMORY 6 6 PRESET ( P.15) Selects a preset number. PRESET 7 SETUP ( P.17) Shows the setup menu in the front panel display.
ADDITIONAL INFORMATION Basic information on this unit ■ General ■ DLNA What is “Yamaha Network Player NP-S2000”? NP-S2000 can play back the following audio sources: • DLNA-compatible server (music files stored on a PC or a NAS) For details, see “DLNA” below. • Internet radio (vTuner) For details, see “Internet radio” ( P.23). Also, you can select a playback source or operate this unit from the remote control or an external media controller (PC browser or dedicated mobile device application).
ADDITIONAL INFORMATION What types of audio formats can I play back on this unit? This unit supports monaural or stereo sounds of WAV, FLAC, MP3, AAC and WMA files. For example, the following audio formats are not supported.
ADDITIONAL INFORMATION Troubleshooting Refer to the tables below if the unit does not function properly. If the problem you are experiencing is not listed below, or if the instruction below does not help, download the FAQ file from “http://download.yamaha.com/file/45350” and check it. Still, if you cannot find information you are looking for, contact the nearest authorized Yamaha dealer or service center.
ADDITIONAL INFORMATION ■ DLNA Problem This unit does not detect the digital media server (PC). Some audio files cannot be played back on this unit. Cause Remedy See page No server application is installed on the PC. Install a DLNA-compatible server application such as Windows Media Player 11, Windows Media Player 12 or TwonkyMedia server. — Windows Media Player 11 or Windows Media Player 12 is not started on the PC. Start Windows Media Player 11 or Windows Media Player 12 on the PC.
ADDITIONAL INFORMATION Problem The sound from the Internet radio breaks sometimes. Cause Remedy See page Intermittent audio occurs depending on the network condition between your local network and the Internet station. Try the station later or select another station. If the problem happens with any stations, your network itself may have a problem. To enjoy Internet radio in a good condition, we recommend that you use a fast broadband connection to the Internet.
SPECIFICATIONS INPUT/OUTPUT • NETWORK Ethernet connection .................................100Base-TX/10Base-T DLNA version ................................. 1.5 (DMP/DMR supported) Audio format (DLNA)........... WAV, FLAC, MP3, AAC, WMA Audio format (Internet radio) ...................................MP3, WMA Audio sample rate (DLNA) ..... 96, 88.2, 64, 48, 44.1, 32, 24, 22.05, 16, 12, 11.025, 8 kHz Bit depth (DLNA)......................................................... 16, 24 bit • BALANCED OUT ........
■ License agreement ATTENTION PLEASE READ THIS SOFTWARE LICENSE AGREEMENT (“AGREEMENT”) CAREFULLY BEFORE USING THIS SOFTWARE. YOU ARE ONLY PERMITTED TO USE THIS SOFTWARE PURSUANT TO THE TERMS AND CONDITIONS OF THIS AGREEMENT. THIS AGREEMENT IS BETWEEN YOU (AS AN INDIVIDUAL OR LEGAL ENTITY) AND YAMAHA CORPORATION (“YAMAHA”). BY DOWNLOADING, INSTALLING, COPYING, OR OTHERWISE USING THIS SOFTWARE YOU ARE AGREEING TO BE BOUND BY THE TERMS OF THIS LICENSE.
Limited Guarantee for European Economic Area (EEA) and Switzerland Thank you for having chosen a Yamaha product. In the unlikely event that your Yamaha product needs guarantee service, please contact the dealer from whom it was purchased. If you experience any difficulty, please contact Yamaha representative office in your country. You can find full details on our website (http://www.yamaha-hifi.com/ or http://www.yamaha-uk.com/ for U.K. resident).
■ ■ ■ ■ ■ ■ ■ ■ Information about software Information sur le logiciel Information uber Software Information om programvara Informazioni sul software Información sobre el software Informatie over software Информация о программном обеспечении This product uses the following free software. For information (copyright, etc) about each software, read the original sentences stated below.
JUTBG NP-S2000 追加情報 日本語 Información adicional Español 機能変更により、再生可能なフォーマットに Apple Lossless フォーマット が追加されました。 ソフトウェアの著作権などについては裏面に示した原文をお読みください。 La función adicional de este producto admite formato de archivo de audio Apple Lossless Para obtener información detallada sobre la propiedad intelectual y la licencia, consulte la otra cara de esta página. Additional information Informazioni addizionali English Italiano The additional feature on this product supports Apple Lossless audio format.
Copyright English Copyright © 2011 Apple Inc. All rights reserved. Licensed under the Apache License, Version 2.0 (the “License”); you may not use this file except in compliance with the License. You may obtain a copy of the License at http://www.apache.org/licenses/LICENSE-2.0 Unless required by applicable law or agreed to in writing, software distributed under the License is distributed on an "AS IS" BASIS, WITHOUT WARRANTIES OR CONDITIONS OF ANY KIND, either express or implied.
NP-S2000_OM_G_cv1_4.