U Compact Disc Player Lecteur Compact Disc OWNER’S MANUAL MODE D’EMPLOI
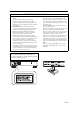
IMPORTANT SAFETY INSTRUCTIONS IMPORTANT SAFETY INSTRUCTIONS CAUTION RISK OF ELECTRIC SHOCK DO NOT OPEN CAUTION: TO REDUCE THE RISK OF ELECTRIC SHOCK, DO NOT REMOVE COVER (OR BACK). NO USER-SERVICEABLE PARTS INSIDE. REFER SERVICING TO QUALIFIED SERVICE PERSONNEL.
IMPORTANT SAFETY INSTRUCTIONS FCC INFORMATION (for US customers) 1 IMPORTANT NOTICE: DO NOT MODIFY THIS UNIT! This product, when installed as indicated in the instructions contained in this manual, meets FCC requirements. Modifications not expressly approved by Yamaha may void your authority, granted by the FCC, to use the product. 2 IMPORTANT: When connecting this product to accessories and/or another product use only high quality shielded cables. Cable/s supplied with this product MUST be used.
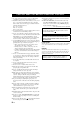
CAUTION: READ THIS BEFORE OPERATING YOUR UNIT. 1 To assure the finest performance, please read this manual carefully. Keep it in a safe place for future reference. 2 Install this sound system in a well ventilated, cool, dry, clean place – away from direct sunlight, heat sources, vibration, dust, moisture, and/or cold. For proper ventilation, allow the following minimum clearances. Top : 2.5 cm (1 inch) Rear: 2.5 cm (1 inch) Sides: 2.
CONTENTS CONTROLS AND FUNCTIONS ......................... 2 Front panel ................................................................. 2 Rear panel connections .............................................. 3 Remote control........................................................... 4 Program playback Audio CD ................................... 5 ADDITIONAL INFORMATION PLAYABLE DISC AND FILE FORMAT............8 USING THE ADVANCED SETUP.......................9 TROUBLESHOOTING ............................
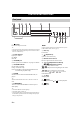
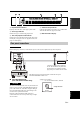
INTRODUCTION CONTROLS AND FUNCTIONS Front panel 1 (Power) Press to turn the power on/off. Note y Connect using the ANALOG OUT terminals when you use PURE DIRECT mode (refer to page 3). • The power indicator above lights up when this unit is turned on. • Playback starts automatically if the power is turned on while a disc is set in the disc tray. 2 Power indicator Lights up as follows: ON: Bright OFF: Off 3 iPod/USB port Connect your iPod or USB device. See page 6 for details.
CONTROLS AND FUNCTIONS E Source type indicator Indicates the type of content being played back. G Advanced setup indicator Indicates the enabled special modes. See “USING THE ADVANCED SETUP” (page 9) for details. INTRODUCTION D Playback Status Indicator Lights up when this unit is in the play or pause mode.
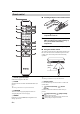
CONTROLS AND FUNCTIONS Remote control ■ Installing batteries in the remote control 1 Press the part and slide the battery compartment cover off. 2 Insert the two supplied batteries (AA, R6, UM-3) according to the polarity markings (+ and –) on the inside of the battery compartment. 3 Slide the cover back until it snaps into place. ■ Using the remote control The remote control transmits a directional infrared beam.
CONTROLS AND FUNCTIONS 8 FOLDER Data Disc (Folder down), (Folder up) USB 9 OPEN/CLOSE Opens or closes the disc tray. Notes 0 PURE DIRECT Turns on or off the PURE DIRECT mode to improve audio quality. See page 2 for details. y This setting is retained even if you turn off this unit. A RANDOM Turns on or off the random sequence playback mode. Note The random playback mode is canceled when the disc is ejected. B REPEAT Repeats playback of a single track or all tracks.
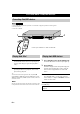
OPERATION PLAYING BACK iPod/USB DEVICE Connecting iPod/USB devices Notes iPod • Use the USB cable supplied with your iPod. If no USB cable is supplied, purchase one from Apple Inc. • Turn off your iPod. • Do not use a USB hub. 1 4 Connect your USB device or iPod via USB cable Playing back iPod 1 2 Press CD/USB to select the iPod/USB mode. The iPod/USB indicator on the front panel lights up in orange, then changes to green when playback is ready.
PLAYING BACK iPod/USB DEVICE Disconnecting iPod/USB devices Stop playback, and then disconnect your iPod or USB device. It is recommended that you press CD/USB to switch to the CD mode, confirm that the CD/USB indicator goes off, and then disconnect your iPod/USB device. CAUTION Do not disconnect your iPod or USB device while playing back from the connected device, or while “USB READING” appears in the front panel display.
ADDITIONAL INFORMATION PLAYABLE DISC AND FILE FORMAT ■ Playable MP3 and WMA files (USB device and Data Disc) ■ Playable discs Use compact discs bearing the marks below. MP3 Bitrate (kbps) Sampling frequency (kHz) MPEG 1 Audio Layer-3 32-320 * 32/44.1/48 MPEG 2 Audio Layer-3, 2 8-160 * 16/22.05/24 MPEG-2.5 Audio Layer-2 8-160 * 8/11.025/12 Format .... Compact discs (digital audio) .... CD-R, CD-RW digital audio discs • CD-R or CD-RW discs bearing one of the following phrases.
PLAYABLE DISC AND FILE FORMAT ■ Handling compact discs • Always handle with care so that the playing surface is not scratched. Do not warp discs. • To keep clean the playing surface, wipe with a clean, dry cloth. Do not use any type of disc cleaner, spray, or any other chemical-based liquid. • Do not wipe with a circular motion; wipe straight outward from the center. • Use a soft-tipped pen when writing on the label side of the disc.
TROUBLESHOOTING If the unit fails to operate normally, check the following points to determine whether the problem can be corrected by the simple measures suggested. If it cannot be corrected, or if the problem is not listed in the Problems column, disconnect the power cable and contact your authorized Yamaha dealer or service center for help. Possible Causes This unit fails to turn on. The power cable is not connected to the AC IN inlet on the rear panel or not plugged in the wall outlet.
TROUBLESHOOTING Problems Sound “skips”. Possible Causes Solutions This unit is being subjected to vibrations or impacts. Relocate this unit. Refer to page — The disc is dirty. Clean the disc. 8 Sound “hums”. Improper cable connections. Securely connect the audio cables. If the problem persists, the cables may be defective. 3 Noise from a nearby tuner. The tuner is too close to this unit. Move the tuner and this unit farther apart or turn off this unit. — Noise from inside of the disc tray.
© 2009 Yamaha Corporation All rights reserved.