
User Manual


ShureWirelesswithYamahaCL/QL
www.yamahaproaudio.com
11
6 Wireless Control from CL/QL
Now the whole system is ready for control and monitoring. Follow these steps on the
CL/QL console:
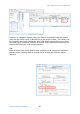
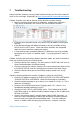
1. Open the I/O DEVICE menu
2. Take a look at the WIRELESS tab
3. Select the required ULXD/QLXD/AXT device from the left column. Press and
hold to make the front panel LEDs flash (for easy identification of the device).
4. The device details will be shown on the console screen, with a blue
“CONTROLLABLE”
indicator. Touch the
area of the controls
to open the I/O
DEVICE pop-up
window.
5. Edit the receiver
channel’s name, the
RX.GAIN (receiver
gain), and the MUTE
status. Monitor the
transmitter
frequency, RF
LEVEL and battery
level.
6. Note: AXT includes
additional TX.GAIN and TX NAME functions. QLXD doesn’t include the MUTE
function.
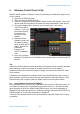
Tip:
Note that the Shure device control parameters correspond only to real-time operation
and monitoring, and are not stored or recalled in the scene. If you want to
synchronize the scene recall with the gain change, you need to use DIGITAL GAIN
in the console.
Furthermore, the wireless mic settings can be accessed directly from the console’s
input channels. But first the input port must be assigned to the input channel. With
Dante devices, this is simple: patch the Dante input port to the Input Channel.
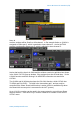
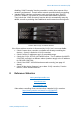
6.1 Input Channel Control of ULXD4D/Q
In the example below, the ULXD4Q is patched to the console’s Dante input ports 41-
44, and these Dante ports are patched to input channels 41-44. So when viewing
input channels 41-48 on the HOME OVERVIEW screen, the ULXD information is
displayed in the input area at the top. And when taking a look at the SELECTED CH
VIEW for input 41, the receiver information is displayed.
Touch the RX.GAIN parameter on the screen twice to open the GAIN / PATCH pop-
up window.