
User Manual


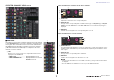

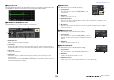
Table Of Contents
- How to Use This Reference Manual
- Table of contents
- Function Tree
- SELECTED CHANNEL section
- Centralogic section
- Input and output patching
- Input channels
- Signal flow for input channels
- Specifying the channel name/icon
- HA (head amp) settings
- Sending the signal from an input channel to the STEREO/MONO bus
- Sending a signal from an input channel to a MIX/ MATRIX bus
- Channel name display indication
- Correcting delay between channels (Input Delay)
- Surround output for input channels
- Channel library operations
- OUTPUT channels
- EQ and Dynamics
- Channel Job
- Scene memory
- Monitor and Cue functions
- Talkback and Oscillator
- Meters
- Graphic EQ, Parametric EQ, Effects, and PREMIUM RACK
- I/O devices and external head amps
- MIDI
- Recorder
- Setup
- About the SETUP screen
- User settings
- Preferences
- USER DEFINED keys
- Functions that can be assigned to USER DEFINED keys
- USER DEFINED knobs
- Functions that can be assigned to USER DEFINED knobs
- Assignable encoders
- Functions that can be assigned to the assignable encoders
- GAIN/PAN/ASSIGN knob (assignable encoder) functions
- Custom fader bank
- Master fader
- Custom fader bank functions
- Console Lock
- Saving and loading setup data to and from a USB flash drive
- Formatting a USB flash drive
- Word clock and slot settings
- Using cascade connections
- Basic settings for MIX buses and MATRIX buses
- Switching the entire phantom power supply on/off
- Specifying the brightness of the touch screen, LEDs, channel name displays, and lamps
- Setting the date and time of the internal clock
- Setting the network address
- Dante audio network settings
- Using GPI (General Purpose Interface)
- Help function
- Other functions
- Initializing the unit to factory default settings
- Adjusting the detection point of the touch screen (Calibration function)
- Adjusting the faders (Calibration function)
- Fine-tuning the input and output gain (Calibration function)
- Adjusting the channel color (Calibration function)
- Adjusting the brightness of the channel name display
- Adjusting the contrast of the channel name display
- Initializing the console settings and Dante audio network settings
- Warning/Error Messages
- Index
- Data List
- Table of Contents
- EQ Library List
- DYNAMICS Library List
- Dynamics Parameters
- Effect Type List
- Effects Parameters
- Premium Rack Processor Parameters
- Parameters That Can Be Assigned to Control Changes
- NRPN Parameter Assignments
- Mixing Parameter Operation Applicability
- MIDI Data Format
- Input/output characteristics
- Electrical Characteristics
- Mixer Basic Parameters
- Pin Assignment
- MIDI Implementation Chart

SELECTED CHANNEL section
Reference Manual
7
SELECTED CHANNEL VIEW screen
SEND field
In this field, you can view the send level and pre/post from the channel
to each MIX/MATRIX bus. You can also switch the on/off status of the
send signals. The view and the function of the knobs and buttons in
the SEND field vary depending on whether a pair of bus channels
(odd-numbered and even-numbered) are comprised of two mono
channels or a stereo channel.
1 Tabs
Enable you to select a group of 16 output bus channels to be
displayed in the SEND field.
• MIX1-16 tab............................ displays MIX buses 1-16.
• MIX17-24/MATRIX tab ........... displays MIX buses 17-24 and
MATRIX buses 1-8.
If the destination bus channels are two mono channels:
1 SEND knob
Adjusts the send level to the corresponding bus.
2 PRE indicator
The type of the corresponding bus is indicated. If the type is VARI [PRE EQ] or VARI [PRE
FADER], and if the PRE button on the MIX SEND 8ch screen is turned ON, the type is
displayed.
3 ON button
Switches the send signal to the corresponding bus on or off.
If the destination bus is a stereo channel:
1 SEND/PAN knob
The right-hand knob adjusts the level of the signal sent to a pair of bus channels (even-
numbered and odd-numbered). The left-hand knob adjusts the pan and balance of the
same signal.
2 PRE indicator
The type of the corresponding bus is indicated.
3 ON button
Switches the send signal to the two buses on or off.
NOTE
• If the type of the destination bus is set to FIXED, controllers 2 and 3 mentioned above will not
be displayed.
• Press the SEND knob or PAN knob on screen to open the SEND 8ch window.
1
1
2
3
1
2
3