
User Manual


ShureWirelesswithYamahaCL/QL
www.yamahaproaudio.com
8
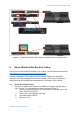
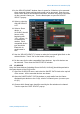
12. In the DEVICE MOUNT window, there is space for 24 devices to be mounted.
Once mounted, Dante patching and control can be accessed. Even the non-
Dante Shure devices should be mounted here, because they will be controlled
via the console’s Dante port. Touch a blank space to open the DEVICE
SELECT pop-up.
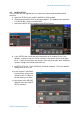
13. Select to view the
ONLINE DEVICE
LIST.
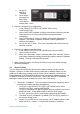
14. Select a Shure
device: a
ULXD4D/Q should
have a name
beginning with
“Y0**”, where ** is
a hexadecimal
number. Each
compatible device
type should be
listed with its
model name in
blue.
15. Use the “DEVICE IDENTIFY” button to make the front panel lights flash on the
selected device. Touch “OK” at the bottom of the pop-up.
16. Do the same for the other compatible Shure devices. Up to 24 devices can
be mounted. Then close the DANTE SETUP window.
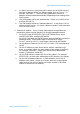
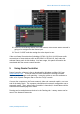
4.3 I/O DEVICE
Next, the Dante devices (including Shure ULXD4D, ULXD4Q) should be patched to
the Dante inputs of the CL/QL mixer.
17. Open the I/O DEVICE menu, and select the DANTE PATCH tab at the top-left
of the screen. All the mounted devices are shown.
18. Open the DANTE INPUT PATCH window, to patch audio from the Dante-
equipped input devices to the CL/QL mixer’s 64 Dante inputs. (
32 Dante inputs
for QL1
).
19. Choose which Dante input should be used by the first wireless mic channel.
Touch to open the PORT SELECT pop-up.