
User Manual


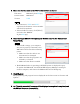
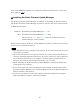
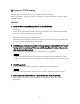

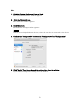

Table Of Contents
- ■ Precautions (Please be sure to read this section first!)
- ■ Update procedure sequence
- ■ Checking the version number
- ■ Preparing for the update
- ■ Updating the RMio64-D firmware
- ■ Installing the Dante Firmware Update Manager
- ■ Computer TCP/IP setting
- ■ Updating the Dante firmware
- ■ About Failsafe Mode
- ■ Error Message List (RMio64-D Update Program)

10
■
Updating the Dante firmware
Described below are the procedures to update the Dante module firmware integrated
in the RMio64-D unit.
• To update the Dante firmware, you need to connect an RMio64-D to the computer
one at a time, and repeat the update procedure for each device.
• For details of the Dante Firmware Update Manager, refer to “AUD-MAN-
Firmware Update Manager” stored in the compressed file folder.
1.
Connect the Dante [PRIMARY] connector on the rear panel of the RMio64-D unit
to the Ethernet connector on the computer using an Ethernet cable.
Be sure to directly connect the computer and the RMio64-D unit, and do not
connect any other Dante device to the computer.
2.
Turn on the power to the RMio64-D.
3.
Run the Dante Firmware Update Manager as described below.
Windows
Select [All programs] or [All apps] [Audinate] [Dante Firmware Update
Manager] [Dante Firmware Update Manager], then right-click and select “Run
as Administrator.”
Mac
Double-click “Applications” “Dante Firmware Update Manager.”
• Confirm in the title bar that the version number is 1.4.7.1 or higher (Windows)
or 1.4.5 or higher (Mac).
• The “User Account Control” dialog box may appear. Click [Continue] or [Yes].
4.
If you see the interface selection screen, select the interface card to connect the
Dante device.