
User Guide


Yamaha Professional Audio CL StageMix V4.5 User Guide
Page 10
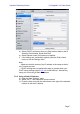
iii. Enter the CL series console’s IP address noted in 3.1. The default IP
Address may not need to be changed but confirm this in the Network
Setup screen of the CL series console (refer to 3.1). If you need to
modify the IP Address in StageMix, make sure you include the dots
between the sets of numbers (as shown above).
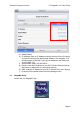
iv. Enter the CL series console’s MAC address noted in 3.1. When
entering the MAC Address, the colons between sets of characters will
be automatically added by StageMix.
v. Select the Model of CL series console.
vi. Press the [ADD MIXER] button at the bottom of the screen.
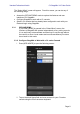
3.3.3 Select a Mixer and Begin Working
If your iPad has been configured to work with a CL series console,
select the mixer from the list and press [CONNECT]. (The model of
mixer (CL1, CL3 or CL5) will appear in smaller text below the mixer’s
name.)
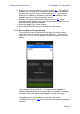
The message “Syncing With CL…” will appear while StageMix is
obtaining parameters from the console. After this process is complete,
the Mixer window will appear and StageMix is ready to be used.
If StageMix cannot connect with your console, refer to the
Troubleshooting section (10.0) at the end of this document for possible
solutions.