
Reference Manual
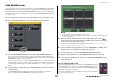
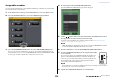
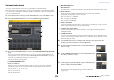
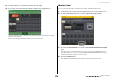


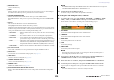

Table Of Contents
- How to Use This Reference Manual
- Contents
- Function Tree
- SELECTED CHANNEL section
- Centralogic section
- Input and output patching
- Input channels
- Signal flow for input channels
- Specifying the channel name, icon and channel color
- Making HA (Head Amp) settings
- Sending a signal from an input channel to the STEREO/MONO buses
- Sending a signal from an input channel to a MIX/ MATRIX bus
- Correcting delay between channels (Input Delay)
- Channel library operations
- Output channels
- EQ and Dynamics
- Grouping and linking
- Scene memory
- About scene memories
- Using scene memories
- Editing scene memories
- Using the Global Paste function
- Using the Focus function
- Using the Recall Safe function
- Using the Fade function
- Outputting a control signal to an external device in tandem with scene recall (GPI OUT)
- Playing back an audio file that links to a scene recall
- Using Preview mode
- Monitor and Cue functions
- Talkback and Oscillator
- Meters
- Graphic EQ, effects, and Premium Rack
- I/O device and external head amp
- MIDI
- User settings (Security)
- Recorder
- Help function
- Other functions
- About the SETUP screen
- Word clock and slot settings
- Using cascade connections
- Basic settings for MIX buses and MATRIX buses
- Switching the entire phantom power supply on/ off
- Specifying the brightness of the touch screen, LEDs, channel name displays, and lamps
- Setting the date and time of the internal clock
- Setting the network address
- Initializing the unit to factory default settings
- Adjusting the detection point of the touch screen (Calibration function)
- Adjusting the faders (Calibration function)
- Fine-tuning the input and output gain (Calibration function)
- Adjusting the channel color (Calibration function)
- Adjusting the brightness of the channel name display
- Adjusting the contrast of the channel name display
- Dante audio network settings
- Using GPI (General Purpose Interface)
- Appendices
- EQ Library List
- DYNAMICS Library List
- Dynamics Parameters
- Effect Type List
- Effects Parameters
- Premium Rack Processor Parameters
- Effects and tempo synchronization
- Parameters that can be assigned to control changes
- NRPN parameter assignments
- Mixing parameter operation applicability
- Functions that can be assigned to USER DEFINED keys
- Functions that can be assigned to USER DEFINED knobs
- Functions that can be assigned to the assignable encoders
- MIDI Data Format
- Warning/Error Messages
- Electrical characteristics
- Mixer Basic Parameters
- M IDI Implementation Chart
- Index

User settings (Security)
Reference Manual
177
Saving and loading setup data to and from a USB
flash drive
This section explains how to connect a commercially-available USB flash drive to the USB connector
located to the right of the display, and save the internal settings and user authentication keys of the CL
series console to the USB flash drive or load them from the USB flash drive.
NOTE
• Operation is guaranteed only for USB flash drives.
• The operation of USB flash drives with capacities of up to 32GB has been verified. (However, this
does not necessarily guarantee the operation of all USB flash drives.) The FAT16 and FAT32
formats are supported. A USB flash drive with a capacity of 4GB or larger will be formatted in
FAT32, and a USB flash drive with a capacity of 2GB or smaller will be formatted in FAT16.
NOTICE
An ACCESS indicator appears in the Function Access Area while data is being accessed (saved,
loaded, or deleted). During this time, do not disconnect the USB plug or power-off the CL unit.
Doing so may damage the data in the flash drive.
Saving the CL console’s internal data on a USB flash drive
All of the CL series console’s internal data can be saved on a USB flash drive as a setting file. The saved
file will have an extension of “.CLF”.
1. In the Function Access Area, press the SETUP button to access the SETUP screen.
2. Press the SAVE/LOAD button to access the SAVE/LOAD popup window.
3. If necessary, press the directory icon and change the directory.
To move to the next higher level, press the arrow button in the PATH field.
4. Press the SAVE button.
A keyboard window will appear, allowing you to enter a file name and comment.
5. Enter a file name or comment, and press the SAVE button.
When the file has been saved, the PROCESSING popup window that shows the progress of the
writing operation will close.
NOTE
• If you are going to overwrite a file or save a file with the same name in the same folder, a dialog
will ask you to confirm the overwrite.
• You can enter a comment of up to 32 characters.
• You may enter a file name of more than eight characters. However, the drive name, path name,
and file name are limited to a total of 256 characters. If you exceed this limit, you will be unable
to save the file. If an error message appears at the bottom of the screen, shorten the file name
and try saving the file again.