
User Manual


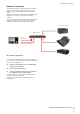

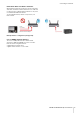
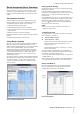

Table Of Contents

Dante Accelerator Basic Operation
DANTE ACCELERATOR Operation Manual 9
Dante Accelerator Basic Operation
Once you have installed a Dante Accelerator in your computer
and connected it to a network, you are in a position to start
using Dante networking in earnest to set up audio routing
between other Dante-enabled devices you may have on the
network.
Pre-operation Checklist
To start configuring and using your Dante Accelerator and
Dante Controller you should have completed the following:
• Installed your Dante Accelerator in your computer
• Installed the Dante Accelerator drivers
• Downloaded and installed your Dante Controller
• Set up a network between your computer and your Dante-
enabled devices
• Referred to the Dante Controller User Guide
Download the Dante Controller User Guide from the following
website:
http://www.yamahaproaudio.com/downloads/
Using Dante Controller
When you open the Dante Controller it displays the Network
View, which shows all the Dante-enabled devices on the
network. Initially it will display devices, but not channels within
devices. Devices with transmitter (Tx) channels will be
displayed along the top row and devices with receiver (Rx)
channels will be displayed in the left hand column Channels
can be viewed by clicking on the + symbol next to Dante
Transmitters or Dante Receivers, or the + symbol next to a
particular Dante device.
The Dante Controller User Guide contains detailed information
about all aspects of using the Dante Controller. This section is
only a brief overview – you will need to refer to the Dante
Controller User Guide to be able to use all features of the
Dante Controller.
Dante Controller Network View
Setting Up Audio Routing
The Dante Controller can be used to configure audio routing
between Dante devices.
In the expanded view, wherever there is a blue cell at the
intersection of a transmitting channel column and an receiving
channel row, it is possible to establish an audio routing
between them.
Using the Network View, click on the cell at the intersection of
a transmit and receive channel to configure an audio routing
from the transmitting channel to the receiving channel. A
green icon will appear when the routing is established.
Click again to remove the routing.
NOTE
Ctrl+click on the cell at the intersection of the devices to
configure the entire routing.
Configuring the Card
To configure features of your Dante Accelerator, including its
name, sample rate, and latency:
1. Start the Dante Controller.
2. Select the device – either:
• Double-click on the device name in the Dante Controller
Network View (either in the transmitter row, or the
Receiver column) - or:
• From the Network View menu, select Device -> Device
View (or press Ctrl+D).
This opens a Device View window for the selected device.
If there are multiple computers with Dante Accelerator cards in
your network, to identify a particular card:
• Look for the device name ending in the last six characters of
its MAC address – or:
• After selecting a device at random, use the Identify feature in
the Dante Controller (see below) to check which card it is.
Device View Window
The Device View has five tabs: Receive, Transmit, Status,
Device Config and Network Config. The Receive tab for a
configured Dante Accelerator is shown below.
Device View window
Identify
feature