SPECIAL MESSAGE SECTION PRODUCT SAFETY MARKINGS: Yamaha electronic products may have either labels similar to the graphics shown below or molded/stamped facsimiles of these graphics on the enclosure. The explanation of these graphics appears on this page. Please observe all cautions indicated on this page and those indicated in the safety instruction section. CAUTION RISK OF ELECTRIC SHOCK DO NOT OPEN CAUTION: TO REDUCE THE RISK OF ELECTRIC SHOCK. DO NOT REMOVE COVER (OR BACK).
Introduction Nous vous remercions d’avoir choisi le Clavinova Yamaha CLP-152S/153S. Le Clavinova est un instrument de musique perfectionné faisant appel aux innovations les plus récentes de la technologie musicale mise au point par Yamaha. Si vous utilisez votre Clavinova avec le soin qui convient, il vous donnera de grandes satisfactions pendant de longues années.
Table des matières Face avant ................................................................................................... 2 Raccordements .......................................................................................... 4 Sélection et exécution d’une voix ......................................................... 5 ■ Reproduction des morceaux de démonstration ..................................... 5 Mode double .................................................................................
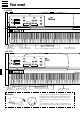
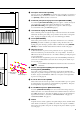
Face avant CLP-153S 3 6 4 TEMPO 120 32 280 METRONOME MAX PIANO MASTER VOLUME MIN 2 1 TEMPO 120 32 CLAVINOVA TONE E. PIANO HARPSICHORD DEMO MIDI/ TRANSPOSE ORGAN 5 280 METRONOME MAX PIANO MASTER VOLUME MIN 7 RECORDER PLAY REC RECORDER PLAY REC CLAVINOVA TONE E.
1 Interrupteur d’alimentation [POWER] Appuyez sur la touche [POWER] une première fois pour mettre sous tension et une deuxième fois pour mettre hors tension. Le témoin à LED du sélecteur de voix [PIANO] s’allume à la mise sous tension. 2 Commande principale de réglage du volume [MASTER VOLUME] La commande [MASTER VOLUME] permet de régler le volume (niveau) du son produit par le système stéréo interne du Clavinova.
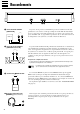
Raccordements IN MIDI OUT AUX IN R 3 1 Prises d’entrée auxiliaire [AUX IN L/R] AUX IN R L DOU-10 2 Prises de sortie auxiliaire [AUX OUT R et L/L+R] R AUX OUT L/L+R Chaîne stéréo MIDI IN OUT AUX OUT R L/L+R 12 Ces prises ont été prévues essentiellement pour le raccordement d’un module générateur de sons externe, comme par exemple le module Disk Orchestra DOU10.
Sélection et exécution d’une voix ZMettez sous tension Vérifiez que le cordon d’alimentation du Clavinova est correctement branché à une prise secteur murale et appuyez sur l’interrupteur [POWER], situé sur le côté gauche du clavier, pour mettre sous tension. Lorsque le Clavinova est sous tension, le témoin du sélecteur de voix [PIANO] s’allume (la voix PIANO est automatiquement sélectionnée à la mise sous tension).
Mode double Le mode DOUBLE permet de jouer simultanément deux voix sur tout le clavier. Pour activer le mode DOUBLE, appuyez simultanément sur deux sélecteurs de voix (ou appuyez sur un sélecteur tout en maintenant un autre sélecteur enfoncé). Lorsque le mode DOUBLE est activé, les témoins des deux voix sélectionnées s’allument. Pour revenir au mode normal à une voix, appuyez sur n’importe quel sélecteur de voix.
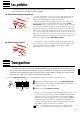
Les pédales Le CLP-152S/153S est pourvu de deux pédales produisant une variété d’effets similaires à ceux produits par les pédales d’un piano acoustique. ● Pédale douce/Sostenuto (gauche) Lorsque l’instrument est mis sous tension, la pédale gauche fonctionne comme une pédale douce. Une pression sur la pédale réduit alors le volume et modifie légèrement le timbre des notes jouées.
Réglage de la hauteur La fonction de réglage de la hauteur permet d’accorder le Clavinova sur une plage de ±50 centièmes par bonds approximatifs de 1,6 centième. Cent centièmes égalent un demi-ton, de sorte qu’il est possible d’accorder avec une grande précision la hauteur d’ensemble sur une plage approximative d’un demi-ton. Cette fonction est utile pour accorder le Clavinova sur un autre instrument ou sur de la musique enregistrée.
Métronome et réglage du tempo Le métronome du CLP-152S/153S est une fonction pratique pour s’exercer. C’est également un guide rythmique précieux pour l’enregistrement à l’aide de la fonction enregistreur décrite plus loin. Le métronome Le métronome est activé et désactivé à l’aide de la touche [METRONOME]. Appuyez sur la touche [METRONOME] pour allumer son témoin et activer le métronome. Appuyez une deuxième fois pour éteindre le témoin et désactiver le métronome.
Mode d’emploi de l’enregistreur L’enregistreur du CLP-152S/153S vous permet d’enregistrer et de reproduire ce que vous jouez sur le clavier. C’est un accessoire utile dans un programme d’étude car il vous permet de vous écouter jouer de la perspective de l’auditeur.
Reproduction RECORDER PLAY REC Pour reproduire ce que vous avez enregistré, appuyez simplement sur la touche RECORDER [PLAY]. La reproduction commence à partir du début des données enregistrées et s’arrête automatiquement à la fin. Vous pouvez également arrêter la reproduction à tout moment en appuyant sur la touche RECORDER [PLAY].
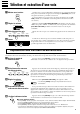
Fonctions MIDI ● Quelques mots sur l’interface MIDI Câble MIDI MIDI OUT MIDI IN DOU-10 Clavinova Enregistrement de données Reproduction deData données Playback MIDI OUT MIDI IN MIDI OUT MIDI IN DOU-10 Clavinova MIDI, de l’anglais “Musical Instrument Digital Interface” (interface pour instruments de musique numériques), est une interface de communication utilisée mondialement qui permet le partage de données musicales entre divers instruments ou appareils musicaux compatibles MIDI et la commande mu
● Sélection des canaux MIDI de transmission et de réception MIDI OUT MIDI IN Générateur de sons Tone Generator DOU-10 MIDI THRU (réglé pour ne recevoir que sur le canal MIDI 2) MIDI IN Clavinova (réglé pour ne recevoir que sur le canal MIDI 1) Le système MIDI permet la transmission et la réception de données MIDI sur 16 canaux différents. Le Clavinova est pourvu de plusieurs canaux afin de permettre la commande sélective de certains instruments ou appareils connectés en série.
Fonctions MIDI Autres fonctions MIDI Les fonctions MIDI énumérées ci-contre sont activées en maintenant enfoncée la touche [MIDI/ TRANSPOSE] et en appuyant sur le sélecteur de voix correspondant. Des explications détaillées sont données aux pages suivantes. TABLEAU DES FONCTIONS MIDI Fonction Sélecteur de voix CLP-152 S/153S Commande locale ON/OFF [PIANO] Changement de programme ON/OFF [CLAVINOVA TONE] Changement de commande ON/OFF [E.
● Changement de commande ON/OFF Normalement le Clavinova répond aux données de changement de commande MIDI qui lui sont transmises par un clavier ou autre appareil MIDI externe, ce qui permet de commander la voix sélectionnée du Clavinova au moyen des pédales et autres réglages de “commande” transmis par un appareil de commande. Le Clavinova transmet également des données de changement de commande MIDI chaque fois que l’une de ses pédales est actionnée.
Fonctions MIDI ● Mode de partage MIDI et local gauche OFF En mode de partage MIDI une partie du clavier du Clavinova est utilisée pour jouer les voix du Clavinova de la manière habituelle, alors que l’autre sert à commander un deuxième clavier ou un générateur de sons MIDI, comme par exemple le module Disk Orchestra DOU-10. Dans ce mode, la partie droite du clavier est utilisée pour jouer les voix internes du Clavinova, alors que la partie gauche sert à commander le clavier ou le générateur de sons externe.
Dépistage des pannes Lorsque l’instrument semble ne pas fonctionner correctement, vérifiez d’abord les points suivants pour déterminer si le Clavinova est vraiment en panne. 1. Aucun son à la mise sous tension Le cordon d’alimentation est-il correctement branché à une prise secteur? Vérifier le branchement avec soin. La commande [MASTER VOLUME] est-elle réglée à un niveau d’écoute suffisant? 2.
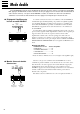
1 A B C D 6 x 25 mm round-head screws 6 x 25 mm Halbrundschrauben Vis à tête ronde de 6 x 25 mm Tornillos de cabeza redonda de 6 x 25 mm x4 x4 x4 1 1 1 x4 1 4 x 25 mm round-head screws 4 x 25 mm Halbrundschrauben Vis à tête ronde de 4 x 25 mm Tornillos de cabeza redonda de 4 x 25 mm Keyboard Stand Assembly NOTE • We do not recommend attempting to assemble the Clavinova alone. The job can be easily accomplished, however, with only two people.
2 3 6 x 25 mm round-head screws 1 6 x 25 mm Halbrundschrauben 1 Vis à tête ronde de 6 x 25 mm 1 Tornillos de cabeza redonda de 6 x 25 mm 1 B D C D C 4 x 25 mm round-head screws 2 4 x 25 mm Halbrundschrauben 2 Vis à tête ronde de 4 x 25 mm 2 Tornillos de cabeza redonda de 4 x 25 mm 2 Assemblage du support de clavier REMARQUE • Nous ne vous conseillons pas d’essayer d’assembler le Clavinova seul. Toutefois, ce travail peut être facilement exécuté par deux personnes.
4 A D A D 6 x 16 mm flat-head screws 3 6 x 16 mm Senkschrauben 3 Vis à tête plate de 6 x 16 mm 3 Tornillos de cabeza plana de 6 x 16 mm 3 V Install the main unit (A). V Montieren Sie die Tastatureinheit (A). Place the main unit (A) on the side panels (D) with the screws on its bottom panel (toward the rear of the main unit) just behind the grooves in the brackets located at the top of the side panels. Then slide the main unit forward until it stops.
5 6 A C A Cord holder Kabelhalter Support de cordon Soporte del cable V Posez le clavier (A) V Instale la unidad principal (A). Placez le clavier sur les panneaux latéraux (D), avec les vis de son panneau inférieur (situées vers l’arrière du clavier) placées immédiatement derrière les rainures des ferrures situées à la partie supérieure des panneaux latéraux (D), puis faites glisser le clavier vers l’avant jusqu’à ce qu’il vienne en butée.
MIDI Data Format/MIDI-Datenformat/Format des données MIDI/Formato de datos MIDI If you’re already very familiar with MIDI, or are using a computer to control your music hardware with computer-generated MIDI messages, the data provided in this section can help you to control the Clavinova.
IMPORT ANT SAFETY INSTRUCTIONS INFORMATION RELATING TO PERSONAL INJURY, ELECTRICAL SHOCK, AND FIRE HAZARD POSSIBILITIES HAS BEEN INCLUDED IN THIS LIST. WARNING- When using any electrical or electronic product, basic precautions should always be followed. These precautions include, but are not limited to, the following: 1.
FCC INFORM ATION (U.S.A.) harmful to the operation of other electronic devices. Compliance with FCC regulations does not guarantee that interference will not occur in all installations. If this product is found to be the source of interference, which can be determined by turning the unit “OFF” and “ON”, please try to eliminate the problem by using one of the following measures: Relocate either this product or the device that is being affected by the interference.