SPECIAL MESSAGE SECTION PRODUCT SAFETY MARKINGS: Yamaha electronic products may have either labels similar to the graphics shown below or molded/stamped facsimiles of these graphics on the enclosure. The explanation of these graphics appears on this page. Please observe all cautions indicated on this page and those indicated in the safety instruction section. CAUTION RISK OF ELECTRIC SHOCK DO NOT OPEN CAUTION: TO REDUCE THE RISK OF ELECTRIC SHOCK. DO NOT REMOVE COVER (OR BACK).
Vorwort Herzlichen Dank für den Kauf des Yamaha Clavinovas CLP-152S/153S. Ihr Clavinova ist ein hochwertiges Musikinstrument, das auf modernster Yamaha-Musiktechnologie basiert. Bei umsichtiger Handhabung wird es Ihnen viele Jahre Spaß an und mit Musik bieten. ● Das Yamaha AWM-Wellenspeicher-Tongeneratorsystem produziert voll und natürlich klingende Stimmen.
Inhalt Bedienelemente ........................................................................................2 Anschlüsse ................................................................................................. 4 Anwählen und Spielen von Stimmen .................................................. 5 ■ Abspielen der Demo-Stücke ................................................................. 5 Dual-Modus ...............................................................................................
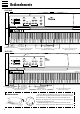
Bedienelemente CLP-153S 3 280 METRONOME MAX PIANO MASTER VOLUME 2 1 TEMPO 120 32 MIN 7 RECORDER PLAY REC CLAVINOVA TONE E. PIANO HARPSICHORD DEMO MIDI/ TRANSPOSE ORGAN 5 280 METRONOME MAX PIANO MASTER VOLUME MIN 6 4 TEMPO 120 32 RECORDER PLAY REC CLAVINOVA TONE E.
1 Netzschalter [POWER] Mit diesem Schalter wird das Instrument ein- und ausgeschaltet. Beim Einschalten leuchtet anfänglich die Anzeige-LED der Stimmentaste [PIANO] auf. 2 Lautstärkeregler [MASTER VOLUME] Der [MASTER VOLUME]-Regler dient zur Einstellung der Gesamtlautstärke des eingebauten Stereo-Verstärkers. Wenn ein Kopfhörer an der PHONESBuchse (Seite 4) angeschlossen ist, wird der [MASTER VOLUME]-Regler zur Einstellung der Kopfhörerlautstärke verwendet.
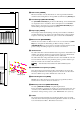
Anschlüsse IN MIDI OUT AUX IN R 3 1 Zusatzgerät-Eingangsbuchsen (AUX IN L/R) AUX IN R L DOU-10 2 Audio-Ausgangsbuchsen (AUX OUT R und L/L+R) R AUX OUT L/L+R Stereoanlage (MIDI IN und OUT) MIDI IN OUT AUX OUT R L/L+R 12 Diese Buchsen sind für die Verwendung mit einem externen Tongeneratormodul vorgesehen, wie beispielsweise der Yamaha Disk Orchestra-Einheit DOU-10.
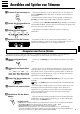
Anwählen und Spielen von Stimmen ZSchalten Sie das Instrument ein. POWER XStellen Sie die Lautstärke ein. MASTER VOLUME MIN MAX CWählen Sie eine Stimme. PIANO CLAVINOVA TONE E. PIANO HARPSICHORD Schließen Sie das Clavinova an eine Wandsteckdose an, und drücken Sie dann den [POWER]-Schalter links neben der Tastatur, um das Instrument einzuschalten. Beim Einschalten leuchtet zunächst die Anzeige-LED der Stimmentaste [PIANO] (die Stimme wird beim Einschalten automatisch aufgerufen).
Dual-Modus Im Dual-Modus können Sie zwei Stimmen gleichzeitig über die gesamte Tastatur spielen. Zum Aktivieren des Dual-Modus drücken Sie zwei Stimmentasten gleichzeitig (oder tippen eine Stimmentaste an, während die andere gedrückt gehalten wird). Die Anzeigen der beiden Stimmentasten leuchten dabei zur Bestätigung auf. Zum Umschalten auf normalen Spielmodus drücken Sie einfach wieder eine einzelne Stimmentaste.
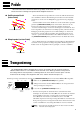
Pedale Das CLP-152S/153S ist mit zwei Pedalen ausgestattet, die wie die Pedale eines akustischen Pianos umfangreiche Spielausdrucksmöglichkeiten bieten. ● Soft/Sostenuto-Pedal (linkes Pedal) Wenn das Instrument eingeschaltet wird, ist für das linke Pedal zunächst die Soft-Funktion aktiviert. Beim Betätigen des Pedals wird die Lautstärke vermindert, wobei die sich die Klängfärbung gespielter Noten geringfügig ändert.
Stimmung Sie können das Clavinova innerhalb eines Bereichs von ±50 Cent in Schritten zu etwa 1,6 Cent stimmen. Hundert Cent entsprechen einem Halbton, so daß der Stimmbereich insgesamt ungefähr einen Halbton beträgt. Mit der Stimmfunktion können Sie das Clavinova an andere Instrumente oder Tonaufzeichnungen anpassen. Z CLP-152S: Zum Heben der Tonhöhe halten Sie die Tasten E0 und F0 ● Abstimmen auf einen höheren Ton E 0 F0 C3 B3 gedrückt.
Metronom- und Tempoeinstellung Das CLP-152S/153S ist mit einem eingebauten Metronom ausgestattet, daß beim Üben von Stücken hilfreich ist und auch beim Aufnehmen mit der an späterer Stelle beschriebenen Recorder-Funktion zum Angeben des Takts eingesetzt werden kann. Das Metronom Der Metronomton wird mit der [METRONOME]-Taste ein- und ausgeschaltet. Zum Einschalten drücken Sie die [METRONOME]-Taste, so daß deren Anzeige leuchtet. Bei dunkler Anzeige ist das Metronom ausgeschaltet.
Verwendung der Recorder-Funktion Mit der Recorder-Funktion des CLP-152S/153S können Sie Ihr Tastaturspiel aufzeichnen und später abspielen lassen. Dies ist eine hilfreiche Übungsstütze, die Ihnen die Beurteilung Ihres Könnens aus der Perspektive eines Zuhörers ermöglicht. Die Funktion kann natürlich auch nur zum Spaß eingesetzt werden.
Wiedergabe RECORDER PLAY REC Zum Abspielen der Aufnahme drücken Sie einfach die RECORDERTaste [PLAY]. Die Wiedergabe setzt am Anfang der aufgezeichneten Daten ein und spielt die Daten bis zum Ende der Aufnahme ab. Sie können die laufende Wiedergabe auch durch einen weiteren Druck auf die [PLAY]Taste frühzeitig stoppen. HINWEIS ● Schnellvorlauf mit Ton RECORDER PLAY REC MIDI/ TRANSPOSE • Beim Ausschalten des CLP-152S/153S gehen alle aufgezeichneten Daten verloren.
MIDI-Funktionen ● Eine kurze Einführung in MIDI MIDI-Kabel MIDI OUT MIDI IN DOU-10 Clavinova Aufzeichnung Wiedergabe Playback Data MIDI OUT MIDI IN MIDI OUT MIDI IN DOU-10 Clavinova MIDI steht für “Musical Instrument Digital Interface” und stellt einen weltweiten Kommunikationsstandard für elektronische Musikinstrumente dar. Dank dieses Systems können MIDI-Instrumente Daten untereinander austauschen und sich gegenseitig steuern.
● Wahl des MIDI-Sende- und -Empfangskanals MIDI OUT MIDI IN Tongenerator Tone Generator DOU-10 MIDI THRU (Empfängt auf MIDIKanal 2.) MIDI IN Das MIDI-System erlaubt das Senden und Empfangen von MIDI-Daten auf 16 verschiedenen Kanälen. Es wurden mehrere Kanäle vorgesehen, um eine individuelle Steuerung von Geräten zu ermöglichen, die in Reihe geschaltet sind. Damit kann ein einzelner MIDI-Sequenzer auf zwei verschiedenen Instrumenten oder Tongeneratoren “spielen”.
MIDI-Funktionen Andere MIDI-Funktionen Die rechts aufgelisteten MIDI-Funktionen werden bei gedrückt gehaltener [MIDI/TRANSPOSE]-Taste durch Antippen der entsprechenden Stimmentaste aufgerufen. Detaillierte Beschreibungen finden Sie auf den folgenden Seiten. MIDI-Funktionsübersicht Funktion Lokalsteuerung EIN/AUS Stimmentaste am CLP-152 S/153S [PIANO] Programmwechsel EIN/AUS [CLAVINOVA TONE] Steuerelementdaten EIN/AUS [E.
● Steuerelementdaten EIN/AUS Normalerweise spricht das Clavinova auf MIDI-Steuerelementmeldungen von einem externen MIDI-Gerät oder Keyboard an, wobei die aktive Clavinova-Stimme von den empfangenen Pedal- oder Reglerdaten beeinflußt wird. Darüber hinaus sendet das Clavinova MIDI-Steuerelementdaten, wenn eines seiner Pedale betätigt wird.
MIDI-Funktionen ● MIDI-Splitmodus und Lokalsteuerung AUS für linken Abschnitt Im MIDI-Splitmodus wird die Tastatur in zwei Abschnitte aufgeteilt, wobei Sie auf einem Abschnitt wie gewohnt eine der Clavinova-Stimmen spielen können, während Tastenanschläge auf dem anderen Tastaturabschnitt ein externes MIDI-Keyboard oder einen Tongenerator (z. B. die Yamaha Disk Orchestra-Einheit DOU-10) steuern.
Störungsbeseitigung Falls eine Betriebsstörung auftreten sollte, überprüfen Sie bitte zunächst die folgenden Punkte, bevor Sie einen wirklichen Defekt annehmen. 1. Keine Tonerzeugung nach dem Einschalten Ist der Netzstecker richtig an einer Steckdose angeschlossen? Den Netzanschluß sorgfältig überprüfen. Ist der MASTER VOLUME-Regler auf eine geeignete Lautstärke eingestellt? 2. Das Clavinova gibt den Ton von Radio- oder Fernsehsendungen wieder Dies kann in der Nähe von starken Sendern vorkommen.
1 A B C D 6 x 25 mm round-head screws 6 x 25 mm Halbrundschrauben Vis à tête ronde de 6 x 25 mm Tornillos de cabeza redonda de 6 x 25 mm x4 x4 x4 1 1 1 x4 1 4 x 25 mm round-head screws 4 x 25 mm Halbrundschrauben Vis à tête ronde de 4 x 25 mm Tornillos de cabeza redonda de 4 x 25 mm Keyboard Stand Assembly NOTE • We do not recommend attempting to assemble the Clavinova alone. The job can be easily accomplished, however, with only two people.
2 3 6 x 25 mm round-head screws 1 6 x 25 mm Halbrundschrauben 1 Vis à tête ronde de 6 x 25 mm 1 Tornillos de cabeza redonda de 6 x 25 mm 1 B D C D C 4 x 25 mm round-head screws 2 4 x 25 mm Halbrundschrauben 2 Vis à tête ronde de 4 x 25 mm 2 Tornillos de cabeza redonda de 4 x 25 mm 2 Assemblage du support de clavier REMARQUE • Nous ne vous conseillons pas d’essayer d’assembler le Clavinova seul. Toutefois, ce travail peut être facilement exécuté par deux personnes.
4 A D A D 6 x 16 mm flat-head screws 3 6 x 16 mm Senkschrauben 3 Vis à tête plate de 6 x 16 mm 3 Tornillos de cabeza plana de 6 x 16 mm 3 V Install the main unit (A). V Montieren Sie die Tastatureinheit (A). Place the main unit (A) on the side panels (D) with the screws on its bottom panel (toward the rear of the main unit) just behind the grooves in the brackets located at the top of the side panels. Then slide the main unit forward until it stops.
5 6 A C A Cord holder Kabelhalter Support de cordon Soporte del cable V Posez le clavier (A) V Instale la unidad principal (A). Placez le clavier sur les panneaux latéraux (D), avec les vis de son panneau inférieur (situées vers l’arrière du clavier) placées immédiatement derrière les rainures des ferrures situées à la partie supérieure des panneaux latéraux (D), puis faites glisser le clavier vers l’avant jusqu’à ce qu’il vienne en butée.
MIDI Data Format/MIDI-Datenformat/Format des données MIDI/Formato de datos MIDI If you’re already very familiar with MIDI, or are using a computer to control your music hardware with computer-generated MIDI messages, the data provided in this section can help you to control the Clavinova.
IMPORT ANT SAFETY INSTRUCTIONS INFORMATION RELATING TO PERSONAL INJURY, ELECTRICAL SHOCK, AND FIRE HAZARD POSSIBILITIES HAS BEEN INCLUDED IN THIS LIST. WARNING- When using any electrical or electronic product, basic precautions should always be followed. These precautions include, but are not limited to, the following: 1.
FCC INFORM ATION (U.S.A.) harmful to the operation of other electronic devices. Compliance with FCC regulations does not guarantee that interference will not occur in all installations. If this product is found to be the source of interference, which can be determined by turning the unit “OFF” and “ON”, please try to eliminate the problem by using one of the following measures: Relocate either this product or the device that is being affected by the interference.