CLP-280/270 OWNER'S MANUAL Before using the Clavinova, be sure to read “PRECAUTIONS„ on pages 3-4. IMPORTANT —Check your power supply— Make sure that your local AC mains voltage matches the voltage specified on the name plate on the bottom panel. In some areas a voltage selector may be provided on the rear of the main keyboard unit near the power cord. Make sure that the voltage selector is set for the voltage in your area. The voltage selector is set at 240V when the unit is initially shipped.
Introduction SPECIAL MESSAGE SECTION PRODUCT SAFETY MARKINGS: Yamaha electronic products may have either labels similar to the graphics shown below or molded/stamped facsimiles of these graphics on the enclosure. The explanation of these graphics appears on this page. Please observe all cautions indicated on this page and those indicated in the safety instruction section. CAUTION RISK OF ELECTRIC SHOCK DO NOT OPEN CAUTION: TO REDUCE THE RISK OF ELECTRIC SHOCK. DO NOT REMOVE COVER (OR BACK).
PRECAUTIONS PLEASE READ CAREFULLY BEFORE PROCEEDING * Please keep this manual in a safe place for future reference. WARNING Always follow the basic precautions listed below to avoid the possibility of serious injury or even death from electrical shock, short-circuiting, damages, fire or other hazards. These precautions include, but are not limited to, the following: Power supply/Power cord Water warning • Only use the voltage specified as correct for the instrument.
Connections Using the bench (If included) • Before connecting the instrument to other electronic components, turn off the power for all components. Before turning the power on or off for all components, set all volume levels to minimum. Also, be sure to set the volumes of all components at their minimum levels and gradually raise the volume controls while playing the instrument to set the desired listening level.
Introduction Thank you for choosing the Yamaha Clavinova CLP-280/270. In order to make the most of your Clavinova’s performance potential and features, please read this Owner’s Manual thoroughly, and keep it in a safe place for later reference. About this Owner’s Manual and Data List This manual consists of four main sections: “Introduction,” “Basic Operation,” “Detailed Settings,” and “Appendix.” Also, a separate “Data List” is provided. Introduction: Please read this section first.
Table of contents Introduction Introduction About this Owner’s Manual and Data List .................................................................................................................... 5 Included Accessories ....................................................................................................................................................... 5 Application Index ...................................................................................................................
Introduction Automatically selecting a song in storage media ... [SongAutoOpen]....................................................................... 53 Changing the type of characters on screen ... [CharacterCode]................................................................................. 53 Playing Back Recorded Songs and Commercially-available Music Data............................................. 54 Playing back a song .............................................................................
Application Index Use this index to find reference pages that may be helpful for your application and situation. Introduction Listening Listening to demo songs...............................................“Listening to the Demonstration Tunes” on page 18 “Playing the 50 Piano Preset Songs” on page 20 Listening to demo songs with different voices ............“Listening to the Demonstration Tunes” on page 18 Listening to songs from “50 greats for the Piano” .............
Application Index Introduction Use this index to find reference pages that may be helpful for your application and situation. Settings Making detailed settings for recording and playback .................................. “Detailed settings for recording and playback [FILE/SONG SETTING]” on page 71 Making detailed settings for the metronome ......................................... “Detailed settings for the metronome METRONOME [SETTING]” on page 74 Making detailed settings for the voices ...............
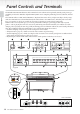
Panel Controls and Terminals Introduction The Yamaha CLP-280/270 Clavinova offers unmatched sonic realism and exceptionally natural grand-piano type playability, and features Yamaha’s original AWM Dynamic Stereo Sampling technology for rich, authentic, musical voices.
Panel Controls and Terminals Adjust the volume level using this dial. 3 [SONG BALANCE] slider . . . . . . . . . page 42 This lets you adjust the volume balance between the song playback and the sound you are playing on the keyboard. 4 [DEMO] button . . . . . . . . . . . . . . . . page 18 Demonstration playback is available for each voice. 5 [REPEAT] button . . . . . . . . . . . . . . . page 23 For repeatedly playing back a single song or specifying a range (in beats) within a song for repeated playback.
Introduction to the Controls Introduction This instrument has many buttons and controls—so many that you may feel overwhelmed at first. However, once you understand the basic operations, you’ll find the instrument is very easy to use. Press the button corresponding to the function you want to use. The buttons are the means of entrance to the functions.
Introduction Introduction to the Controls ■ To reset the values or parameters, press the [–][+] buttons simultaneously. If you’ve changed the parameter values or settings, you may wan to reset them to their normal condition. To do this, simply press the [–][+] buttons simultaneously. B A MetronomeVolume NO YES 100 D C The TEMPO and BRILLIANCE buttons are the same shape as the A [–][+] – D [–][+] buttons.
Before Using the Clavinova Introduction About the key cover To open the key cover: Lift the cover slightly, then push and slide it open. To close the key cover: Slide the cover toward you and gently lower the cover over the keys. Be careful to avoid catching your fingers when opening or closing the cover. CAUTION Hold the cover with both hands when opening or closing it. Do not release it until it is fully opened or closed.
Introduction Before Using the Clavinova Turning the power on 1. Connect the power cable. First insert the plug of the power cable into the AC connector on the Clavinova, then plug the other end of the cable into the proper AC outlet on the wall. In some areas a plug adaptor may be provided to match the pin configuration of the AC wall outlets in your area. 1-1 1-2 (The shape of plug differs depending on locale.
Before Using the Clavinova Adjusting the display contrast You can adjust the contrast of the display by turning the [CONTRAST] knob located to the right of the LCD. Introduction A TERMINOLOGY CONTRAST B Use this knob. NO YES EXIT C CONTRAST: difference between brightness and darkness D Setting the volume To adjust the volume, use the [MASTER VOLUME] dial located at the left of the panel. Play the keyboard to actually produce sound while you adjust the volume. The level decreases.
. Basic Operation CLP-280/270 Owner’s Manual 17
Listening to the Demonstration Tunes For each voice group, the Clavinova contains one demo song that shows off the character of the voices. This section explains how to listen to the demo songs for the voice groups listed below. Demonstration tunes Basic Operation Voice group Tunes GRAND PIANO1 HARPSICHORD Composer “Eintritt” Waldszenen Op. 82 Gavotte R.Schumann J.S.Bach The demonstration pieces listed above are short rearranged excerpts the original compositions.
Listening to the Demonstration Tunes Select a tune and start playback. Press the voice group button for the demo song that you want to hear. The indicator of the voice group button you pressed will light, and the demo song will begin playing. Subsequently, the demo songs will play back consecutively from the upper left voice group button until you stop the playback. 3. Stop the playback and exit from demo mode. Press the [DEMO] button.
Listening to 50 Piano Preset Songs The Clavinova provides performance data of 50 piano songs. You can just listen to these songs (page 20) or use them for practice (page 22). You can also refer to the included “50 greats for the Piano” booklet that contains the scores for 50 piano preset songs.
Listening to 50 Piano Preset Songs Adjusting the tempo A B Tempo NO YES 86 C 3. TIP You can also use the D [–][+] buttons to change the tempo. TIP Basic Operation You can use the TEMPO [DOWN][UP] buttons to adjust the playback tempo as required. The default tempo (the song’s original tempo) is set when you press the [DOWN] and [UP] buttons simultaneously. Press either of the [SONG SELECT] button to return to the song select screen.
Listening to 50 Piano Preset Songs Practicing a one-hand part using 50 preset songs The 50 preset songs have separate left- and right-hand parts on individual parts. You can turn the left- and right-hand parts on or off as required so you can practice the corresponding part (the part that is turned off) on the keyboard. The right-hand part is played by [RIGHT] and the left-hand part is played by [LEFT].
Listening to 50 Piano Preset Songs Stop playback. When playback is complete, it automatically stops and the Clavinova locates the top of the song. If you wish to stop playback in the middle of a song, press the [STOP] button. You can also pause playback by pressing the [PLAY/PAUSE] button. Playback stops when you press the button. TIP Resetting the part playback Both parts are automatically turned ON whenever you select a new song. Basic Operation 3.
Listening to 50 Piano Preset Songs Specifying a range of measures and playing them back repeatedly (A-B repeat) Procedure Basic Operation 1. Select the desired song for practicing and play it. Press the [PLAY/PAUSE] button to start playback. 2. Specify the repeat range. Press the [REPEAT] button at the starting point (A) of the range to be repeated. Press the [REPEAT] button again at the ending point (B).
Selecting and Playing Voices Selecting Voices SONG EXTRA PARTS LEFT RIGHT SONG SELECT REC STOP PLAY/PAUSE FILE/SONG SETTING REPEAT KEYBOARD METRONOME SETTING ON/OFF A CONTRAST B NO DOWN YES UP Voice group buttons GRAND PIANO 1 GRAND PIANO 2 E.PIANO 1 E.PIANO 2 HARPSICHORD E.CLAVICHORD VIBRAPHONE GUITAR VOICE SETTING CHURCH ORGAN JAZZ ORGAN STRINGS CHOIR SYNTH. PAD WOOD BASS E.
Selecting and Playing Voices Using the pedals The Clavinova has three foot pedals: damper pedal (right), sostenuto pedal (center), and soft pedal (left) that produce a range of expressive effects similar to those produced by the pedals on an acoustic piano. Basic Operation Damper (right) pedal When you press the damper pedal, the notes you play have a longer sustain.
Selecting and Playing Voices Adding variation to the sound [BRILLIANCE]/[REVERB]/[CHORUS] Basic Operation The Effect function enables you to add expression to the sound. The Clavinova effects include Brilliance, Reverb, and Chorus. [CHORUS] button [REVERB] button SONG EXTRA PARTS LEFT RIGHT SONG SELECT REC STOP PLAY/PAUSE FILE/SONG SETTING REPEAT KEYBOARD METRONOME SETTING ON/OFF A CONTRAST B NO DOWN YES UP GRAND PIANO 1 GRAND PIANO 2 E.PIANO 1 E.PIANO 2 HARPSICHORD E.
Selecting and Playing Voices [REVERB] This control adds reverberation to the sound by simulating the natural reverberation of a concert hall. Procedure Basic Operation Pressing the [REVERB] button repeatedly toggles the reverb on and off. Even if the reverb effect is turned off, a “soundboard reverb” effect will be applied when the GrandPiano1 or GrandPiano2 voice is selected.
Selecting and Playing Voices Combining two voices (Dual mode) The numbers on the upper row indicate the steps in Dual mode using voices from different group. SONG EXTRA PARTS LEFT RIGHT SONG SELECT REC STOP PLAY/PAUSE FILE/SONG SETTING REPEAT KEYBOARD 2 METRONOME SETTING ON/OFF 2 A 1 3 Voice group buttons GRAND PIANO 1 GRAND PIANO 2 E.PIANO 1 E.PIANO 2 HARPSICHORD E.CLAVICHORD VIBRAPHONE GUITAR VOICE SETTING CHURCH ORGAN JAZZ ORGAN STRINGS CHOIR SYNTH. PAD WOOD BASS E.
Selecting and Playing Voices Dual mode using voices in the same voice group Procedure Basic Operation 1. Select a voice group. In normal play mode, press the desired voice group button. 2. Select a voice. Use the A [–][+] buttons to select a voice. 3. Select another voice. TIP Use the B [–][+] buttons to select another voice in the same voice group. To use the identical voices, press the B [–][+] buttons once.
Selecting and Playing Voices Splitting the keyboard range and playing two different voices (Split mode) 23 2 SONG EXTRA PARTS LEFT RIGHT SONG SELECT REC STOP PLAY/PAUSE FILE/SONG SETTING REPEAT KEYBOARD METRONOME SETTING ON/OFF A CONTRAST B NO DOWN YES UP Basic Operation Split mode enables you to play two different voices on the keyboard — one with the left hand and another with the right hand. For example, you can play a bass part using the [WOOD BASS] or [E.
Selecting and Playing Voices 4. Specify the split point (the border between the rightand left-hand range). The normal setting of the split point is “F 2.” TIP A specified “split point” key is included in the left-hand range. TIP Basic Operation The split point can also be set by the [FUNCTION] parameter [SplitPoint]. (page 85) F2 Center “C” To change the split point setting: Hold down the [SPLIT] button, then use the D [–] [+] buttons to specify the split point.
Selecting and Playing Voices Using the metronome The Clavinova is built-in metronome (a device that keeps an accurate tempo) is a convenient feature for practice. SONG EXTRA PARTS LEFT RIGHT SONG SELECT REC STOP PLAY/PAUSE FILE/SONG SETTING REPEAT KEYBOARD METRONOME SETTING ON/OFF A CONTRAST B NO DOWN YES UP GRAND PIANO 1 GRAND PIANO 2 E.PIANO 1 E.PIANO 2 HARPSICHORD E.CLAVICHORD VIBRAPHONE GUITAR VOICE SETTING CHURCH ORGAN JAZZ ORGAN STRINGS CHOIR SYNTH. PAD WOOD BASS E.
Recording Your Performance Basic Operation This chapter explains how to record your performance using the Clavinova recording function. You can, for example, play back what you have played on the Clavinova keyboard for an effective practice aid. You can also record just the left-hand part, then practice the right-hand part while playing back the recorded left-hand part.
Recording Your Performance Recording a performance without specifying the recording part 2 EXTRA PARTS LEFT RIGHT SONG SELECT REC STOP PLAY/PAUSE FILE/SONG SETTING REPEAT KEYBOARD METRONOME SETTING ON/OFF A CONTRAST B NO DOWN YES UP GRAND PIANO 1 GRAND PIANO 2 E.PIANO 1 E.PIANO 2 HARPSICHORD E.CLAVICHORD VIBRAPHONE GUITAR VOICE SETTING CHURCH ORGAN JAZZ ORGAN STRINGS CHOIR SYNTH. PAD WOOD BASS E.
Recording Your Performance 4. Start and stop recording. TIP Recording begins automatically as soon as you play a note on the keyboard. (Optional) Press the [PLAY/PAUSE] button to start recording. The recording screen displays the current measure number. Using the metronome You can record data while using the metronome. To do this, turn the metronome on before step 4. The metronome is not recorded.
Recording Your Performance Re-recording a song partially This section explains how to record part of a song again. Basic Operation Procedure 1. Select a recording method. 1-1 Press the [FILE/SONG SETTING] button. 1-2 Press the A [–][+] buttons to display “RecStart” or “RecEnd.” 1-3 Press the D [–][+] buttons to specify how the recording should start and end. Starting methods: Normal: The existing data will be erased after re-recording starts.
Recording Your Performance 4. Engage record mode. Press the [REC] button. Basic Operation To stop recording, press the [REC] button again or press the [STOP] button. After pressing the [REC] button again or the [STOP] button when “RecStart” is set to “Normal” (page 37), “Overwrite?” is shown in the display. To cancel this and not overwrite, press the B [– (NO)] button. 5. Start and stop recording. Recording begins automatically as soon as you play a note on the keyboard.
Recording Your Performance Recording a performance of several different parts 23 2 EXTRA PARTS LEFT RIGHT SONG SELECT REC STOP PLAY/PAUSE FILE/SONG SETTING REPEAT KEYBOARD METRONOME SETTING ON/OFF A CONTRAST B NO DOWN YES UP GRAND PIANO 1 GRAND PIANO 2 E.PIANO 1 E.PIANO 2 HARPSICHORD E.CLAVICHORD VIBRAPHONE GUITAR VOICE SETTING CHURCH ORGAN JAZZ ORGAN STRINGS CHOIR SYNTH. PAD WOOD BASS E.
Recording Your Performance 3. Start and stop recording. Recording begins automatically as soon as you play a note on the keyboard. Basic Operation (Optional) Press the [PLAY/PAUSE] button to start recording. To stop recording, press the [STOP] button. The Clavinova locates the top of the song. To stop recording, press the [STOP] button. The Clavinova locates the top of the song. As soon as recording is stopped, the song is automatically saved to Storage memory (page 43).
Recording Your Performance Changing a voice or tempo after recording You can change the voice and tempo after recording to change a song’s feel or to set a more suitable tempo. You can also change these elements in the middle of a song. 1. 2. 3. 4. Select a song you wish to change (page 40).
Recording Your Performance Adjusting the volume balance between playback and your performance [SONG BALANCE] While recording multiple parts one by one, you can adjust the volume balance between the playback of the recorded parts and your current performance. Basic Operation Procedure 1. Move the [SONG BALANCE] slider to the left or right to make adjustments. SONG KEYBOARD SONG BALANCE The song playback volume will be lower. TIP Some commercially-available music data contains extremely high volumes.
Handling files such as deleting song files ...
Handling files such as deleting song files ... [FILE/SONG SETTING] Song types This instrument handles various types of songs. Letters and song numbers are displayed to the left of the song name. The letters indicate the different song types as follows: Basic Operation P ..................Preset songs M .................Memory songs MP...............Protected songs such as preset songs saved to Storage memory, or Disk Orchestra Collection (DOC) songs, and Disklavier Piano Soft songs in the Storage memory.
Handling files such as deleting song files ... [FILE/SONG SETTING] Basic file operation A message (information or confirmation dialog) sometimes appears on the screen to facilitate operation. Refer to the “Message List” on page 93 for an explanation of each message, appropriate actions to take. SONG EXTRA PARTS LEFT RIGHT SONG SELECT REC STOP PLAY/PAUSE FILE/SONG SETTING REPEAT KEYBOARD 3 METRONOME SETTING ON/OFF 4 A CONTRAST B NO DOWN YES UP GRAND PIANO 1 GRAND PIANO 2 E.PIANO 1 E.
Handling files such as deleting song files ... [FILE/SONG SETTING] Saving recorded songs to a USB storage device ... [Save] Recorded songs are automatically saved to Storage memory from Current memory, so normally you won’t need to save songs using this function. However, if a “MemoryFull” message or “SystemLimit” message appear, save the song to another device using this function. Basic Operation A B Save Selected?--> M-001:NewSong001.
Handling files such as deleting song files ... [FILE/SONG SETTING] Deleting a song from the Clavinova’s Storage memory or from a USB storage device ... [Delete] Basic Operation This deletes a song from Storage memory or from a USB storage device. It is not possible to delete a preset song or current song. B A Delete Execute?--> U1-001:NewSong001 /C NO YES D Procedure 4-1 Press the C [–][+] buttons to select a song to delete. 4-2 Press the B [+ (YES)] button located next to “Execute?→.
Handling files such as deleting song files ... [FILE/SONG SETTING] Renaming files ... [Rename] You can change a song’s title except for the preset songs and [-----: NewSong]. Procedure Basic Operation CAUTION See page 45 for information on basic operations. The following is a detailed procedure for Step 4. A B Rename Execute?--> M-001:NewSong001 C 4. Do not turn off the power or eject the media while “Executing” is shown in the display.
Handling files such as deleting song files ... [FILE/SONG SETTING] Copying files ... [Copy] A B Copy Execute?--> U1-001:NewaSong001 /- NO C YES D Copy operation TIP Please note that the copy features are intended for your personal use only. Basic Operation You can copy songs. However, you cannot copy files to the same root directory or same folder. TERMINOLOGY Root: The highest level of a hierarchical structure. This indicates an area which does not belong to a folder.
Handling files such as deleting song files ... [FILE/SONG SETTING] Procedure TIP See page 45 for information on basic operations. The following is a detailed procedure for Step 4. Basic Operation 4-1 Protected songs cannot be copied. TIP When you copy a song to/from a USB storage device, make sure that a USB storage device is connected to the instrument. Please note that the copy features are intended for your personal use only. TIP Press the B [+ (YES)] button located next to “Execute?→.
Handling files such as deleting song files ... [FILE/SONG SETTING] Moving files ... [Move] You can move (cut and paste) songs. B Move Execute?--> U1-001:NewSong001 /C NO Basic Operation A YES D Procedure See page 45 for information on basic operations. The following is a detailed procedure for step 4. When you move a song to/from a USB storage device, make sure that a USB storage device is connected to the instrument. TIP You cannot move a folder.
Handling files such as deleting song files ... [FILE/SONG SETTING] Making folders in the USB storage device ... [MakeDir] You can create folders (directories) on the USB storage device to organize songs. This instrument enables you to create folders only in the USB storage device—not in the Preset song memory and Storage memory. Basic Operation CAUTION B A MakeDir Execute?--> U1 :NewDir_ NO YES Do not turn off the power or eject the media while “Executing” is shown in the display.
Handling files such as deleting song files ... [FILE/SONG SETTING] Automatically selecting a song in storage media ... [SongAutoOpen] A B SongAutoOpen NO YES On C D Procedure TIP Basic Operation Specify whether a song (not contain in a folder) which does not contain to a folder will automatically be opened when you insert the media. When a USB storage device is connected to the instrument, a song in the device will not automatically open.
Playing Back Recorded Songs and Commercially-available Music Data TIP You can play back songs recorded using the Record function (page 34) as well as commercially-available music data. You can also play the keyboard along with the playback. See page 57 for information on the types of song data that can be played on the Clavinova. TIP TIP Basic Operation Songs containing a large amount of data may not be able to be read properly by the instrument, and as such you may not be able to select them.
Playing Back Recorded Songs and Commercially-available Music Data 2-1 Use the A [–][+] buttons to select the song type: “PRESET,” “MEMORY,” or “USB1.” 2-2 Basic Operation PRESET ......Stands for Preset song memory. This memory contains 50 piano preset songs. MEMORY...Stands for Storage memory. This memory contains recorded songs or copied songs. “MEMORY” is not displayed when this memory does not contain any songs. USB1...........Stands for USB storage device.
Playing Back Recorded Songs and Commercially-available Music Data Adjusting the tempo You can use the TEMPO [DOWN][UP] buttons to adjust the playback tempo as required before or during playback. The default tempo (the song’s original tempo) is set when you press the [DOWN] and [UP] buttons simultaneously. Press the [SONG SELECT] button to return to the song select screen. Basic Operation 4. Stop playback. 5. Return to the main screen.
Playing Back Recorded Songs and Commercially-available Music Data Turning part playback on and off TIP You can practice a part or phrase using the “SongRepeat (page 71)” and “PhraseMark (page 71)” parameters in the “FILE/SONG SETTING” menu. Basic Operation While the Clavinova is playing or stopped, pressing these part buttons turn off the indicators, and the data on those parts will not be played. Pressing the part buttons toggles part playback on and off. You can play the part that is turned off.
Connections Connectors Basic Operation CAUTION Before connecting the Clavinova to other electronic components, turn off the power to all the components. Before turning the power on or off to all components, set all volume levels to minimum (0). Otherwise, electrical shock or damage to the components may occur.
Connections CAUTION When the Clavinova’s AUX IN jacks are connected to an external device, first turn on the power to the external device, then to the Clavinova. Reverse this order when you turn the power off. Clavinova TIP The Clavinova’s [MASTER VOLUME] dial setting affects the input signal from the AUX IN jacks, but the [REVERB], [CHORUS], and BRILLIANCE [MELLOW] [BRIGHT] (page 27) settings do not.
Connections Connecting to a USB storage device By connecting the instrument to a USB storage device with a standard USB cable, you can save data you’ve created to the connected device, as well as read data from the connected device. Basic Operation Compatible USB storage devices Up to two USB storage devices, such as a floppy disk drive, hard disk drive, CD-ROM drive, flash memory reader/writer, etc., can be connected to the USB [TO DEVICE] terminal. (If necessary, use a USB hub.
Connections Connection to a USB storage device USB [TO DEVICE] terminal A TIP If you connect USB storage devices to both USB [TO DEVICE] terminals, the devices may not operate properly. Basic Operation This instrument has two USB [TO DEVICE] terminals; one on the left of the panel and one on the terminal at the front. Select the desired terminal SELECT USB TO DEVICE USB [TO DEVICE] terminal B Both are the same terminal; however, both cannot be used at the same time.
Connections Backing up your data to a computer ■ Backing up the instrument data to a computer Once you’ve saved data to a USB storage device, you can copy the data to the hard disk of your computer, then archive and organize the files as desired. Simply reconnect the device as shown below. Basic Operation Saves internal data to a USB storage device. Instrument USB [TO DEVICE] terminal USB storage device Disconnect the USB storage device from the instrument and connect it to the computer.
Connections Connecting a personal computer There are the two methods by which to connect the Clavinova to a personal computer: 1. Connecting the USB port on the computer to the Clavinova’s USB [TO HOST] terminal (see below) 2. Using a MIDI interface and the Clavinova’s MIDI terminals (page 64) If you are using a computer that has a USB interface, we recommend that you connect the computer and the instrument by USB, rather than by MIDI.
Connections CAUTION Precautions when using the USB [TO HOST] terminal Basic Operation When connecting the computer to the USB [TO HOST] terminal, make sure to observe the following points. Failing to do so risks freezing the computer and corrupting or losing data. If the computer or the instrument freezes, turn the power to the instrument off and restart the computer.
Detailed Settings CLP-280/270 Owner’s Manual 65
Detailed Settings You can set various parameters to make the best use of Clavinova functions, such as fine tuning the pitch, selecting a voice for the metronome, repeating playback, etc. For the basic procedure to make these settings, refer to page 91.
Detailed Settings Voices [VOICE SETTING] In Dual mode, parameters with the “ *” mark are set for Voice 1 and Voice 2 individually.
Detailed Settings Other settings [FUNCTION] Detailed Settings 68 Settings Parameter name Changing the key Transpose 83 Selecting a touch response TouchResponse 83 Fine tuning the pitch Tune 84 Selecting a tuning curve for a piano voice PianoTuningCurve 84 Selecting a scale Scale 84 Specifying the Split Point SplitPoint 85 Setting the right pedal function RPedalFunc 85 Setting the center pedal function CPedalFunc 85 Setting the left pedal function LPedalFunc 85 Setting the au
Detailed Settings Making detailed settings 1 2 SONG EXTRA PARTS LEFT RIGHT SONG SELECT REC STOP PLAY/PAUSE FILE/SONG SETTING REPEAT KEYBOARD METRONOME SETTING ON/OFF 3 4 A CONTRAST B NO DOWN 1 YES UP GRAND PIANO 1 GRAND PIANO 2 E.PIANO 1 E.PIANO 2 HARPSICHORD E.CLAVICHORD VIBRAPHONE GUITAR VOICE SETTING CHURCH ORGAN JAZZ ORGAN STRINGS CHOIR SYNTH. PAD WOOD BASS E.
Detailed Settings 4. Write, execute, or save the data. There are two ways to respond to the messages. If “Execute?→” or “Start?→” appears: Detailed Settings Press the B [+(YES)] button to display confirmation (“Sure?→”). To proceed, press the B [+(YES)] button again. The Clavinova displays “Executing” and writes the data. When the operation is complete, it displays “Completed” for three seconds, then returns to the previous screen.
Detailed settings for recording and playback [FILE/SONG SETTING] For information on the settings “Save” – “CharacterCode,” see “Handling files such as deleting song files ... [FILE/SONG SETTING]” on page 43. You can make detailed settings for the selected song. First, select the desired song from preset songs (“PRESET”), memory songs (“MEMORY”), or External songs (“USB1”) (see page 54). Procedure Select the desired song and press the [FILE/SONG SETTING] button to access the “File/Song Setting” menu.
Detailed settings for recording and playback [FILE/SONG SETTING] Correcting note timing [Quantize] You can correct the timing of notes. For example, you can adjust recorded notes to precise eighth or sixteenth notes. • Changes are made by song. See the procedure on page 69. Stores the changed value. A B Quantize Execute?--> Strength= 50% 1/8 C NO Quarter-note length YES D Detailed Settings Specifies the type of note. Notes for which you can adjust the timing: 1/4.................
Detailed settings for recording and playback [FILE/SONG SETTING] Deleting data from each channel [ChannelClear] You can select a single channel to listen to its contents. Playback starts from the first note. See the procedure on page 69. Playback continues as long as you press and hold down this button. A You can delete data from each of 16 channels. See the procedure on page 69. Delete data.
Detailed settings for the metronome METRONOME [SETTING] You can set the time signature, volume level, and voice of the Clavinova metronome. Procedure Press the METRONOME [SETTING] button to access the Metronome Setting menu. METRONOME [SETTING] button SONG EXTRA PARTS LEFT RIGHT SONG SELECT REC STOP PLAY/PAUSE FILE/SONG SETTING REPEAT KEYBOARD METRONOME SETTING ON/OFF A CONTRAST B NO DOWN YES UP GRAND PIANO 1 GRAND PIANO 2 E.PIANO 1 E.PIANO 2 HARPSICHORD E.
Detailed settings for the voices [VOICE SETTING] This menu enables you to make various detailed settings for the voices in Dual or Split mode and the effects. You can make these settings for each voice (or each combination of voices) individually. You can listen to the notes you play on the keyboard while changing the settings. Procedure 1. Select a voice and press the [VOICE SETTING] button to access the “Voice Setting” menu.
Detailed settings for the voices [VOICE SETTING] TIP In Dual mode, parameters with the “*” mark are set for Voice 1 and Voice 2 individually. TIP Parameter names enclosed in parentheses ( ) are displayed in Dual mode. The pitch of a note can be shifted upward or downward in steps of an octave. See the procedure on page 69.
Detailed settings for the voices [VOICE SETTING] Setting the reverb type [ReverbType] Selecting the chorus type [Chorus Type] TIP TIP You cannot set this parameter for the voice parts “Left” and “LeftXLayer.” You cannot set this parameter for the voice parts “Left” and “Left × Layer.” See the procedure on page 69. See the procedure on page 69. B Main ReverbType Set?--> Hall1 NO C A Main ChorusType YES D B Set?--> Chorus NO C Setting range: Room Simulates reverberation in a room.
Detailed settings for the voices [VOICE SETTING] SoundBoard Setting the chorus on/off [ChorusOnOff] Off You can set the [CHORUS] button on or off for each voice. When you select a voice, the chorus on/ off setting for the voice automatically changes according to this parameter. Setting the speed of the vibraphone vibrato effect* [VibeRotorSpeed] TERMINOLOGY TIP Even if this parameter is turned on, the chorus effect is disabled if the ChorusSend parameter is set to 0. See the procedure on page 69.
Detailed settings for the voices [VOICE SETTING] Setting the rotation speed of the rotary speaker* [RotarySpeed (Rot.Speed)] Adjusting the resonance effect* [HarmonicContent (Harmonic)] See the procedure on page 69. This will be displayed only if Rotary is selected for the DSP Type parameter explained above. It sets the rotation speed of the rotary speaker effect. See the procedure on page 69.
Detailed settings for the voices [VOICE SETTING] Adjusting the low-range gain (amount of boost/cut) of the equalizer* [EQ LowGain] See the procedure on page 69. B A Main EQ LowGain Set?--> 0 NO YES D C Detailed Settings Setting range: –12 - +12 dB Setting the touch sensitivity [TouchSense]* This parameter enables determines the manner and degree to which the volume level changes in response to your touch on the keyboard (how hard you play).
Detailed settings for iAFC [iAFC SETTING] When iAFC is engaged, the Clavinova will sound deeper and more resonant, similar to an acoustic musical instruments. This lets you experience the ambience and reverberation that are characteristic of performing on stage or simulates the sustain sound that occur when you press the damper pedal of a grand piano. This section describes how to make various settings for the iAFC function.
Detailed settings for iAFC [iAFC SETTING] Adjusting the Spatial Effect depth [SpatialFX Depth] Restoring the default calibration setting [iAFC Default] Detailed Settings Spatial Effect is one type of the iAFC effect. Spatial Effect creates a sense of reverberation and spaciousness by picking up the output sound using internal microphones and output the sound from the speaker on the rear of the instrument. The spread and spaciousness of the sound is different depending on the depth.
Other settings [FUNCTION] You can make detailed settings for touch, tuning, scale, etc. Procedure Press the [FUNCTION] button to enter Function mode. SONG EXTRA PARTS LEFT RIGHT SONG SELECT REC STOP PLAY/PAUSE FILE/SONG SETTING REPEAT KEYBOARD METRONOME SETTING ON/OFF A CONTRAST B NO DOWN YES UP GRAND PIANO 1 GRAND PIANO 2 E.PIANO 1 E.PIANO 2 HARPSICHORD E.CLAVICHORD VIBRAPHONE GUITAR VOICE SETTING CHURCH ORGAN JAZZ ORGAN STRINGS CHOIR SYNTH. PAD WOOD BASS E.
Other settings [FUNCTION] Fine tuning the pitch [Tune] Selecting a scale [Scale] You can fine tune the pitch of the entire instrument. This function is useful when you play the Clavinova along with other instruments or CD music. See the procedure on page 69. A B Tune NO You can select various scales. Equal Temperament is the most common contemporary piano tuning scale. However, history has known numerous other scales, many of which serve as the basis for certain genres of music.
Other settings [FUNCTION] Specifying the Split Point [Split Point] You can specify the split point (the boundary between the right-hand and left-hand keyboard areas). See the procedure on page 69. Setting the center pedal function [CPedalFunc] See the procedure on page 69. B A B A SplitPoint NO CPedalFunc Set?--> Sostenuto NO YES YES F#2 D C D Setting range: Same as “Setting the right pedal function” above, except for the following parameters.
Other settings [FUNCTION] Setting the auxiliary pedal function [AuxPedalFunc] You can assign a function to the pedal connected to the Clavinova’s AUX PEDAL jack. See the procedure on page 69. B A AuxPedalFunc Set?--> Expression NO YES D C Turning the center pedal function on/off [CPedalOnOff] This turns the center pedal function on or off for the relevant voice part.
Other settings [FUNCTION] Turning the auxiliary pedal function on/off [AuxPedalOnOff] This turns the auxiliary pedal function on or off for the relevant voice part. In other words, you can select the desired voice part (Main, MainLayer, Left, LeftLayer) and determine whether the auxiliary pedal function (set on page 86) will affect that part or not. See the procedure on page 69. Selecting a type of auxiliary pedal [AuxPedalType] A pedal connected to the [AUX PEDAL] jack may switch on and off differently.
Other settings [FUNCTION] Setting the depth of string resonance [StringResonanceDepth] This parameter is effective on the voices, such as “Grand Piano 1.” See the procedure on page 69. A B StringResonanceDepth NO YES 5 C D Detailed Settings Setting range: Off, 1 - 10 Setting the range of pitch bend [PitchBendRange] This specifies the amount of change that can be produced by the pitch bend function which smoothly varies the pitch. • This setting applies only to the manually-played sound.
Other settings [FUNCTION] Setting the MIDI receive channel [MidiInChannel] Select the volume level of the signal output from the AUX OUT jacks. When “Fixed” is selected, the level cannot be controlled by using the [MASTER VOLUME] control. When “Variable” is selected, the level can be controlled by using the [MASTER VOLUME] control. See the procedure on page 69.
Other settings [FUNCTION] Turning Local control on/off [LocalControl] Selecting a type of data received via MIDI [ReceiveParameter] Detailed Settings “Local Control On” is a state in which the Clavinova produces the sound from its tone generator when you play the keyboard. In “Local Control Off ” state, the keyboard and the tone generator are cut off from each other. This means that even if you play the keyboard, the Clavinova will not produce the sound.
Other settings [FUNCTION] Transmitting the initial settings on the panel [InitialSetup] Setting range: On/Off A B InitialSetup Start?--> NO C YES D Selecting items saved at shutdown [MemoryBackup] You can back up some settings, such as voice selection and metronome setting, so that they will not be lost after you turn off the power to the Clavinova.
Other settings [FUNCTION] Other method for restoring the normal settings Press and hold down the white key on the right end (C7) and press the [POWER] switch to turn on the power to the Clavinova. In this case, the Memory songs saved in the storage memory are not erased. Backing up the Clavinova's internal data [FullBackup] For maximum data security Yamaha recommends that you copy or save your important data to a USB storage device. This provides a convenient backup if the internal memory is damaged.
Message List The messages are listed in alphabetical order. AccessError AccessError AllFiles?--> BackupMemoryFull CalibrationError DefaultReset Calibration Speaker sound is off Meaning • This message appears when data has failed to be written or loaded to the Storage memory or USB storage device. When you write or load data via USB storage device, check the USB cable connection and try again. If you still see this message, the Storage memory/ media/device may have malfunctioned or may be damaged.
Message List Message This message appears when a communication error occurred between the instrument and drive. Check the USB cable connection and try again. If you still see this message, use a drive whose compatibility has been confirmed by Yamaha (page 60). DriveError DriveNumLimitOver Detailed Settings DriveRemoved DuplicateName Execute?--> FactorySet Restart The number of drives exceeds the limitation.
Message List Message Meaning LastPowerOffIllegal MemoryChecking MakeDir ---:Select USB Drive MemoryFull NoDrive NoFile NoSongToCopy NoSongToMove Detailed Settings There is a problem with the USB [TO HOST] terminal • When using the CLP-280/270 connected to your personal computer: The driver or MIDI application on your computer is not functioning correctly, perhaps because the computer is turned off, the cable is not connected correctly.
Message List Message Meaning You tried to rename a song that does not exist in the Storage memory or on USB storage device. Select a Memory song or External song via the [SONG SELECT] button. NoSongToRename Overwrite?--> Detailed Settings PC<->CLP InCommunication This message appears when Musicsoft Downloader is started on a computer connected to the instrument. When this message appears, you cannot operate the instrument.
Message List SongChanged Clear? SongChanged Save? SongError Meaning This message appears when you record or edit the protected song and select another song. The recorded/edited protected song cannot be saved. The song will be deleted when you select another song. You tried to perform another operation before saving the recorded song to storage memory or an external device. If you continue the operation, the recorded song will be lost. To delete the new recording, press the B [– (NO)] button.
Message List Message UnformattedDrive Format? UnsupportedDrive WrongDrive Detailed Settings WrongName WrongSelection 98 CLP-280/270 Owner’s Manual Meaning You tried to perform a file- or drive-related operation using an unformatted media. To cancel the operation, press the B [– (NO)] button. To format the disk and try again, press the B [+ (YES)] button to display the format parameter (page 52). This message appears when you connect an unsupported drive.
Questions about Operations and Functions While you are using a function, some buttons not used for the function are disabled. If the song is playing, stop the playback. Otherwise, press the [EXIT] button to return to the main screen. Then, perform the desired operation. ■ The sound sustains indefinitely and does not decay when I press the sostenuto pedal.
Questions about Operations and Functions ■ How much data can I record? • Current memory (page 46): About 300KB • Storage memory (page 46): About 1,750KB ■ The on/off setting of the pedal connected to the AUX PEDAL jack is reversed. Some types of pedals may turn on and off in opposite fashion. Use the “AuxPedalType” parameter (page 86) in the “FUNCTION” menu to change the external pedal setting. ■ The song title is not correct.
Appendix CLP-280/270 Owner’s Manual 101
Troubleshooting Problem Solution The power of the Clavinova does not turn on. The power cable is not plugged in (check at the Clavinova and at the electrical outlet). Insert the power cable plug firmly into the Clavinova and into the electrical outlet of the correct voltage. (page 15) There is a clicking noise when you press the [POWER] button to turn the power on or off. This is caused by the electrical power within the instrument. This is not a malfunction. Noise is heard from the Clavinova.
Problem Cause Solution The USB storage device is not recognized by the instrument. The USB storage device may not be recognized by the instrument depending on the timing of the device connection or the setting of the [SELECT] switch. Disconnect the USB storage device and connect it again and select a device using the [SELECT] switch.
Data Compatibility This section covers basic information on data compatibility: whether or not other MIDI devices can playback the data recorded by CLP-280/270, and whether or not the CLP-280/270 can playback commercially available song data or song data created for other instruments or on a computer. Depending on the MIDI device or data characteristics, you may be able to play back the data without any problem, or you may have to perform some special operations before the data can be played back.
Data Compatibility ■ DOC (Disk Orchestra Collection) This voice allocation format is compatible with many of Yamaha’s MIDI devices, including the Clavinova series instruments. This is also common format used with various Yamaha software. ■ GS GS was developed by the Roland Corporation. In the same way as Yamaha XG, GS is a major enhancement of the GM specifically to provide more voices and drum kits and their variations, as well as greater expressive control over voices and effects.
Preset Voice List : Yes ×: No Voice group Voice name Stereo sampling Touch Sense Dynamic sampling Key-off samples String resonance GrandPiano1 This sound was sampled from a full concert grand piano. Three stages of dynamics were sampled, and no effort has been spared in making the sound virtually identical to that of an acoustic piano. Even the tonal changes produced by the damper pedal and the subtle sounds of releasing a key are reproduced.
Voice group Voice name Stereo sampling Touch Sense Dynamic sampling Key-off samples String resonance Voice description × × A warm and natural nylon-string guitar sound. Enjoy the atmosphere it adds to a quiet song. × × × A bright steel guitar sound. Ideal for popular music. NylonGuitar GUITAR SteelGuitar CHURCH ORGAN × PipeOrgan Principal × × × × This voice features the combination of pipes (8'+4'+2') of a principal (brass instrument) organ. It is suitable for Baroque church music.
Voice Combination Examples (Dual and Split) Dual MAIN + MAIN MAIN + MAIN MAIN + MAIN GrandPiano1 + E.Piano1 GrandPiano1 + E.Piano2 GrandPiano1 + SynthPiano GrandPiano2 + GrandPiano2 MAIN + MAIN MAIN + MAIN E.Piano1 + SlowChoir E.Piano2 + E.Clavichord MAIN + MAIN Harpsichord8' + Strings MAIN + MAIN Celesta + SynthStirngs This combination is often used in popular music. This produces a fantasy, spacious piano sound. This combination sounds as if you are playing two notes that are one octave apart.
CLP-280/270: Keyboard Stand Assembly CAUTION • Be careful not to confuse parts, and be sure to install all parts in the correct direction. Please assemble in accordance with the sequence given below. • Assembly should be carried out by at least two persons. • Be sure to use the correct screw size, as indicated below. Use of incorrect screws can cause damage. • Be sure to tighten up all screws upon completing assembly of each unit. • To disassemble, reverse the assembly sequence given below.
CLP-280/270: Keyboard Stand Assembly 2. 3. Attach B. Appendix 2-1 Insert B between E and F as shown in the illustration. 2-2 Align and attach B to the front side of D, E and F. 2-3 Secure B using the 4 x 14mm thin screws. * Insert two screws into the smaller holes on the brackets. 2-4 Temporarily secure with 4 x 14mm thin screws. * Insert four screws into the smaller holes on the brackets.
CLP-280/270: Keyboard Stand Assembly 3-3 Align the dimple on side A with the inner side of E and F. Simultaneously lower the left and right side of A, and secure with E and F. 4. Attach A. 4-1 Secure A using two 6 x 16mm short screws from the rear. 4-2 Secure A using four 6 x 16mm short screws from the front. 4-3 Firmly tighten the screws you temporarily secured in step 2-4 above (assembly B).
CLP-280/270: Keyboard Stand Assembly 5. Connect the speaker cord. 7. Attach C. 5-1 Remove the twist tie attaching the speaker cord. 7-1 Place on D, the stopper-wood at the bottom edges of C, then secure the top. 5-2 Insert the speaker cord plug into the connector so that the tab extends toward the front when viewed from the rear. 7-2 Secure upper right and left of C using two 4 x 14mm thin screws. 7-2 7-1 Connect the pedal cord. 6-1 Insert the pedal cord plug into the [PEDAL] connector.
CLP-280/270: Keyboard Stand Assembly Voltage Selector Before connecting the AC power cord, check the setting of the voltage selector which is provided in some areas. To set the selector for 110V, 127V, 220V or 240V main voltages, use a “minus” screwdriver to rotate the selector dial so that the correct voltage for your region appears next to the pointer on the panel. The voltage selector is set at 240V when the unit is initially shipped.
Handling the Floppy Disk Drive (FDD) and Floppy Disks (Optional) An optional floppy disk drive can be installed to this instrument. For instructions on installing the floppy disk drive, see page 115. The floppy disk drive lets you save original data you’ve created on the instrument to floppy disk, and allows you to load data from floppy disk to the instrument. Be sure to handle floppy disks and treat the disk drive with care. Follow the important precautions below.
Installing the Floppy Disk Drive (Optional) The optional UD-FD01 floppy disk drive can be installed to the bottom of the instrument by using the included floppy disk drive case and screws. Have a Phillips-head (+) screwdriver ready. 1. Remove the three backing papers from the adhesive tape in the case, and fit the floppy disk drive into the case. 3. Attach the drive and case assembly to the left underside of the instrument, using the included four screws (4mm x 10mm).
Specifications Item Keyboard Sound Source Polyphony (max) Voice Selection Effect CLP-280 CLP-270 Natural Wood keyboard (with real-wood white keys) GH3 keyboard AWM Dynamic Stereo Sampling 128 Panel preset for manual performance: 38 voices, XG voices: 480 voices + 12 drum kits, GM2 and GS voices for GM2/GS song playback Reverb, Chorus, Brilliance, Variation effect, Insertion effect x 3, iAFC Controls Dual, Split Display LCD Recording/Playback Memory Device Appendix Pedal Demo Songs Jacks/Terminal
Index You can search the desired section using not only the terminology in this manual but also commonly-used words. The * mark indicates that the corresponding page includes the terminology explanation in the right column. 50 greats for the Piano ............................... 5 50 Piano Preset Songs .............................. 20 Practicing a one-hand part................ 22 A A – D [–][+] buttons ............................... 12 A-B repeat.................................................
Index O S Other settings ........................................... 83 Save............................................................ 46 Scale........................................................... 84 Select 50 piano preset songs......................... 20 Demo Songs ....................................... 19 Recorded Songs and Music Data ...... 54 [SELECT] switch ...................................... 61 Selecting a touch response ....................... 83 SMF (Standard MIDI File) ............
MEMO CLP-280/270 Owner’s Manual 119
MEMO 120 CLP-280/270 Owner’s Manual
IMPORTANT SAFETY INSTRUCTIONS INFORMATION RELATING TO PERSONAL INJURY, ELECTRICAL SHOCK, AND FIRE HAZARD POSSIBILITIES HAS BEEN INCLUDED IN THIS LIST. WARNING- When using any electrical or electronic product, basic precautions should always be followed. These precautions include, but are not limited to, the following: 1.
FCC INFORMATION (U.S.A.) 1. IMPORTANT NOTICE: DO NOT MODIFY THIS UNIT! This product, when installed as indicated in the instructions contained in this manual, meets FCC requirements. Modifications not expressly approved by Yamaha may void your authority, granted by the FCC, to use the product. 2. IMPORTANT: When connecting this product to accessories and/or another product use only high quality shielded cables. Cable/s supplied with this product MUST be used. Follow all installation instructions.
For details of products, please contact your nearest Yamaha representative or the authorized distributor listed below. Pour plus de détails sur les produits, veuillez-vous adresser à Yamaha ou au distributeur le plus proche de vous figurant dans la liste suivante. NORTH AMERICA CANADA Yamaha Canada Music Ltd.
Clavinova Web site http://music.yamaha.com/homekeyboard/ Yamaha Manual Library http://www.yamaha.co.jp/manual/ U.R.G., Pro Audio & Digital Musical Instrument Division, Yamaha Corporation © 2005 Yamaha Corporation WE03680 603MWAP1.