
Manual


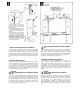


•Long screws (gold) x 4
•Lange Schrauben (goldfarben) x 4
•Vis longues (dorées) x 4
•Tornillos largos (dorados) x 4
•Short screws (black) x 8
•Kurze Schrauben (schwarz) x 8
•Vis courtes (noires) x 8
►Tornillos cortos (negros) x 8
•Long screws (black) x4
•Lange Schrauben (schwarz) x 4
•Vis longues (noires) x 4
•Tornillos largos (negros) x 4
•Joint connectors x 4
•Verbindungsstücke x 4
•Dispositifs d'assemblage x 4
•Juntas X 4
7 C
•Power cord
•Netz Kabel
•Cordon d'alimentation
•Cable de alimentación
I Keyboard Stand Assembly
NOTE: We do not recommend attempting to assemble the Clavinova
alone. The job can be easily accomplished, however, with
only two people.
1
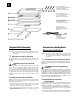
Open the box and remove all the parts.
On opening the box you should find the parts shown in the
illustration. Check to make sure that all the required parts are
provided.
2
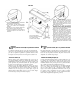
Install the power cord (G) in the pedal
box (C).
Invert the pedal box (C) and firmly insert the power cord plate
into the slot provided until it clicks into place. The short end
of the power cord should be inside the pedal box. Fasten the
short end of the power cord using the power cord clip so that
the cord extends from the side of the pedal box as shown in
the illustration. Also make sure that the pedal cable (already
installed) extends from the other end of the pedal box in the
same way.
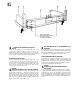
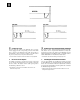
O Assemble the side panels (D) and feet (E).
Install the joint connectors in side panels (D) as shown in the
illustration, then secure the feet (E) to the side panels (D) with
the long gold-colored screws.
* When installing the joint connectors in the holes in the side
panels (D), make sure that the arrows printed on their upper
surface face in the direction shown in the illustration.
* Make sure that the left and right feet are facing in the proper
direction as shown in the illustration. The grooved edge of each
foot should face inward.
Zusammenbau des Keyboard-
Ständers und Aufstellung
HINWEIS: Wir raten davon ab, die Montage und Aufstellung des
Clavinovas alleine auszuführen. Zwei Personen können
das Clavinova jedoch problemlos zusammenbauen und
aufstellen.
1
Versandkarton öffnen und alle Telle auspacken.
Der Karton sollte all die in der linken Abbildung gezeigten Teile
enthalten. Vergewissern Sie sich, daß alle benötigten Teile vor
handen sind.
2
Das Netzkabel (G) in den Pedalkasten (C)
installieren.
Den Pedalkasten (C) umdrehen und die Platte des Netzkabels
in den Schlitz einrasten. Das kurze Ende des Netzkabels sollte
im Pedalkasten sein. Das kurze Ende des Netzkabels mit der
der Klemme so befestigen, daß das Netzkabel entsprechend der
Abbildung aus der Seite des Pedalkastens herausragt. Außerdem
sicher stellen, daß das Pedalkabel (bereits installiert) aus der
anderen Seite des Pedalkastens herausragt.
w Die Seitenplatten (D) und Füsse (E)
zusammenbauen.
Die Verbindungsstücke entsprechend der Abbildung in die Sei
tenplatten (D) einsetzen. Dann die Füsse (E) mit den langen
goldfarbenen Schrauben an den Seitenplatten (D) anbringen.
* Beim Einsetzen der Verbindungsstücke in die Seitenplatten (D)
sicherstellen, daß die Pfeile auf den Oberseiten wie in der Abbil
dung ausgerichtet sind.
* Sicherstellen, daß linker und rechter Fuß in die gezeigte Richtung
weisen. Die Fußkante mit der Nut sollte dabei nach innen weisen.