
User Manual


MONTAGE Owner’s Manual
10
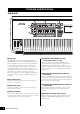
Controls and Functions
a [AUDITION] button
Use this button (in the Performance Play, Live Set, or
Category Search displays) to play back or stop a sample
phrase showcasing the selected Performance sound. This
sample phrase of the Performance is called the “Audition
phrase.” The button fully lights when it is ON and the button
lights dimly when the Audition function is active such as in
the Category Search display.
b PART [COMMON] button
Turning on this button lets you edit the parameters
commonly applied to all Parts. The button fully lights when it
is turned on and the button lights dimly when it is turned off.
c ELEMENT/OPERATOR [COMMON] button
Turning this button on lets you edit the parameters
commonly applied to all Elements/Keys/Operators. The
button fully lights when it is turned on and the button lights
dimly when it is turned off.
d Number A [1] – [16] buttons
Use these buttons to select Parts on the Performance Play
display and the Edit display.
The buttons can also be used to select a main category from
the Category Search display. In the Live Set display, the
Number A [1] – [4] buttons can be used to select
Performances in the first line, and the Number A [9] – [12]
buttons can be used to select Performances in the second
line. The Number A [5] – [8] buttons can be used to select
Live Set pages 1 – 4, and the Number A [13] – [16] buttons
can be used to select Live Set pages 5 – 8.
According to each of the displays, the button fully lights
when it is selected, the button lights dimly when it is
selectable, and the button lamp is off when not selectable.
(Only in the case of selecting pages in the Live Set display,
this button can be used even if the lamp is off.)
e Number B [1] – [8] buttons
Use these buttons to select Motion Sequencer types on the
Performance Play display and to turn the Motion Sequencer
for each Part ON/OFF.
The buttons can be used to select Elements/Keys/Operators
from the Edit display. The buttons can also be used to select
sub categories from the Category Search display. In the Live
Set display, the Number B [1] – [4] buttons can be used to
select Performances in the third line, and the Number B [5] –
[8] buttons can be used to select Live Set pages 9 – 12.
According to each of the displays, the button fully lights
when it is selected, the button lights dimly when it is
selectable, and the button lamp is off when not selectable.
(Only in the case of selecting pages in the Live Set display,
this button can be used even if the lamp is off.)
f Number C [1] – [8] buttons
Use these buttons to select Arpeggio types on the
Performance Play display and to turn the Arpeggio for each
Part ON/OFF.
The buttons can be used to mute Elements/Keys/Operators
from the Edit display. The buttons can also be used to select
Performances from the Category Search display. In the Live
Set display, the Number C [1] – [4] buttons can be used to
select Performances in the fourth line, and the Number C [5]
– [8] buttons can be used to select Live Set pages 13 – 16.
According to each of the displays, the button fully lights
when it is selected, the button lights dimly when it is
selectable, and the button lamp is off when not selectable.
(Only in the case of selecting pages in the Live Set display,
this button can be used even if the lamp is off.)
g PART [MUTE] button
By turning this button on, the Number A [1] – [16] buttons
can be used as mute on/off controls. The button fully lights
when it is turned on and the button lights dimly when it is
turned off. The button can also be used to switch Live Set
banks from the Live Set display.
h PART [SOLO] button
By turning this button on, the Number A [1] – [16] buttons
can be used as solo on/off controls for Parts. The button fully
lights when it is turned on and the button lights dimly when it
is turned off. The button can also be used to switch Live Set
banks from the Live Set display.
i ELEMENT/OPERATOR [MUTE] button
By turning this button on, the Number B [1] – [8] buttons can
be used to select Elements/Keys/Operators 1 – 8, and the
Number C [1] – [8] buttons can be used as mute on/off
controls for Elements/Keys/Operators 1 – 8. The button lights
dimly when it works as mute on, and fully lights when it works
as mute off. For operations other than Part editing, the button
is off. The button can also be used to switch Live Set banks
from the Live Set display.
j ELEMENT/OPERATOR [SOLO] button
By turning this button on, the Number B [1] – [8] buttons (or
the Number C [1] – [8] buttons) can be used to as solo on/off
controls for Elements 1 – 8. The button fully lights when solo
is on, and lights dimly when solo is off. In other situations,
except for Part editing operations, the button is off. The
button can also be used to switch Live Set banks from the
Live Set display.
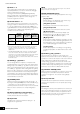
Number buttons PART [MUTE]
button and PART
[SOLO] are OFF
PART [MUTE]
button ON
PART [SOLO]
button ON
Number A [1] – [8]
buttons (upper line)
Part select (1 – 8) Part mute (1 – 8) Part select (1 – 8)
Number A [9] – [16]
buttons (lower line)
Part select (9 – 16) Part mute (9 – 16) Part solo (9 – 16)
Number B [1] – [8]
buttons
Motion Sequencer for each Part ON/OFF (1 – 8 / 9 – 16)
Number C [1] – [8]
buttons
Arpeggio for each Part ON/OFF (1 – 8 / 9 – 16)
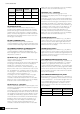
Number buttons ELEMENT/OPERATOR
[MUTE] button ON
ELEMENT/OPERATOR
[SOLO] button ON
Number B [1] – [8] buttons Element select (1 – 8) Element solo (1 – 8)
Number C [1] – [8] buttons Element mute (1 – 8) Element solo (1 – 8)