
manual


28 CP4 STAGE/CP40 STAGE Reference Manual
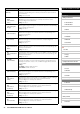
Design of the CP4 STAGE & CP40 STAGE
Reference
Performances
Editing Performances
Common Edit Area
01: Chorus Effect
02: Reverb Effect
03: General
04: Name
Part Edit Area
01: Play Mode
02: Filter/EG
03: Effect-A
04: Effect-B
05: Controller
06: Receive Switch
Master Keyboard Area
Job Area
01: Recall
02: Copy
03: Bulk
Store Performance Function
Compare Performance Function
File Area
01: Save
02: Load
03: Rename
04: Delete
05: Format
06: Memory Info
Utility Area
01: General
02: MIDI
03: Controller
04: MasterComp
05: Master EQ
06: Panel Lock
Utility Job Area
01: Factory Set
02: Version
Appendix
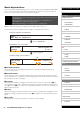
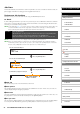
1 EDIT Job
This shows that you are on the Performance Job menu.
2 More symbol
This symbol indicates that other menu items are available for selection. In this case, they can be
displayed using the [d] and [u] buttons.
3 Menu item
The items available for selection from the Performance Job menu are shown here. In this case, use
the [d] or [u] button to select 02: Copy, and then press the [ENTER] button to open the Copy
screen.
4 Selected screen
The name of the current screen is shown here.
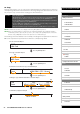
5 Copy from
This shows the Performance from which settings will be copied. Use the [-1/NO] and [+1/YES]
buttons or the Data Dial to select a Performance, and then press the [ENTER] button.
6 Cursor (R)
The flashing cursor indicates the parameter currently selected for editing.
7 Src (source settings)
This shows the settings that will be copied. If necessary, move the flashing cursor (
R
) to the setting
underneath Src using the [l] button. Use the [-1/NO] and [+1/YES] buttons or the Data Dial to
select settings to copy from the following.
CP4 STAGE: Common, Part:MAIN, Part:LAYER, Part:SPLIT, and MasterKbd
CP40 STAGE: Common, Part:MAIN, Part:SP/LA, and MasterKbd
NOTE If Src is set to “MasterKbd”, zone settings will be copied.
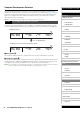
8 Dst (destination)
This shows the settings from the current Performance that will be overwritten. Move the flashing
cursor (
R
) to the setting underneath Dst using the [r] button, and then use the [-1/NO] and
[+1/YES] buttons or the Data Dial to select the settings to be overwritten from the following.
CP4 STAGE: Common, Part:MAIN, Part:LAYER, Part:SPLIT, and MasterKbd
CP40 STAGE: Common, Part:MAIN, Part:SP/LA, and MasterKbd
NOTE If Src (source) is set to “Common” or “MasterKbd”, Dst (destination) will be fixed at “Common” or
“MasterKbd”, respectively. If Src (source) is set to a Part, it will not be possible to set Dst (destination) to
“Common” or “MasterKbd”.
9 Edit symbol (E)
This symbol is displayed when the current Performance has been edited but not yet stored.
) Are you sure?
This message is displayed before executing Performance Job functions. Press the [+1/YES] button
to copy the selected settings. Alternatively, press the [-1/NO] button to return to the previous
screen.
03: Bulk
Using the Bulk Dump function, you can send all of the data from the currently selected Performance
to a computer or another MIDI instrument.
NOTE The Edit menu is the first screen displayed when the [EDIT] button is pressed.
NOTE Before executing Performance Job functions, the instrument will display the Confirmation popup to
confirm that you wish to proceed (“Are you sure?”). You can press the [+1/YES] button to execute the
function or the [-1/NO] button to return to the previous screen without doing so.
NOTE It will not be possible to send data using the Bulk Dump function if the DevNo parameter (device
number) is set to “off”. This parameter can be set on the MIDI screen (page 42) from the Utility area.
Procedure 1. Press the [EDIT] button.
2. On the Edit menu, use the [d] button to select 04: Job, and then press the [ENTER] button.
3. Use the [d] button to select 03: Bulk, and then press the [ENTER] button.
4. When the Confirmation popup is displayed, press the [+1/YES] button to send the data.