(DECLARATION OF CONFORMITY PROCEDURE) Responsible Party: Address: Telephone: Fax: Type of Equipment: Model Name: Yamaha Electronics Corporation, USA. 6660 Orangethorpe Avenue Buena Park, CA 90620 714-522-9105 714-670-0108 CD Recordable/Rewritable Drive CRW2200UX This device complies with Part 15 of the FCC Rules.
Laser Product Class: Class 1 Laser Diode Properties Wavelength: 780-787 nm Pulse Durations and Max. Output at the lens of the Laser Pickup Unit Read Mode: 0.7mW (Continuous) Write Mode: Max. 38mW (for 166ns, Min. Cycle 86.6ns) Laserprodukt-Klasse: Klasse 1 Eigenschaften der Laserdiode Wellenlänge: 780-787 nm Impulsdauer und max. Ausgang an der Linse der Laser-Abtasteinheit Lesemodus: 0,7mW (kontinuierlich) Schreibmodus: Max. 38mW (für 166ns, Zyklusmin.
English OWNER’S MANUAL i
SAFETY PRECAUTIONS PLEASE READ THE FOLLOWING WARNING AND CAUTION CAREFULLY TO PROTECT YOUR PERSONAL SAFETY AND PREVENT DAMAGE TO THE DEVICE. These precautions explain how to use the device correctly and safely, thereby preventing injury to yourself or to others. This section has been sub-divided into a WARNING section and a CAUTION section, according to the likelihood and nature of any potential injuries or damage inflicted.
● Insert the AC plug firmly, as a poor connection can result in electrical shock or fire. ● Only use the included AC adapter, as malfunction or fire may result. ● Do not connect too many devices to a single electrical outlet, or use voltages exceeding the rated voltage as this may cause overheating and fire. CAUTION Always follow these basic precautions to prevent physical injury to yourself or others, or damage to the instrument or other property.
■ About handling CD-R/RW discs 1. Do not store discs in areas subject to excessive humidity or heat (i.e., in direct sunlight or near a heater). 2. Do not touch the surface of a disc. When handling a disc, hold it by the edges. 3. Remove dust and dirt from the surface of a disc. Use an air-blower (i.e., camera lens blower) to remove dust. The surface of a disc may be scratched if wiped with a dry cloth. 4. Do not stick labels on the surface of a disc. 5.
Table of Contents Introduction........................................................................ 1 Features of the CRW2200UX Drive .................................................. 1 Before Use ......................................................................... 4 System Requirements.......................................................................... 4 Supported Discs................................................................................... 6 Serial Number ........................
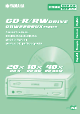
Introduction Features of the CRW2200UX Drive High speed writing/reading The CRW2200UX drive supports up to 20X-speed writing of CD-R discs,*1 and up to 10X-speed writing/rewriting of CD-RW discs.*2 Furthermore, the drive supports data reading and digital audio data extraction at up to 40X speed. USB 2.0 compatible USB 2.0 provides high-speed data transfer capability (max. speed 480 Mbits/sec.). The transfer speed is about 40 times faster than the conventional USB standard (USB 1.1).
Introduction High-fidelity digital audio The CRW2200UX drive supports extraction of digital audio data at up to 40X speed, as well as the recording of digital sound with complete fidelity even when writing at 20X speed. CD TEXT support Information such as the song name or artist name can be recorded on Audio CDs using CD creation software. The text data on the created disc can be displayed on a CD player that is compatible with the CD TEXT format.
Introduction Buffer Underrun Defined CD-R/RW drives are equipped with buffer memory. This memory temporarily stores data while a disc is being recorded. When buffer memory becomes empty (due to unexpected interruptions or the system’s inability to keep up with the writing process), a writing error occurs. This error is known as a “buffer underrun error.” ➀ ➁ Data ➂ If data transfer is interrupted... Data is stored in buffer memory...
Before Use System Requirements If your computer doesn’t meet the requirements listed below, the CRW2200UX drive may not be able to write at the maximum speed. Computer • PC/AT-Compatible Computer • CPU: Pentium II-class or higher, 300 MHz or faster. • RAM: 64 MB or more • USB port (USB 2.0 compatible) • A spare PCI expansion slot or a CardBus slot for a USB interface card (if one hasn’t been installed yet).
Before Use USB cable The USB standard for maximum length of cable between devices is five meters. CRW2200UX Maximum length of cable between devices : 5.0 m Operating System (OS) Windows 98 Second Edition, Windows Me, or Windows 2000 Professional Notes • For Windows 98 Second Edition, install the included device drivers (storage class drivers) to the PC. For details, refer to the separate manual, “Device Driver Installation Guide”, that came with the CRW2200UX drive.
Before Use Supported Discs The CRW2200UX drive can write to discs that carry the following logos: CD-R discs*1 The CRW2200UX drive can write to these discs at 1X, 2X, 4X, 8X, 12X, 16X, or 20X speed. These discs can be played back in a CD-ROM drive or a CD player. Notes • 16X- or 20X-speed writing is enabled with Partial CAV method. (→P. 7) • For 8X or faster writing, use CD-R discs that match their respective writing speeds.
Before Use About the Orange Book The Orange Book standard defines how all recordable discs (including CD-R and CD-RW) are written. Part 2 of the Orange Book standard relates to CD-R discs, and Part 3 to CD-RW discs. The standard was named after the color of the book’s cover. About CD-ROMs A CD-ROM disc is a compact disc containing high-density read-only data. It has many applications, including the playback of music and video, the archiving of data, as well as on-line documentation.
Before Use About 10X-speed writing/rewriting of a High Speed CD-RW disc 10X-speed writing/rewriting of a High Speed CD-RW disc is enabled with the CLV method, and the 4X-10X Full CAV method. Commonly, writing/rewriting is enabled with the CLV method. When writing/rewriting with packet writing (→P. 28), you can also select the Full CAV method. For more details, refer to the documentation that came with your CD writing software. (Make sure that your CD writing software supports the Full CAV method.
Front and Rear of Unit Front Panel ➀ ➁ ➄ ➂ ➅ ➃ ➆ ➀ Power LED Lights up in green when the power of the drive is turned on. ➁ Disc tray The disc tray is used to hold the disc. It slides out from the drive unit when a disc needs to be loaded or unloaded. (→P. 18) ➂ Manual eject hole Only use this if no other method is available for unloading a disc. (→P. 19) ➃ Eject button Press this button when you need to open or close the disc tray. (→P.
Front and Rear of Unit Rear Panel ➀ ➁ ➂ ➃ ➀ LINE OUT jacks (L/R) To listen to audio CDs with the CRW2200UX drive, connect these to the line level input (LINE IN) of the stereo equipment with a standard stereo phono cable (sold separately). ➁ Power switch (STANDBY/ON) Turns the power on or off. (→P. 12, 14) ➂ DC-IN connector Insert the included AC adapter connector. (→P. 13) ➃ USB port Insert the connector of the included USB cable here. (→P.
Setup Procedures Setup Flowchart For easy cross-referencing, the relevant pages in this manual are given. Make sure that system configuration (CPU, RAM, OS, etc.) of your computer meets the requirements of the CRW2200UX drive. (→ →P. 4) Does your computer have a USB port with USB 2.0? Do you have an appropriate USB 2.0 interface card? No Yes STEP Set up the CRW2200UX drive. 1 (→ →P. 12 – 15) Turn on the computer and the drive, then use the USB cable to connect the computer and the drive.
Setup Procedures STEP 1 Set Up the CRW2200UX Drive 1 Turn on the computer. 2 Make sure that the power switch on the rear panel of the CRW2200UX drive is set to STANDBY. 3 Connect the included USB cable with the CRW2200UX drive. The included USB cable has two types of plugs: series A plug and series B plug. Series A plug Series B plug Insert the series B plug (with a square cross section) of the included USB cable in the USB port of the CRW2200UX drive.
Setup Procedures 4 Connect the included AC adapter to the DC-IN connector of the drive with the arrow on the adapter plug facing left, as shown below. DC-IN connector Screw Arrow 5 Connect the included power cable to the AC adapter (➀ ➀). Connect the other end of the power cable to the AC outlet (➁ ➁). ➀ ➁ Electrical plugs/sockets vary according to country/region. Notes • Operate the drive only with the included AC adapter. • The included AC adapter may become warm during use.
Setup Procedures 6 Turn on the CRW2200UX drive. When the power of the CRW2200UX drive is turned on, the power LED on the front panel lights up in green.
Setup Procedures 7 Connect the series A plug of the included USB cable to the USB port of the interface card. USB port USB cable (included) Series A plug Notes • Be sure to connect the drive to the USB port of the interface card. If you connect the drive to the computer via a hub, the drive may not operate properly. • When the CRW2200UX drive is connected to a USB 1.1-compliant port on your computer, it operates in accordance with USB 1.1 standard.
Setup Procedures STEP 3 Configuring for the Operating System After connecting the CRW2200UX drive to the computer, you can verify that the drive is correctly recognized by your computer. For Windows 98 Second Edition/Me Select Control Panel, System, and open the Device Manager tab. Note For Windows Me, when the System icon on the Control Panel is not displayed, click the “view all Control Panel options” located on the left side of your Windows screen. Make sure that “YAMAHA CRW2200E” (Fig.
Setup Procedures STEP 4 Install the CD Writing Software For details about how to install and use the software, refer to the documentation that came with it.
Operation Loading/Ejecting a Disc You can load and eject a disc (as described below) only when the CRW2200UX drive is turned on. 1 2 1 Open the disc tray by pressing the eject button on the CRW2200UX drive’s front panel. 2 Place the disc onto the disc tray with its label or printing facing upward, or remove the disc from the disc tray. 3 Close the disc tray by pressing the eject button again. You can also gently push it closed. Load or unload the disc after the disc tray has fully opened.
Operation Ejecting a Disc in an Emergency If the disc tray fails to open for some reason, such as a malfunction of the internal spring-loaded mechanism or power outage, it can be opened manually. Manual eject hole Paper clip You should attempt to eject a disc manually only as a last resort. Malfunctions may occur if you do this too frequently. 1 Turn off the computer and the CRW2200UX drive.
Operation Disconnecting the CRW2200UX Drive The CRW2200UX drive can be connected or disconnected to or from your computer at any time whether the computer is turned on or off (hot swapping). When removing the CRW2200UX drive with the computer turned on, or when turning off the drive with the computer connected, follow the procedure below. 1 Exit the writing software. 2 Be sure to remove any disc from the disc tray. 3 For Windows 98 Second Edition, remove the drive.
Troubleshooting Please refer to the YAMAHA CD-R/RW Drive web site for the latest support information, including troubleshooting information. YAMAHA CD-R/RW Drive web site URL: http://www.yamaha.co.jp/english/product/computer/ Europe URL: http://www.yamaha-it.de/ The drive does not turn on. ● Are the AC adapter and the power cable connected correctly? Make sure that the CRW2200UX drive is correctly connected to the AC outlet, using the included AC adapter and power cable. (→P.
Troubleshooting The disc tray does not open. ● Is the CRW2200UX drive turned on? The power LED on the front panel of the CRW2200UX drive should light up when power is turned on. ● Is any CD writing software being used? Some CD writing software locks the eject button while it is running on a computer. (If you are using such a software program, the disc tray does not open even if the eject button is pressed.
Troubleshooting No data can be read from a disc. ● Is the disc ejected against your will? Refer to “The disc is ejected against your will (or it comes out spontaneously).” (→P. 22) ● Are you sure the disc is of one of the types supported by the drive? Before use, make sure that the disc is compatible with the CRW2200UX drive. (→P. 31) ● Isn’t the disc dusty or dirty? Remove dust or dirt from the disc, using an air spray or by wiping with a dry, soft cloth.
Troubleshooting The playback of an audio CD (CD-DA) cannot be heard. ● Make sure that powerd speakers (optional) are correctly connected to the LINE OUT jacks (L/R) of the CRW2200UX drive, using audio cables (optional). (→P.
Troubleshooting The error message “Buffer Underrun” is displayed. ● If your CD writing software supports the Buffer Underrun Protection, you must activate the Buffer Underrun Protection. For more details, refer to the documentation that came with your CD writing software. ● To prevent the occurrence of a buffer underrun and to increase the efficiency of data writing, try the following: • Reduce the data writing speed. • Create an image file on the hard drive. • Optimize the hard drive.
Appendix Recording Methods Disc-at-Once (DAO) This method is used to write all data onto a disc in one operation. This method writes multiple pieces of data successively without placing space between them, starting in the innermost track of the disc. Once data is recorded by this method, no data can be added to the same disc even if there is enough space left on it. This method is very useful for making a backup copy of an entire CD.
Appendix Track-at-Once (TAO) This method is used to write data on a disc on a track-by-track basis. A track can be defined as the smallest unit of area that contains an ordinary program, pictorial data, text data, etc. This method allows you to add data to the same disc, one track of data at a time, as long as there is free space left on the disc. Discs that contain data recorded in several different sessions (writing of tracks) are referred to as multisession discs.
Appendix Packet Writing This method is used to record data onto a disc on a file-by-file basis. This method divides a track into small segments called “packets” so that data can be written on a packet-by-packet basis, which means that you can record data in much the same way as you copy data to a floppy or hard drive by dragging and dropping it on your desktop. With such handiness, Packet Writing is suitable for daily data backup.
Appendix About the Firmware The firmware refers to the operating software designed for your CD-R/RW drive. It is stored in drive’s flash memory, so that it can be erased and rewritten. To enhance operation reliability, YAMAHA will continue improving the firmware and make updates to it available. You can find information about the latest firmware in the YAMAHA CD-R/RW Drive web site. YAMAHA CD-R/RW Drive web site URL: http://www.yamaha.co.jp/english/product/computer/ Europe URL: http://www.yamaha-it.
Appendix LED Indicator Messages The following table shows the various LED signals and meanings when the CRW2200UX drive is turned on.
Appendix CRW2200UX Specifications Supported Formats Write Read Play CD-DA ● ● ● (*4) CD TEXT ● ● ● CD-ROM (*1) ● ● ● Mixed Mode CD-ROM (CD-ROM+CD-DA) ● ● ● (*4) CD-ROM XA (*1) ● ● ● (*4) Photo CD (*1) ● (*2)(*3) ● ● (*4) Video CD ● ● ● (*4) CD-i ● ● (*3) ● CD EXTRA (*1) *1: includes multisession ● *2: suitable disc required *3: suitable application software required ● (*4) *4: suitable application software required for playback Note Excludes ADPCM Encode/Decode & Vid
Appendix Data Capacity 700 MB (79 min.) 650 MB (74 min.) 550 MB (63 min.) Data Transfer Rate (Mode 1) 1X: 150 KB/sec. 2X: 300 KB/sec. 4X: 600 KB/sec. 8X: 1,200 KB/sec. 10X: 1,500 KB/sec. 12X: 1,800 KB/sec. Data Buffer Size 8 MB (3,224 sectors) Average Random Access Time 150 msec. (reading) Sector Size 2,048 – 2,352 bytes Interface USB 2.0/1.1 Burst Transfer Rate USB 2.0 (High speed mode): 480 MB/sec. (max) USB 1.1 (Full speed mode): 12 MB/sec.
Appendix AC adapter Rated Input Voltage SKB2505A : 100 – 120 V AC ± 10% SMB2505A : 220 – 240 V AC ± 10% Rated Input Current SKB2505A : 0.64 A (100 – 120 V AC) SMB2505A : 0.4 A (220 – 240 V AC) Rated Output Voltage +5 V, +12 V DC Rated Output Current 1.5 A Terminal Output Polarity 1 2 3 4 5 1 : +12 V DC 2 : GND 3 : +5 V DC 4 : GND 5 : +5 V DC Operating Environment Temperature 0 – 40 ºC Humidity 20 – 90% RH (no condensation) Dimensions (includes projection) Width: 63.0 mm Height: 31.
Appendix Index A H AC adapter ........................................... 13 Audio CD ............................................. 26 Hard Drive Space ................................... 5 Headphone jack...................................... 9 Headphone volume control .................... 9 High Speed CD-RW discs ..................... 6 Hot swapping ................................... 1, 20 B Buffer Underrun..................................... 3 Buffer Underrun Error ...........................
Appendix S SafeBurn™............................................. 1 Serial Number ........................................ 8 Series A plug........................................ 12 Series B plug ........................................ 12 Session ................................................. 26 Session-at-Once (SAO)........................ 27 Single session....................................... 27 Supported Discs ..................................... 6 Supported Formats ..............................
Distributors and Head Offices / Vertriebs- und Hauptgeschäftsstelle Distributeurs et sièges sociaux / Distribuidores y Casas matrices If you have any questions, please contact your dealer or one of the following companies. Bei weiteren Fragen wenden Sie sich Sitte an Ihren Händler oder eine der folgenden Firmen.