CRX-E320_UCA_cv.fm Page 1 Thursday, June 21, 2007 3:51 PM UCA CD RECEIVER AMPLI-TUNER CD © 2007 YAMAHA ELECTRONICS CORPORATION, USA 6660 ORANGETHORPE AVE., BUENA PARK, CALIF. 90620, U.S.A. YAMAHA CANADA MUSIC LTD. 135 MILNER AVE., SCARBOROUGH, ONTARIO M1S 3R1, CANADA YAMAHA ELECTRONIK EUROPA G.m.b.H. SIEMENSSTR. 22-34, 25462 RELLINGEN BEI HAMBURG, GERMANY YAMAHA ELECTRONIQUE FRANCE S.A. RUE AMBROISE CROIZAT BP70 CROISSY-BEAUBOURG 77312 MARNE-LA-VALLEE CEDEX02, FRANCE YAMAHA ELECTRONICS (UK) LTD.
IMPORTANT SAFETY INSTRUCTIONS CAUTION RISK OF ELECTRIC SHOCK DO NOT OPEN CAUTION: TO REDUCE THE RISK OF ELECTRIC SHOCK, DO NOT REMOVE COVER (OR BACK). NO USER-SERVICEABLE PARTS INSIDE. REFER SERVICING TO QUALIFIED SERVICE PERSONNEL.
FCC INFORMATION (for US customers) 1 IMPORTANT NOTICE: DO NOT MODIFY THIS UNIT! This product, when installed as indicated in the instructions contained in this manual, meets FCC requirements. Modifications not expressly approved by Yamaha may void your authority, granted by the FCC, to use the product. 2 IMPORTANT: When connecting this product to accessories and/or another product use only high quality shielded cables. Cable/s supplied with this product MUST be used. Follow all installation instructions.
CAUTION: READ THIS BEFORE OPERATING YOUR UNIT. 1 2 3 4 5 6 7 8 9 10 11 12 13 14 15 16 17 To assure the finest performance, please read this manual carefully. Keep it in a safe place for future reference. Install this unit in a well ventilated, cool, dry, clean place with at least 10 cm on the top, 10 cm on the left and right, and 10 cm at the back of this unit — away from direct sunlight, heat sources, vibration, dust, moisture, and/or cold.
Contents Features ................................................................... 2 Supplied accessories ............................................... 2 Controls and functions ........................................... 3 Front panel ................................................................. 3 Display....................................................................... 4 Remote control........................................................... 5 Setting the timer ............................
FEATURES Features • Audio CDs, MP3 CDs, and WMA CDs playable • USB supported • Easy operation with MULTI JOG button • Multi-function remote control • DIGITAL OPTICAL OUT jack ■ About this manual • • • • • In this manual, operations that can be performed with either this unit or its remote control are explained using the remote control. Remote control descriptions and illustrations in this manual are based on the U.K. and Europe models unless otherwise specified. y indicates a tip for your operation.
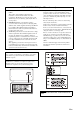
Controls and functions 12 3 4 5 INTRODUCTION Front panel 6 7 INPUT MULTI JOG VOLUME STANDBY/ON USB PORTABLE PHONES SOUND MODE TIMER C D E PUSH-ENTER 8 9 0 AB 1 STANDBY/ON Turns on this unit. Press this button again to set this unit to the standby mode (see page 14). F 9 PORTABLE jack Connects your portable audio device (see page 13). Note 0 PHONES jack Connects your headphones (see page 13).
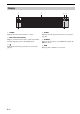
Controls and functions Display 1 2 3 4 TUNED STEREO USB 5 6 1 TUNED Lights up when this unit is tuned in to a station. 2 Multi-information display Displays various information such as a title, track number, and elapsed playing time for disc/USB playback. 3 Lights up when the timer play function is activated (see page 29). 4 En SLEEP 4 SLEEP Lights up when the sleep timer function is activated (see page 30). 5 STEREO Lights up when receiving a strong FM radio signal in the FM stereo mode.
Controls and functions Remote control Operations common to all modes ■ Common functions STANDBY/ON 1 Infrared signal transmitter Sends signals to this unit (see page 8). OPEN/CLOSE 2 1 2 5 6 9 3 2 STANDBY/ON ( ) Turns on this unit or sets it to the standby mode (see page 14). 4 7 8 INDEX DIMMER 0 5 FREQ/TEXT PROG REPEAT MODE A B PTY SEEK START INTRODUCTION The following operations are available for this unit in any input mode.
Controls and functions ■ CD/USB mode The following operations are available for this unit when the CD or USB mode is selected. y STANDBY/ON OPEN/CLOSE 6 1 1 2 5 6 9 2 PROG 7 8 INDEX DIMMER 0 REPEAT MODE A B PTY SEEK START RANDOM TIME/INFO DISPLAY 1 Number keys Input numerals to specify track numbers (see page 18). 4 FREQ/TEXT 3 4 5 3 Press CD or USB to set this unit to the CD or USB mode before carrying out the following operations.
Controls and functions ■ TUNER mode The following operations are available for this unit when the TUNER mode is selected. y 1 OPEN/CLOSE 1 2 5 6 9 0 3 4 7 8 INDEX DIMMER FREQ/TEXT PROG 2 REPEAT MODE DISPLAY START SLEEP FOLDER FILE ENTER PRESET FILE VOLUME 3 MUTE 4 1 Number keys Select the preset station number (see page 26). 2 Radio Data System tuning keys (U.K.
Controls and functions ■ Installing batteries in the remote control ■ Using the remote control Within 6 m (20 feet) Press 30˚ 1 Press cover. 2 Insert the two supplied batteries (AA, R06, UM-3) into the battery compartment. Insert the batteries according to the polarity markings (+ and –). 3 on the battery cover and open the Close the battery cover. ■ To replace batteries Change both batteries when the operation range of the remote control decreases.
CONNECTING SPEAKERS Connecting speakers Follow the procedure below to connect your speakers to this unit. The connection example below uses the Yamaha NXE700 (consisting of two speakers) and its supplied cables. For information on your speakers, refer to the owner’s manual supplied with your speakers. CAUTION Do not connect the power cable of this unit until all cable connections are completed.
Connecting speakers 1 Remove approximately 10 mm (3/8 in) of insulation from the end of each speaker cable and then twist the exposed wires of the cable together to prevent short circuits. 10 mm (3/8 in) 2 Connecting a subwoofer Connecting a subwoofer is optional. The low frequency signals of the front left and right channels are downmixed at the SUBWOOFER OUT jack of this unit. Connect the SUBWOOFER OUT jack on this unit to the INPUT jack on your subwoofer using a subwoofer cable.
CONNECTING ANTENNAS Connecting antennas To enjoy radio on this unit, you need to connect FM/AM antennas to this unit. This product includes an indoor FM antenna and AM loop antenna. If the radio wave reception is weak in your area or you want to improve the radio wave reception, we recommend that you use outdoor antennas. For details, consult the nearest authorized Yamaha dealer or service center. Indoor FM antenna (supplied) 3 Insert one of the AM loop antenna lead wires into the AM ANT terminal.
CONNECTING EXTERNAL COMPONENTS Connecting external components You can connect external components such as a CD or MD recorder to this unit. For information on your component, refer to the owner’s manual supplied with the component. Connecting a CD or MD recorder If you connect your CD or MD recorder to this unit using an optical cable, you can digitally record the audio source played on this unit. You can also select the connected CD or MD recorder as an input source for this unit (see page 32).
Connecting external components Connecting a USB device This unit has a USB port and can access MP3 or WMA files saved on your USB device. Connect your USB device to the USB port on the front panel of this unit. For playback information of a USB device, see page 17. Connecting a portable audio device You can connect your portable audio device to the PORTABLE jack on the front panel of this unit. Use a commercial audio cable with a 3.5 mm mini plug to connect your portable audio device to this unit.
CONNECTING THE POWER CABLE Connecting the power cable After you made all connections, connect the power cables of this unit, subwoofer, and external component to an AC wall outlet respectively. MAINS To an AC wall outlet TUNER AUX FM ANT 75Ω UNBAL. OUT GND AM ANT L R Turning on and off the power • • STANDBY/ON STANDBY/ON ( OPEN/CLOSE ) 1 2 5 6 9 0 3 4 7 8 INDEX DIMMER FREQ/TEXT PROG REPEAT A B PTY SEEK 14 En Press STANDBY/ON to turn on this unit.
ADJUSTING THE CLOCK Adjusting the clock INPUT MULTI JOG STANDBY/ON USB PORTABLE PHONES VOLUME MULTI JOG SOUND MODE TIMER PUSH-ENTER 1 Press TIMER on the front panel, and push MULTI JOG immediately. TIME 00:00 PREPARATION MULTI JOG TIMER Notes • If the time is not set successfully, “00:00” blinks in the front panel display. • The time setting is canceled if the power cable is unplugged for over 4 minutes. Flashes 2 Rotate MULTI JOG to adjust the hour, and push MULTI JOG.
Basic receiver operation Basic receiver operation ■ To select an input source using INPUT on the front panel Selecting the input source Press INPUT repeatedly. Each time you press INPUT, the input source changes as follows. You can enjoy playing back various input sources on this unit. After connecting speakers, antennas, or other component, follow the procedures below to select the input source you want to play. For information on connection methods, see pages 12 and 13.
Basic playback operations for discs and USB devices Basic playback operations for discs and USB devices You can enjoy playing back your audio CDs, USB devices, and MP3 or WMA files recorded on a disc/USB device. Some operations may be different or restricted depending on the disc/USB device. Before playing back, check the compatibility of your disc/USB device with this unit (see page 38).
Basic playback operations for discs and USB devices ■ To search backward/forward You can search a desired point within a track during playback or pause. • For backward search, press and hold b. ■ To select a folder/file for an MP3 or WMA format file 1 • For forward search, press and hold a. ■ To skip tracks • To skip to the start of the current track, press b (or rotate MULTI JOG on the front panel counterclockwise).
Basic playback operations for discs and USB devices Switching the playback information display You can switch the playback information shown in the front panel display of this unit. Available information differs depending on the type of the disc/USB device. Press TIME/INFO repeatedly during playback.
Basic playback operations for discs and USB devices ■ Playback information for MP3 or WMA files recorded on discs/USB devices The following information is available during playback of MP3 files recorded on an audio CD.
Basic playback operations for discs and USB devices Repeat playback (REPEAT) ■ To repeat between two points (A-B repeat) (Audio CD only) You can repeat the specified section of a track by setting two (start and end) points. You can repeat playback of the selected track(s) in your disc/USB device. STANDBY/ON OPEN/CLOSE 1 2 3 5 6 7 8 INDEX DIMMER 9 4 0 FREQ/TEXT PROG During playback, press A-B at the point where you want to start repeat playback.
Basic playback operations for discs and USB devices Programmed playback (PROGRAM) 4 To finish track programming, press PROG. CD/Program 60:59 P09 TTL You can customize the playback order up to 40 tracks stored in a disc/USB device. The example below uses a disc. STANDBY/ON Number keys 5 OPEN/CLOSE 1 2 3 5 6 7 8 INDEX DIMMER 9 0 PROG REPEAT MODE ■ To check or correct the programmed tracks START RANDOM h 1 In the stop mode, press PROG.
Basic playback operations for discs and USB devices Index search (Audio CD only) If your disc contains index numbers, you can start playback from any desired index number. STANDBY/ON Number keys OPEN/CLOSE 1 2 5 6 9 0 3 4 7 8 INDEX DIMMER FREQ/TEXT PROG REPEAT INDEX A B 1 During playback, press INDEX. 2 Use the number keys to enter the index number you want. BASIC OPERATION CD/Index 01 T001 ■ To cancel the index search function Press INDEX again.
FM/AM tuning FM/AM tuning This unit offers several methods for tuning FM/AM radio stations, such as auto tuning, manual tuning, and preset tuning. Follow the procedures below to tune your favorite radio stations. y • Examples of the front panel display in this section are based on the U.K. and Europe models. • To increase the quality of the FM sound under the weak radio wave, press and hold e on the remote control to automatically change the FM radio wave reception mode of this unit to the monaural mode.
FM/AM tuning Presetting radio stations automatically (Auto preset) Presetting radio stations manually (Manual preset) You can use the automatic preset tuning function to store up to 30 FM stations and 20 AM stations with strong signals. s You can also store up to 30 FM stations and 20 AM stations manually.
FM/AM tuning Selecting preset radio stations (Preset tuning) Editing the name of preset radio stations If you preset your favorite radio stations with auto preset (see page 25) or manual preset (see page 25), you can tune the radio stations simply by selecting the preset number.
FM/AM tuning Receiving Radio Data System stations (U.K. and Europe models only) The Radio Data System is a data transmission system for FM stations used mainly in the U.K. and Europe. This unit can receive Radio Data System data such as PS (program service), PTY (program type), RT (radio text), and CT (clock time) when receiving Radio Data System broadcasting stations. 4 / Press PRESET to select the program type. The PTY program type flashes in the front panel display.
FM/AM tuning 5 Press PTY SEEK START. This unit starts searching for the corresponding Radio Data System stations. This unit stops searching when the selected program type is found. The program name shows up on the front panel display. ■ To switch the information display of Radio Data System While receiving Radio Data System, press FREQ/ TEXT. Each time you press the button, the information display changes as follows: PROGRAM SERVICE News PROGRAM TYPE y To cancel PTY SEEK, press PTY SEEK START again.
Setting the timer By setting the timer function, you can set this unit to play the selected input source automatically at the specified time. INPUT MULTI JOG VOLUME STANDBY/ON USB PORTABLE PHONES SOUND MODE TIMER PUSH-ENTER MULTI JOG 1 Press TIMER on the front panel repeatedly until “TIMER” appears on the front panel display, and push MULTI JOG immediately. 2 Rotate MULTI JOG clockwise to select “TIMER ON”, and push MULTI JOG again.
SETTING THE SLEEP TIMER Setting the sleep timer If you set the sleep timer, this unit automatically turns to the standby mode after the specified interval.
Changing the front panel display settings You can switch the information displayed in the front panel display of this unit. Also, you can change the brightness of the front panel display. ■ To dim the display STANDBY/ON Press DIMMER. You can choose your desired brightness of the front panel display between normal (bright), mid dim, and dim.
PLAYING BACK EXTERNAL SOURCES Playing back external sources If you connect an external component to this unit, it plays back the sound source on the component. For details on connection methods, refer to “Connecting external components” (see pages 12 and 13). Note Before making any connections or operating your external component, read the owner’s manual supplied with your component.
Recording audio sources with external components If you connect an external recorder to this unit, you can record sources played back on this unit. For details on the connection methods, refer to “Connecting external components” (see page 12). Note Before making any connections with or operating your external component, read the owner’s manual supplied with your component.
ADJUSTING SOUNDS Adjusting sounds You can adjust the sound settings such as tone and speaker balance on this unit. INPUT MULTI JOG VOLUME STANDBY/ON USB PORTABLE PHONES SOUND MODE TIMER PUSH-ENTER SOUND 1 Press SOUND on the front panel repeatedly to select the setting you want to adjust. Each time you press SOUND, the mode in the front panel display changes as follows: BASS TREBLE BALANCE Normal display (off) BASS: TREBLE: BALANCE: Adjusts the level of the low frequency range.
Troubleshooting In case of a problem with this unit, check the following list first. If you cannot solve your problem with the suggested solutions or if your problem is not listed below, turn off and unplug this unit, and consult the nearest authorized Yamaha dealer or service center. General Problem Power turns on but immediately shuts off. Cause The power cable may be connected improperly. The speaker cable may be shortcircuited.
Troubleshooting Remote control Problem The remote control does not work properly. Cause The remote control may be operated outside its operation range. The remote control sensor on this unit may be exposed to direct sunlight or lighting (inverted fluorescent lamps). The batteries may be worn out. Solution For information on the remote control operation range, refer to “Using the remote control” (see page 8). Change the lighting or orientation of this unit.
Troubleshooting Radio reception ■ FM/AM Problem The preset selecting function (see page 26) does not work. The preset station settings have been cleared. Cause The preset (memory) may have been erased. Solution Preset radio stations again (see page 25). The power to this unit may have been lost more than a week. Plug the power cable into the outlet firmly, and preset the stations again (see page 25). Cause The FM antenna may be connected improperly.
NOTES ON DISCS Notes on discs Disc information This unit is designed for use with audio CD, CD-R, and CD-RW. Also, this unit can play back 8 cm (3 inch) compact discs. y This unit can play back discs bearing any of the logo marks above. A disc logo mark is printed on the disc and the disc jacket. Handling a disc • Do not touch the surface of the disc. Hold a disc by its edge (and the center hole). • Do not leave a disc in the disc tray when not playing.
Glossary ■ MP3 (MPEG-1 Audio Layer-3) ■ Sampling frequency One of the audio compression methods used by MPEG. It employs the irreversible compression method, which achieves a high compression rate by thinning out the data of hardly audible part to human ears. It is said to be capable of compressing the data quantity by about 1/11 (128 kbps) while maintaining a similar audio quality to music CD. The number of sampling (process for digitalizing analog signals) per second.
PRÉCAUTIONS CONCERNANT LA SÉCURITÉ CAUTION RISK OF ELECTRIC SHOCK DO NOT OPEN ATTENTION : POUR RÉDUIRE LES RISQUES D’INCENDIE ET DE DÉCHARGE ELECTRIQUE, NE PAS RETIRER LE COUVERCLE (OU LE PANNEAU ARRIÈRE). AUCUNE PIÈCE INTERNE NE PEUT ÊTRE CHANGÉE PAR L’UTILISATEUR. POUR L’ENTRETIEN, S’ADRESSER À UN PERSONNEL QUALIFIÉ.
Informations de la FCC (Pour les clients résidents aux États-Unis) 1 AVIS IMPORTANT : NE PAS APPORTER DE MOFIDICATIONS À CET APPAREIL ! Ce produit est conforme aux exigences de la FCC s’il est installé selon les instructions du mode d’emploi. Toute modification non approuvée expressément par Yamaha peut invalider l’autorisation, accordée par la FCC, d’utiliser ce produit.
ATTENTION: VEUILLEZ LIRE CE QUI SUIT AVANT D’UTILISER L’APPAREIL. 1 2 3 4 5 6 7 8 9 10 11 12 13 14 15 Pour utiliser l’appareil au mieux de ses possibilités, lisez attentivement ce mode d’emploi. Conservez-le soigneusement pour référence.
Table des matiéres Description .............................................................. 2 Accessoires fournis ................................................. 2 Commandes et fonctions ........................................ 3 Face avant .................................................................. 3 Afficheur.................................................................... 4 Boîtier de télécommande ........................................... 5 Raccordement des enceintes ....................
DESCRIPTION Description • Lecture de CD audio, CD MP3 et CD WMA • Liaison USB • Manipulation facile avec le bouton MULTI JOG • Boîtier de télécommande multifonction • Prise DIGITAL OPTICAL OUT ■ Quelques mots sur ce mode d’emploi • Dans ce mode d’emploi, les opérations qui peuvent être exécutées avec les commandes de cet appareil ou de son boîtier de télécommande, sont décrites comme étant exécutées par ce dernier.
Commandes et fonctions 12 3 4 5 INTRODUCTION Face avant 6 7 INPUT MULTI JOG VOLUME STANDBY/ON USB PORTABLE PHONES SOUND MODE TIMER C D E PUSH-ENTER 8 9 0 AB F 1 STANDBY/ON Cette touche met en service cet appareil. Appuyez une nouvelle fois sur cette touche pour mettre cet appareil en veille (voir page 14). 9 Prise PORTABLE Pour raccorder un lecteur audio portable (voir page 13). Remarque A SOUND Change de paramètres sonores (voir page 34).
Commandes et fonctions Afficheur 1 2 3 4 TUNED STEREO USB 5 6 1 TUNED Ce témoin s’éclaire lorsqu’une station radio est accordée. 2 Afficheur multifonction Affiche plusieurs informations, telles que le titre, le numéro de plage, le temps de lecture écoulé du disque/la lecture USB. 3 Ce témoin s’éclaire lorsque la lecture programmée est en service (voir page 29). 4 Fr SLEEP 4 SLEEP Ce témoin s’éclaire lorsque la minuterie d’arrêt est en service (voir page 30).
Commandes et fonctions Boîtier de télécommande Opérations communes à tous les modes ■ Fonctions communes STANDBY/ON 1 Emetteur de signaux infrarouges Emet des signaux à cet appareil (voir page 8). OPEN/CLOSE 2 1 2 5 6 9 3 2 STANDBY/ON ( ) Met en service ou en veille cet appareil (voir page 14). 4 7 8 INDEX DIMMER 0 5 FREQ/TEXT PROG REPEAT MODE A B PTY SEEK 3 DISPLAY 4 Touches de sélection d’entrée Sélectionne la source d’entrée (voir page 16).
Commandes et fonctions ■ Mode CD/USB Les opérations suivantes peuvent être effectuées sur cet appareil lorsque le mode CD ou USB est sélectionné. y STANDBY/ON OPEN/CLOSE 6 1 1 2 5 6 9 2 PROG 7 8 INDEX DIMMER 0 REPEAT MODE 1 Touches numériques Spécifient les numéros de plages (voir page 18).
Commandes et fonctions ■ Mode TUNER Les opérations suivantes peuvent être effectuées sur cet appareil lorsque le mode TUNER est sélectionné. y 1 OPEN/CLOSE 1 2 5 6 9 0 3 4 7 8 INDEX DIMMER FREQ/TEXT PROG 2 REPEAT MODE A B PTY SEEK START RANDOM TIME/INFO DISPLAY SLEEP FOLDER FILE ENTER PRESET FILE VOLUME 3 MUTE 4 BAND TUNER CD AUX USB PORTABLE Appuyez sur TUNER pour mettre cet appareil en mode TUNER avant d’effectuer les opérations suivantes.
Commandes et fonctions ■ Mise en place des piles dans le boîtier de télécommande ■ Utilisation du boîtier de télécommande Moins de 6 m Appuyez 30˚ sur 1 Appuyez sur sur le couvercle du logement des piles et ouvrez le couvercle. 2 Introduisez les 2 piles fournies (AA, R06, UM-3) dans le logement de piles. Insérez les piles en tenant compte des repères de polarité (+ et –). 3 Refermez le logement des piles.
RACCORDEMENT DES ENCEINTES Raccordement des enceintes Pour raccorder les enceintes à cet appareil, procédez de la manière suivante. Les liaisons illustrées ici sont celles du Yamaha NX-E700 (constitué de deux enceintes) et des câbles fournis avec cet appareil. Pour de plus amples informations sur les enceintes, reportez-vous au mode d’emploi fourni avec vos enceintes. ATTENTION Ne branchez la fiche du cordon d’alimentation de cet appareil que lorsque tous les appareils ont été raccordés.
Raccordement des enceintes 1 Retirez environ 10 mm de gaine de l’extrémité de chaque câble d’enceinte et torsadez les fils nus pour éviter les courtcircuits. 10 mm 2 Raccordement d’un caisson de graves Raccordement d’un caisson de graves en option. Les signaux à basses fréquences des voies avant gauche et droite arrivent mélangés à la borne SUBWOOFER OUT de cet appareil. Reliez la prise SUBWOOFER OUT de cet appareil à la prise INPUT du caisson de graves à l’aide d’un câble prévu à ce effet.
RACCORDEMENT DES ANTENNES Raccordement des antennes Pour écouter la radio sur cet appareil, vous devez raccorder les antennes FM/AM à cet appareil. Une antenne cadre FM intérieure et une antenne cadre AM sont livrées avec cet appareil. Si la réception des ondes est médiocre, ou encore si vous désirez l’améliorer, nous vous suggérons d’envisager l’emploi d’antennes extérieures. Pour de plus amples informations à ce sujet, veuillez consulter le revendeur Yamaha ou un service après-vente.
RACCORDEMENT D’AUTRES APPAREILS Raccordement d’autres appareils Vous pouvez raccorder d’autres appareils, par exemple un enregistreur CD ou MD à cet appareil. Pour de plus amples informations sur les appareils à raccorder, reportez-vous aux modes d’emploi qui les accompagnent. Raccordement d’un enregistreur CD ou MD Si vous raccordez un enregistreur CD ou MD à cet appareil à l’aide d’un câble optique, vous pourrez effectuer des enregistrements numériques des sources audio lues sur cet appareil.
Raccordement d’autres appareils Raccordement d’un dispositif USB Cet appareil est pourvu d’un port USB et peut avoir accès aux fichiers MP3 ou WMA sauvegardés sur un dispositif USB. Raccordez votre dispositif USB au port USB situé sur la face avant de cet appareil. Pour de plus amples informations sur la lecture d’un appareil USB, voir page 17. Raccordement d’un appareil audio portable Vous pouvez raccorder votre appareil audio portable à la prise PORTABLE située sur la face avant de cet appareil.
RACCORDEMENT DU CORDON D’ALIMENTATION Raccordement du cordon d’alimentation Lorsque vous avez relié tous les appareils, branchez les cordons d’alimentation de cet appareil, du caisson de graves et des autres appareils sur des prises secteur. MAINS Vers une prise secteur TUNER AUX FM ANT 75Ω UNBAL.
REGLAGE DE L’HORLOGE Reglage de l’horloge INPUT MULTI JOG STANDBY/ON USB PORTABLE PHONES VOLUME MULTI JOG SOUND MODE TIMER PUSH-ENTER 1 Appuyez sur TIMER sur la face avant, et appuyez immédiatement sur MULTI JOG. TIME 00:00 PRÉPARATIONS MULTI JOG TIMER Remarques • “00:00” clignote dans l’afficheur de la face avant si l’heure n’a pas été réglée correctement. • Le réglage de l’heure est annulé si le cordon d’alimentation reste plus de 4 minutes débranché.
Fonctionnement de base du récepteur Fonctionnement de base du récepteur Sélection de la source d’entrée ■ Pour sélectionner une source avec INPUT sur la face avant Appuyez plusieurs fois de suite sur INPUT. Chaque fois que vous appuyez sur INPUT, la source change de la façon suivante. Divers types de sources peuvent être lues sur cet appareil. Après avoir raccordé les enceintes, les antennes ou un autre appareil, sélectionnez la source souhaitée de la façon suivante.
Fonctions de base pour la lecture de disques et de dispositifs USB Fonctions de base pour la lecture de disques et de dispositifs USB Vous pouvez lire les CD audio, dispositifs USB et fichiers MP3 ou WMA enregistrés sur un disque ou un dispositif USB. Certaines opérations peuvent être différentes ou restreintes pour certains disques ou dispositifs USB. Avant la lecture, assurez-vous que le disque ou le dispositif USB est compatible avec cet appareil (voir page 38).
Fonctions de base pour la lecture de disques et de dispositifs USB ■ Pour effectuer une recherche arrière/ avant Vous pouvez rechercher un passage d’une plage pendant la lecture ou la pause. ■ Pour sélectionner un dossier/fichier pour un fichier de format MP3 ou WMA 1 / Appuyez sur FOLDER pour sélectionner un dossier, puis appuyez sur ENTER. 2 Appuyez sur FILE fichier. 3 Appuyez sur ENTER pour commencer la lecture du dossier/fichier sélectionné.
Fonctions de base pour la lecture de disques et de dispositifs USB Changement des informations concernant la lecture sur l’afficheur Vous pouvez changer les informations concernant la lecture, qui apparaissent sur l’afficheur de la face avant de cet appareil. Les informations disponibles dépendent du type de disque ou du dispositif USB. Appuyez plusieurs fois de suite sur TIME/INFO pendant la lecture.
Fonctions de base pour la lecture de disques et de dispositifs USB ■ Informations concernant la lecture de fichiers MP3 ou WMA enregistrés sur des disques ou des dispositifs USB Les informations suivantes apparaissent pendant la lecture de fichiers MP3 enregistrés sur un CD audio.
Fonctions de base pour la lecture de disques et de dispositifs USB Lecture répétée (REPEAT) ■ Pour répéter un passage (Répétition de A-B) (CD audio seulement) Un passage d’une plage, défini par deux points (début et fin), peut également être répété. La ou les plages sélectionnées sur un disque ou un dispositif USB peuvent être répétées.
Fonctions de base pour la lecture de disques et de dispositifs USB Lecture de programme (PROGRAM) 4 Pour terminer la programmation des plages, appuyez sur PROG. CD/Program 60:59 P09 TTL Vous pouvez programmer l’ordre de lecture de 40 plages au maximum, enregistrées sur un disque ou dispositif USB. Dans l’exemple suivant un disque est utilisé.
Fonctions de base pour la lecture de disques et de dispositifs USB Recherche d’index (CD audio seulement) Si votre disque contient des index, vous pourrez préciser l’endroit où la lecture doit commencer. STANDBY/ON Touches numériques OPEN/CLOSE 1 2 5 6 9 0 3 4 7 8 INDEX DIMMER FREQ/TEXT PROG REPEAT INDEX A B Pendant la lecture, appuyez INDEX. 2 Utilisez les touches numériques pour préciser le numéro de l’index souhaité.
Syntonisation FM/AM Syntonisation FM/AM Cet appareil présente plusieurs méthodes pour l’accord des stations radio FM et AM, par exemple l’accord automatique, l’accord manuel et l’accord de stations présélectionnées. Procédez de la façon suivante pour écouter vos stations radio préférées. y • Les exemples d’affichage sur la face avant dans cette section se réfèrent aux modèles commercialisés au Royaume-Uni et en Europe.
Syntonisation FM/AM Présélection automatique des stations radio (Présélection automatique) Présélection manuelle des stations radio (Présélection manuelle) Vous pouvez sinon utiliser la présélection automatique des stations pour mémoriser les 30 stations FM et 20 stations AM, au maximum, présentant un signal suffisamment puissant. Vous pouvez aussi mémoriser vous-même 30 stations FM et 20 stations AM, au maximum.
Syntonisation FM/AM Sélection d’une station radio présélectionnée (Accord de présélection) Edition du nom des stations radio présélectionnées s Après avoir présélectionné les stations de manière automatique (voir page 25) ou manuelle (voir page 25), vous pouvez accorder une station radio en indiquant simplement son numéro de présélection.
Syntonisation FM/AM Réception des stations du système de diffusion de données radio (Modèles pour le Royaume-Uni et l’Europe uniquement) Le système de diffusion de données radio est un système de transmission d’émissions FM largement utilisé en Europe, y compris au Royaume-Uni. Cet appareil peut recevoir différents types de données via le système de diffusion de données radio, par exemple le nom du programme (PS), le type de l’émission diffusée (PTY), le message alphanumérique (RT) et l’heure (CT).
Syntonisation FM/AM 5 Appuyez sur PTY SEEK START. Cet appareil recherche les émissions correspondantes sur les stations du système de données radio. Lorsqu’il a localisé une émission correspondant au type sélectionné, la recherche s’arrête. Le nom de l’émission apparaît sur l’afficheur de la face avant. ■ Pour changer les informations du système de diffusion de données radio affichées Appuyez sur FREQ/TEXT pendant la réception d’une station du système de diffusion de données radio.
Réglage de la minuterie En réglant la minuterie vous pourrez programmer cet appareil pour qu’il se mette en marche et lise la source sélectionnée à l’heure spécifiée. INPUT MULTI JOG VOLUME STANDBY/ON USB PORTABLE PHONES SOUND MODE TIMER PUSH-ENTER MULTI JOG 1 Appuyez plusieurs fois de suite sur TIMER de la face avant jusqu’à ce que “TIMER” apparaisse sur l’afficheur de la face avant, et appuyez immédiatement sur MULTI JOG.
RÉGLAGE DE LA MINUTERIE D’ARRÊT Réglage de la minuterie d’arrêt Vous pouvez régler cette minuterie pour programmer l’arrêt de cet appareil à l’expiration du temps spécifié.
Changement des réglages apparaissant sur l’afficheur de la face avant Vous pouvez changer les informations qui apparaissent sur l’afficheur de la face avant de cet appareil. Vous pouvez aussi modifier la luminosité de l’afficheur de la face avant. ■ Pour assombrir l’afficheur STANDBY/ON Appuyez sur DIMMER. Vous pouvez choisir une luminosité normale, moyenne ou sombre pour l’afficheur de la face avant.
LECTURE DE SOURCES EXTERNES Lecture de sources externes Cet appareil peut lire la source transmise par un autre appareil, si vous les reliez entre eux. Pour de plus amples informations sur les raccordements, reportez-vous à “Raccordement d’autres appareils” (voir pages 12 et 13). Remarque Avant d’effectuer les liaisons ou de mettre l’autre appareil en service, lisez son mode d’emploi.
Enregistrement de sources audio sur d’autres appareils Si vous reliez un enregistreur à cet appareil, vous pourrez enregistrer les sources reproduites par cet appareil. Pour de plus amples informations sur les raccordements, reportez-vous à “Raccordement d’autres appareils” (voir page 12). Remarque Avant d’effectuer les liaisons ou de mettre l’autre appareil en service, lisez son mode d’emploi.
REGLAGE DES PARAMÈTRES SONORES Reglage des paramètres sonores Vous pouvez régler les paramètres sonores, tels que la tonalité et l’équilibre des enceintes sur cet appareil. INPUT MULTI JOG VOLUME STANDBY/ON USB PORTABLE PHONES SOUND MODE TIMER PUSH-ENTER SOUND 1 Appuyez plusieurs fois de suite sur SOUND de la face avant pour sélectionner le paramètre que vous souhaitez régler.
Guide de dépannage Si cet appareil ne semble pas fonctionner normalement, vérifiez les points de la liste suivante. Si l’anomalie constatée n’est pas mentionnée, ou bien si les mesures suggérées sont sans effet, mettez l’appareil hors service, débranchez la fiche du cordon d’alimentation et adressez-vous au revendeur ou le service après-vente Yamaha le plus proche. Généralités Anomalies L’alimentation se coupe immédiatement après la mise en service.
Guide de dépannage Boîtier de télécommande Anomalies Le boîtier de télécommande ne fonctionne pas convenablement. Causes possibles Vous utilisez le boîtier de télécommande hors de sa portée de fonctionnement. Le capteur de télécommande de cet appareil est exposé à la lumière du soleil ou d’un éclairage (lampe fluorescente à convertisseur). Les piles sont épuisées. Solution Pour de plus amples informations à ce sujet, reportez-vous à “Utilisation du boîtier de télécommande” (voir page 8).
Guide de dépannage Réception de la radio ■ FM/AM Anomalies L’accord d’une station présélectionnée (voir page 26) ne fonctionne pas. Les stations présélectionnées ont été effacées. Causes possibles Le contenu de la mémoire de présélections est effacé. Solution Présélectionnez de nouveau des stations (voir page 25). L’alimentation de cet appareil a été coupée plus d’une semaine.
REMARQUES SUR LES DISQUES Remarques sur les disques Informations sur les disques Les CD, CD-R et CD-RW peuvent être lus sur cet appareil. Les disques compacts de 8 cm peuvent également être lus. y De façon générale, cet appareil est capable de lire les disques portant les logos ci-dessus. Les logos sont imprimés sur les disques et sur leur pochette. Manipulation des disques • Ne touchez pas la surface des disques. Tenez un disque par le bord et le centre.
Glossaire ■ MP3 (MPEG-1 Audio Layer-3) ■ Fréquence d’échantillonnage Une des méthodes de compression du son utilisée par MPEG. Il s’agit d’une méthode de compression irréversible, atteignant un très haut niveau de compression en réduisant les données inaudibles à l’oreille humaine. Elle est capable de comprimer à environ 1/11e (128 kbps) les données audio tout en conservant une qualité sonore similaire à la qualité des CD musicaux.
CRX-E320_UCA_cv.fm Page 1 Thursday, June 21, 2007 3:51 PM UCA CD RECEIVER AMPLI-TUNER CD © 2007 YAMAHA ELECTRONICS CORPORATION, USA 6660 ORANGETHORPE AVE., BUENA PARK, CALIF. 90620, U.S.A. YAMAHA CANADA MUSIC LTD. 135 MILNER AVE., SCARBOROUGH, ONTARIO M1S 3R1, CANADA YAMAHA ELECTRONIK EUROPA G.m.b.H. SIEMENSSTR. 22-34, 25462 RELLINGEN BEI HAMBURG, GERMANY YAMAHA ELECTRONIQUE FRANCE S.A. RUE AMBROISE CROIZAT BP70 CROISSY-BEAUBOURG 77312 MARNE-LA-VALLEE CEDEX02, FRANCE YAMAHA ELECTRONICS (UK) LTD.