
User's Manual


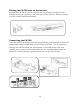


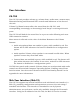
Table Of Contents
- Online Resources
- Contents
- Introduction
- About this Manual
- Getting Started
- User Interface
- Dialer Application
- Basic Operations
- Configuring the CS-700
- Configuring using the Web User Interface
- Configuring using the Service Application
- Configuring using a Provisioning Server, Option 66
- Configuring using a Provisioning Server, Option 150
- Provisioning file
- Provisioning file parameters (All Models)
- Using the Application Programming Interface (API)
- USB API functions
- Telnet / SSH interface
- USB/Telnet/SSH CLI Commands
- usb-conn-status
- speaker-volume
- ringer-volume
- speaker-mute
- mute
- camera-ptz-home
- camera-image-defaults
- camera-backlight
- camera-mute
- camera-pan
- cam-pan-left
- cam-pan-right
- camera-tilt
- cam-tilt-up
- cam-tilt-down
- camera-zoom
- cam-zoom-in
- cam-zoom-out
- cam-apply-defaults
- cam-image-apply-defaults
- status
- status-all
- call-info
- start-time
- dial
- answer
- hangup
- hold
- resume
- swap
- join
- transfer
- vm-count
- do-not-disturb
- dtmf
- registration
- Upgrading the Device Firmware
- Appendix
- Limited Warranty and Limitation of Liability

13
Placing the CS-700 unit on the bracket
Position the CS-700 in such a way that the two hooks in the front of the
bracket fit into the cavities on the lower part of the CS-700. Ensure that the
CS-700 is safely held by the hooks.
Connecting the CS-700
Once the CS-700 is safely positioned on the hooks of the bracket, connect the
power cable and the USB cable to the CS-700 as shown. If it is planned to
manage the CS-700 using the web browser or as a SIP phone (-SP, -DS
models), also connect the network cable into the corresponding connector.
Secure the cables using the provided cable ties to the CS-700 unit.