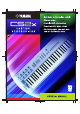
FORMANT SHAPING / FM SYNTHESIS TONE GENERATOR Formant Shaping Synthesis:The Evolution of FM New synthesis technology — FS Synthesis (Formant shaping / FM synthesis) — creates sound with characteristics and flexibility similar to the human voice for extraordinary sonic depth and expressive control.
Intro 12/4/98 11:08 AM Page 3 SPECIAL MESSAGE SECTION This product utilizes batteries or an external power supply (adapter). DO NOT connect this product to any power supply or adapter other than one described in the manual, on the name plate, or specifically recommended by Yamaha. WARNING: Do not place this product in a position where anyone could walk on, trip over ,or roll anything over power or connecting cords of any kind.
Intro 12/4/98 11:08 AM Page 4 PRECAUTIONS PLEASE READ CAREFULLY BEFORE PROCEEDING * Please keep these precautions in a safe place for future reference. WARNING Always follow the basic precautions listed below to avoid the possibility of serious injury or even death from electrical shock, short-circuiting, damages, fire or other hazards. These precautions include, but are not limited to, the following: • Do not open the instrument or attempt to disassemble the internal parts or modify them in any way.
cCS2x_Basic 12/10/98 5:25 PM Page 5 About This Manual CONTENTS Congratulations on your purchase of the CS2x Control Synthesizer! And thank you for choosing Yamaha. Getting Started .................................... 6 Welcome To The World Of CS2x Control Synthesis .......... 6 Main Features .......................................................................... 7 Top Panel ................................................................................ 8 Rear Panel................................
cCS2x_Basic 12/10/98 5:25 PM Page 6 Getting Started Getting Started CONTROL SYNTHESIZER Welcome To The World Of CS2x Control Synthesis Whether you’re a beginner and the CS2x is your very first professional synth, or you’re a seasoned professional making a living entertaining the masses — or whether you style yourself as anything in between — you’re sure to find the CS2x to be one of the finest electronic musical instruments you’ll ever own. It’s certainly one of the most fun.
cCS2x_Basic 12/10/98 5:25 PM Page 7 The CS2x is designed for maximum real-time control during performance. This makes it the ideal choice for Dance DJs, Rhythm And Rhyme MCs, Drum & Bass and Techno musicians — and anyone else whose music thrives on a cutting edge synth sound. It’s also an ideal multitimbral “module” fit for any type of MIDI system. Following is a list of the CS2x’s main features.
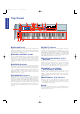
cCS2x_Basic 2/3/99 2:00 PM Page 8 Getting Started Top Panel PHONES L/MONO R DC IN STANDBY ON FOOT FOOT VOLUME CONTROLLER FOOT SWITCH INPUT TO HOST HOST SELECT IN OUT THRU MIDI OUTPUT ARPEGGIATOR TEMPO TYPE P BEND RANGE CONTROL SYNTHESIZER PERFORMANCE STORE MULTI VOLUME ATTACK DECAY RELEASE ASSIGN 1 DATA ARPEGGIO HOLD UTILITY SHIFT PART LAYER OCTAVE 2 PRESET USER 1 – + 8 HPF CUTOFF LPF CUTOFF RESONANCE ASSIGN 2 , PQR 4 5 DEF GHI 2 .
cCS2x_Basic 2/3/99 2:00 PM Page 9 ^ [MULTI] button The NUMERIC KEYPAD is used in conjunction with the [ENTER/YES] and [-/NO/QUICK PC] buttons and has several functions. In Performance mode or Multi Play mode you can use it to select a specific Performance or voice program number (page 24) as well as for selecting a program number when the QUICK PROGRAM CHANGE function is active (page 41).
cCS2x_Basic 2/3/99 2:00 PM Page 10 Getting Started Rear Panel MIDI THRU OUT IN HOST SELECT PC-2 PC-1 MIDI Mac TO HOST INPUT ASSIGNABLE FOOT FOOT FOOT SWITCH CONTROLLER VOLUME STANDBY ON OUTPUT DC IN R PHONES L/MONO 1 MIDI terminals 6 FOOT CONTROLLER jack The MIDI terminals let you connect external MIDI devices such as a sampler, drum machine, sequencer, or computer using MIDI cables.
cCS2x_Basic 12/10/98 Page 11 Setting Up The CS2x This section steps you through the basic connections required for integrating the CS2x into everything from a simple amplification system to a full-blown MIDI music studio. Also included is information about turning on the power and listening to the preprogrammed “Demo” songs. Basic Connections The CS2x By Itself There are many ways to incorporate the CS2x into a simple or expanded music system. Below are a few examples to get you started.
cCS2x_Basic 12/10/98 5:25 PM Page 12 Getting Started Connecting A Foot Controller Connecting External MIDI Components In addition to the on-board SOUND CONTROL knobs and other real-time controllers, you can connect an optional Yamaha FC7 or FC9 foot controller to the CS2x’s FOOT CONTROLLER jack and assign one of many available parameters to be controlled by foot.
cCS2x_Basic 12/10/98 5:25 PM Page 13 Direct Connection To Macintosh If you have an Apple Macintosh not equipped with an external MIDI interface, perform the following operation: By connecting a MIDI data storage device such as the Yamaha MDF3 MIDI Data Filer to the CS2x you can save a single User Performance or all the User Performances and Utility parameters to floppy disk using MIDI data “Bulk Dump” operations. 1. Set the HOST SELECT switch to Mac. 2.
cCS2x_Basic 12/10/98 5:25 PM Page 14 Getting Started Powering Up! Playing The Demo Songs Now that you’ve made all your audio and MIDI connections properly, you’re ready to switch on the power and get down to the business of enjoying the CS2x in all its glory! Here’s the basic procedure: Before you get carried away exploring the many Performances and other great features of the CS2x, you may want to listen to the preprogrammed demonstration songs. 1.
cCS2x_Basic 12/10/98 Page 15 Getting To Know The CS2x CS2x Tone Generation Generating Sounds Electronically For the sake of the uninitiated, let’s take a look at some basic facts regarding the nature of sounds and how they are generated electronically.
cCS2x_Basic 12/10/98 5:25 PM Page 16 Getting Started Oscillators, Filters, Amplifiers And Envelope Generators Synthesizers rely on three distinct electronic components to imitate or “synthesize” the soundwaves of musical instrument voices as well as create entirely new sounds. In traditional analog synthesis the fundamental source sound pitch is generated by an oscillator, its tone is created by a filter, and its volume is determined by an amplifier.
cCS2x_Basic 12/10/98 5:25 PM Page 17 The diagram and accompanying information below explains the CS2x’s tone generation architecture and the key components which go into making up an AWM2 voice, as well as the types of controls and parameters which you can apply to the voice.
cCS2x_Basic 12/10/98 5:25 PM Page 18 Getting Started Normal Voices And Drum Voices As explained in the previous section, an AWM2 waveform is the fundamental source of a CS2x “voice”, which also consists of oscillator, filter and amplifier settings. The CS2x has two types of voices in memory which are preset at the factory: normal voices and drum voices. A normal voice is a typical pitched musical instrument voice such as piano, strings, brass, etc.
cCS2x_Basic 12/10/98 5:25 PM Page 19 The eight SOUND CONTROL knobs give you direct access to a variety of important parameters of the Performance. Turning any SOUND CONTROL knob to the left or right will offset its parameter values accordingly (based on knob positions: left for negative values, right for positive values). Each SOUND CONTROL knob has a center detent, or stop position which represents the original value of the parameter.
cCS2x_Basic 12/10/98 5:25 PM Page 20 Getting Started Following is a description of the types of parameters available for editing: Panel Edit Parameters COMMON Available in Performance mode only, the COMMON parameters in the Common Edit 1 and 2 menus apply to the entire currently selected Performance. Except for the PORTA SWITCH setting, it doesn’t matter which Layer is currently selected, since common parameters apply to all Layer voices equally.
cCS2x_Basic 12/10/98 5:25 PM Page 21 Performance Edit Mode Performance Edit mode is activated when you change a setting for any of the parameters available in the panel edit menus using the Parameter Value [UP/DOWN] buttons — which may affect all Layer voices equally (COMMON menus) or only the currently selected Layer voice (LAYER menus).
cCS2x_Basic 12/10/98 5:25 PM Page 22 Getting Started Multi Play Mode Utility Mode Multi Play mode — accessed by pressing the [MULTI] button — is primarily used for multitimbral song production and playback of up to 16 individual instrument “Parts” when an external MIDI sequencer is connected to the CS2x. The diagram below lists the available parameters for each Part. Utility mode lets you modify System, MIDI and controller assignment parameters which affect both Performance and Multi Play mode.
cCS2x_Basic 12/10/98 Page 23 CS2x Quick Tour This section provides you with a quick guided tour through all the fundamental CS2x operations in Performance mode, such as use of real-time control, Scene, Arpeggiator, panel edit and Performance Store functions. It also provides information about Multi Play mode and multitimbral operation, including Multi Play in Performance mode.
cCS2x_Basic 12/10/98 5:25 PM Page 24 Getting Started ■ NUMERIC KEYPAD Entry Method Category Codes Another way to select a Performance number in the currently selected bank is by using the NUMERIC KEYPAD. This is especially handy if you know the precise number of the Performance you want. Here’s how: Each Performance (or voice in Multi Play mode) has a “Category” code assigned to it which helps you organize your Performances and voices by type for easier visual access.
cCS2x_Basic 12/10/98 5:25 PM Page 25 By rolling the MODULATION wheel forward and back you can apply as much modulation to the tone as you want. The type of modulation which can be applied is determined by the three MW parameter settings in the panel edit matrix (page 46). After selecting a performance, you’re ready to start playing the CS2x! As you do, you’ll want to try out the various control and other features available in Performance mode. Let’s continue with our step-by-step tour.
cCS2x_Basic 12/10/98 5:25 PM Page 26 Getting Started ■ SCENE CONTROL Function Performance Editing And Store 1. Press both [SCENE] buttons simultaneously. The red LED to the left of both [SCENE] buttons will light to indicate the SCENE CONTROL function is active.
cCS2x_Basic 12/10/98 5:25 PM Page 27 The handy ARPEGGIATOR HOLD function lets you play a chord to start the automatic arpeggio, then take your hands away from the keyboard and have the arpeggios continue in a loop without stopping. When you play another chord the arpeggio will change accordingly.
cCS2x_Basic 12/10/98 5:25 PM Page 28 Getting Started ■ Arpeggiator Parameter Settings Arpeggio Pattern Length The main Arpeggiator parameters include TYPE, TEMPO and SUBDIVIDE. TYPE determines the arpeggio characteristics (up, down, up and down, random, etc.). TEMPO of course controls the speed of the arpeggiated chords. SUBDIVIDE determines the arpeggio timing resolution (eighths, sixteenths, dotted notes, etc.).
cCS2x_Basic 12/10/98 5:25 PM Page 29 Although the features we’ve explained so far no doubt provide you with a wealth of tone control and great music making options, we’ve really only just begun to scratch the surface of the CS2x’s power! You can set the amount of Reverb and Chorus for each Layer using the EFFECT REV SEND and CHO SEND parameters, respectively, located in the Layer Edit 4 menu. When EFFECT VARI SEND is set to “on”, however, Reverb and Chorus send levels are applied equally to all Layers.
cCS2x_Basic 12/10/98 5:26 PM Page 30 Getting Started Change the Layer voice.
cCS2x_Basic 12/10/98 5:26 PM Page 31 Sequencer Setup If you’re using a stand-alone hardware-based sequencer, connect it to the CS2x’s MIDI terminals using MIDI cables. If a computer, connect it to the TO HOST terminal using the appropriate cable. (For details about connections, see page 12.) Multi Play mode is especially suitable for multitimbral song production with up to 16 individual musical instrument “Parts” using an external MIDI sequencer or computer running a MIDI music sequencer program.
cCS2x_Basic 12/10/98 5:26 PM Page 32 Getting Started Part Assign Part Parameter Edit You can assign any of the 586 XG normal voices (including the 128 GM voices) or 20 drum voices to each of the 16 Parts. In Multi Play mode there is only one menu of edit parameters available, as printed directly above each [UP/DOWN] button. The position of the EDIT PARAMETER ROTARY switch is irrelevant. 1. Use the PART/LAYER [-] and [+] buttons to select a desired Part, as displayed in the LCD. 1.
cCS2x_Basic 12/10/98 5:26 PM Page 33 XG represents the current state-of-the-art in multitimbral MIDI technology. In the early days of MIDI, it was very difficult to take music data created using one particular sequencer and play it back on another because the instruments assigned to the different parts were different for each maker and even individual composer.
cCS2x_Basic 2/2/99 11:01 AM Page 34 Getting Started Using The CS2x With XGworks 1. Set the CS2x MIDI Performance receive channels. Using Utility mode, set the CS2x MIDI Receive Channel for the Performance (Part 1 = “A”), as well as Parts 5 ~ 16 (page 63), as the situation merits. The XGworks Music Sequencer software application is a powerful all-in-one “DTM” Desktop Music composing, editing and mixing system for Windows95. XGworks is especially suited for the CS2x.
cCS2x_Basic 2/2/99 11:01 AM Page 35 4. Set the volume and panning for each Part. XGworks lets you use MIDI program change messages (page 75) to call up the CS2x’s voices. There are many ways to do so. Take a look at the Track View Window. You can control the CS2x’s volume and panning for each Part using control change messages (page 72) to change the values of each, over a range of 0 ~ 127. From XGworks you can also change these manually using the Mixer Window.
cCS2x_Basic 2/2/99 11:02 AM Page 36 Getting Started 6. When Performance data transmission is finished, stop the XGworks recording. Use the List Window to confirm the data received by XGworks. You can see that the MIDI data format (BULK DUMP “3-6-4-2”, as shown in the separate “Data List” book) hexadecimal messages have been programmed. Transmitting Performance Data 1. In Performance mode, select the CS2x Performance you want to transmit. 2.
cCS2x_Basic 2/2/99 11:02 AM Page 37 Getting Started Simply Dynamite: Yamaha MIDI Magic Yamaha has a full line-up of professional MIDI instruments from which you could choose in order to build up a MIDI music system that’s perfect for your own individual needs.
cCS2x_Ref 12/10/98 5:11 PM Page 38 38
cCS2x_Ref 12/10/98 5:12 PM Page 39 Feature Reference
cCS2x_Ref 12/10/98 5:12 PM Page 40 Feature Reference Following is a description of each function in the various modes along with available parameter settings. Feature Reference Performance Mode 1 Performance Mode In Performance mode you can choose from 256 Preset and 256 User Performances. A Performance consists of up to four “Layer” voices playing simultaneously. You can easily edit each Layer within a Performance so that each sounds and behaves uniquely.
cCS2x_Ref 12/10/98 5:12 PM Page 41 2. Press [ENTER] to confirm the number (1 ~ 128). The Performance name and number you have selected will display in the LCD. The Category name will be shown next to the Performance name. Category VWX YZ' Performance Edit Mode You can edit any Preset or User Performance to create your own unique Performance by changing the various COMMON and LAYER parameter settings.
cCS2x_Ref 12/10/98 5:12 PM Page 42 3. Select a parameter. Press the Parameter Value [UP/DOWN] button corresponding to the parameter you want to edit once to select the parameter and engage Performance Edit mode. The name of the parameter and current settings will display in the LCD.