C Gebruikers Handleiding
SPECIALE MEDEDELINGEN PRODUCT VEILIGHEIDSMARKERINGEN: De produkten van Yamaha zijn voorzien van labels met daarop onderstaande markeringen, of stempels van deze illustraties. De uitleg van deze illustraties staat hieronder. Houd a.u.b. rekening met alle waarschuwingen op deze pagina, en de waarschuwingen in het veiligheidsinstructiegedeelte.
VOORZORGSMAATREGELEN LEES ALLES ZORGVULDIG DOOR VOOR U VERDER GAAT * Bewaar deze voorzorgsmaatregelen op een veilige plaats voor later. WAARSCHUWING Volg altijd de algemene voorzorgsmaatregelen op die hieronder worden opgesomd om te voorkomen dat u gewond raakt of zelfs sterft als gevolg van elektrische schokken, kortsluiting, schade, brand of andere gevaren.
Inleiding ○ ○ ○ ○ ○ ○ ○ ○ ○ ○ ○ ○ ○ ○ ○ ○ ○ ○ ○ ○ ○ ○ ○ ○ ○ ○ ○ ○ ○ ○ ○ ○ ○ ○ ○ ○ ○ ○ ○ ○ ○ ○ ○ ○ ○ ○ ○ ○ ○ ○ ○ ○ ○ ○ ○ ○ ○ ○ ○ Hartelijk dank voor de aanschaf van de Yamaha CS6x/CS6R Control Synthesizer. Uw nieuwe CS6x/CS6R synthesizer maakt gebruik van het hoog aangeprezen AWM2 synthese systeem, waarmee uitzonderlijk realistische geluiden kunnen worden gecreëerd.
Inhoud Basisgedeelte Referentiegedeelte De Knoppen & Aansluitingen ................... 6 De Voice Mode ..........................................74 Alvorens de CS6x te Gebruiken ...............12 Voice Play ................................................. 74 Stroomvoorziening ................................... 12 Voice Edit ................................................. 78 Aansluitingen ........................................... 13 Voice Job Mode ......................................
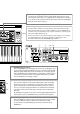
Basisgedeelte De Knoppen en Aansluitingen Regelpaneel CS6x 1 [VOLUME]-knop (Pag. 20) Past het mastervolume aan. Draai de knop naar rechts om het signaalniveau van de OUTPUTL/R-aansluitingen en de PHONES-aansluiting te verhogen. GAIN MIC/LINE 2 LINE 1 L/MONO PHONES A / D INPUT R OUTPUT 1 2 FOO INDIVIDUAL OUTPUT VOLU FILTER VOLUME 2 OCTAVE [UP]- en [DOWN]-knoppen (Pag. 28) (alleen op de CS6x) Druk op één van beide knoppen om het nootbereik van het toetsenbord in octaven te transponeren.
6 Sound Control Knoppen (Pag. 40) (alleen op de CS6x) U kunt de effecten en klankkleur hiermee in realtime wijzigen. Er zijn knoppen voor Filter Cutoff Frequentie en Resonantie, voor de Tijd parameter van de Envelope Generator (EG), en voor Reverb- en Chorus Effecten. Andere knoppen staan in verband met de Arpeggiator, Portamento, Phrase Clip en Sequencer.
LCD (Liquid Crystal Display) Dit is een verlichte uit twee regels bestaande display. 9 [SHIFT]-knop (Pag. 23) In de Voice- of de Performance Play Mode verschijnt als u op de [SHIFT]knop drukt een scherm waarin u de Octave parameter en het MIDI verstuurkanaal (pag. 23) kunt wijzigen. In de verschillende Edit Modes verschijnt een menu-scherm als u op deze knop drukt terwijl u aan aan de [PAGE]-knop draait, en kunt u snel heen en weer springen tussen de verschillende Edit Mode schermen (pag. 23).
^ [ENTER]-knop (Pag. 24, 25) Bij het selecteren van een Geheugen of Bank van een Voice of Performance voert u met deze knop de selectie daadwerkelijk uit. Gebruik deze knop tevens bij het verrichten van Job- of Store-handelingen. & [DEC/NO]-knop (Pag. 24) Verlaag hiermee de waarde van de parameter waarop de cursor is geplaatst. Annuleer hiermee tevens Job- of Store-handelingen. POWER * [INC/YES]-knop (Pag. 24) Verhoog hiermee de waarde van de parameter waarop de cursor is geplaatst.
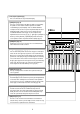
Achterpaneel 3 CARD-sleuf (Pag. 171) Steek hier een Memory Card in om verschillende data met het instrument uit te wisselen. Lees aandachtig de voorzorgsmaatregelen door over het gebruik van een Memory Card (pag. 171) alvorens u een card gaat gebruiken. 1 POWER-schakelaar (Pag. 19) Zet hiermee de synthesizer aan of uit. 2 Stroomaansluiting (Pag. 12) Steek hier het vrouwtje van het bijgeleverde stroomsnoer in, alvorens de stekker in een stopcontact te stoppen. 4 MIDI IN-, OUT-, en THRU-aansluitingen (Pag.
5 HOST SELECT-schakelaar (Pag. 16) Hier kunt u het soort computer selecteren dat op de synthesizer is aangesloten via de TO HOSTaansluiting. 6 TO HOST-aansluiting Sluit hier een computer aan middels een los verkrijgbaar seriële computerkabel (pag. 16). THRU MIDI OUT IN 8 FOOT SWITCHaansluiting (Pag. 18, 48) Sluit hier een los verkrijgbare voetschakelaar (FC4 of FC5) aan.
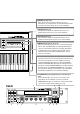
Alvorens de CS6x te Gebruiken In dit gedeelte wordt uitgelegd hoe u de synthesizer aan moet sluiten op een stroombron, op audio en MIDI-apparaten en op een computersysteem. Schakel de synthesizer pas aan als u al de nodige aansluitingen heeft gemaakt. We raden u aan om dit gedeelte aandachtig door te lezen alvorens u de synthesizer gaat gebruiken.
Aansluitingen Het ○ ○ ○ ○Aansluiten ○ ○ ○ ○ ○ ○ ○ ○ ○op ○ ○ Externe ○ ○ ○ ○ ○ ○ ○Audio ○ ○ ○ ○ ○Apparatuur ○ ○ ○ ○ ○ ○ ○ ○ ○ ○ ○ ○ ○ ○ ○ ○ ○ ○ ○ ○ ○ ○ ○ ○ ○ ○ ○ ○ ○ ○ ○ ○ Aangezien de synthesizer niet is voorzien van ingebouwde luidsprekers, zult u het geluid via externe audio apparatuur moeten beluisteren. U kunt eventueel ook een hoofdtelefoon gebruiken. Er zijn verschillende methoden om externe audio apparatuur aan te sluiten, zoals getoond wordt in de volgende illustraties. N.B.
Luidspreker Luidspreker Versterker L Versterker R Mengpaneel OUTPUT L R L R Mengpaneel OUTPUT L R Hoofdtelefoon 1 2 3 4 5 6 7 8 9 10 11 12 13 14 15 16 L R 1 PHONES OUTPUT L / MONO INDIVIDUAL OUTPUT1 R INDIVIDUAL OUTPUT2 2 3 4 5 6 OUTPUT L / MONO 7 8 9 R 10 11 12 13 14 15 16 INDIVIDUAL OUTPUT1 L R INDIVIDUAL OUTPUT2 C CS6R PHONES CS6x Hoofdtelefoon N.B.
Het ○ ○ ○ ○Aansluiten ○ ○ ○ ○ ○ ○ ○ ○ ○van ○ ○ ○ Externe ○ ○ ○ ○ ○ ○ ○MIDI-Apparatuur ○ ○ ○ ○ ○ ○ ○ ○ ○ ○ ○ ○ ○ ○ ○ ○ ○ ○ ○ ○ ○ ○ ○ ○ ○ ○ ○ ○ ○ ○ ○ ○ ○ ○ ○ ○ U kunt externe MIDI-apparatuur met een MIDI-kabel (los verkrijgbaar) aansluiten en besturen vanaf deze synthesizer. U kunt de interne geluiden van de synthesizer tevens met een extern MIDI-toetsenbord of sequencer besturen. In dit gedeelte maakt u kennis met de verschillende toepassingen van MIDI. N.B.
Besturen van een Ander MIDI-Apparaat via de MIDI THRU-aansluiting Externe MIDIsequencer Externe MIDIsynthesizer MIDI OUT MIDI IN MIDI IN MIDI THRU HOST SELECT PC-2 PC-1 MIDI Mac C MIDI IN MIDI OUT Externe MIDI-synthesizer CS6x/CS6R Met bovenstaande MIDI-aansluitingen kunt u MIDI-data via de MIDI OUT-aansluiting versturen, terwijl de MIDI-data van de externe sequencer naar een externe MIDI-synthesizer kunnen worden verstuurd via de MIDI THRU-aansluiting. N.B.
2: MIDI-Interface naar MIDI IN- en OUT-aansluiting Met de MIDI-Interface van de Computer HOST SELECT PC-2 PC-1 MIDI Mac Seriële kabel MIDI IN MIDI OUT Personal System/V PS/V C MIDI OUT MIDI IN CS6x/CS6R Personal System/V IBM Computer met MIDI interface Met een externe MIDI-Interface HOST SELECT MIDI Interface PC-2 PC-1 MIDI Mac MIDI OUT MIDI IN MIDI IN MIDI OUT C Computer CS6x/CS6R N.B. U moet de juiste MIDI-software (sequencer, editor, enz.) in uw computersysteem gebruiken.
Het ○ ○ ○ ○Aansluiten ○ ○ ○ ○ ○ ○ ○ ○ ○van ○ ○ ○ Verschillende ○ ○ ○ ○ ○ ○ ○ ○ ○ ○ ○ Controllers ○ ○ ○ ○ ○ ○ ○ ○ ○ ○ ○ ○ ○ ○ ○ ○ ○ ○ ○ ○ ○ ○ ○ ○ ○ ○ ○ ○ ○ ○ ○ ○ Het achterpaneel van de CS6x bevat verschillende controller-aansluitingen, waaronder FOOT SWITCH, SUSTAIN, FOOT CONTROLLER, FOOT VOLUME en BREATH. U kunt los verkrijgbare controllers hierop aansluiten - zoals een voetschakelaar (de FC4 of FC5), voetpedaal (de FC7) en Breath Controller (BC3, enz.
Het Aanzetten De ○ ○ ○Aanzet-Volgorde ○ ○ ○ ○ ○ ○ ○ ○ ○ ○ ○ ○ ○ ○ ○ ○ ○ ○ ○ ○ ○ ○ ○ ○ ○ ○ ○ ○ ○ ○ ○ ○ ○ ○ ○ ○ ○ ○ ○ ○ ○ ○ ○ ○ ○ ○ ○ ○ ○ ○ ○ ○ ○ ○ ○ ○ Als u alle nodige aansluitingen heeft gemaakt tussen uw synthesizer en de andere apparaten, moet u eerst controleren of alle volumeniveaus op nul staan.
Als u een Memory Card in de CARD-sleuf van het instrument heeft geplaatst of als u een los verkrijgbare Plug-in Board heeft geïnstalleerd, dan kan het zijn dat er eerst andere schermen verschijnen voordat het Voice- of Performance Play Mode-scherm verschijnt. Als er een eerder gebruikte Memory Card in de CARD-sleuf is geplaatst, dan verschijnt een scherm waarin wordt getoond dat er files in het externe (EXT) geheugen worden geladen.
Basishandelingen In dit gedeelte wordt een globale uitleg gegeven over de werking van de synthesizer. Een Mode Selecteren Er zijn verschillende bedieningsmodes - Voice Play Mode, Phrase Clip Mode, enz. - die het u makkelijker maken om efficiënt met de verschillende functies van de synthesizer te werken. N.B. Een overzicht van de verschillende Modes is op pag. 35 te vinden. Er zijn aparte Play Modes voor Voices, Performances en Phrase Clips.
4 Phrase Clip Edit Mode (pag. 146) Druk op de [EDIT]-knop in de Phrase Clip Play Mode. Druk, om naar een andere Mode te gaan, op de desbetreffende knop van die Mode of druk op de [EXIT]knop om naar de Phrase Clip Play Mode terug te keren. GEN Name) Ctgry Common a-Z 0-? Cursor [--:Init Perf ] 5 Phrase Clip Job Mode (pag. 154) Druk op de [JOB]-knop in de Performance Play Mode.
Een Scherm Selecteren ▼ U kunt tussen schermen heen en weer schakelen door aan de [PAGE]-knop te draaien en vervolgens op de [SHIFT], PROGRAM/PART, [EXIT] en [ENTER]knoppen te drukken. Sommige Modes bevatten meerdere schermen. In dat geval kunt u met de [PAGE]-knop, terwijl u de [SHIFT]-knop vasthoudt, naar een specifiek scherm gaan. Als u bijvoorbeeld in de Voice Edit Mode de [PAGE]-knop gebruikt terwijl u de [SHIFT]-knop ingedrukt houdt, dan wordt het volgende scherm getoond.
De Cursor Verplaatsen [ENTER]-knop ○ ○ ○ ○ ○ ○ ○ ○ ○ ○ ○ ○ ○ ○ ○ ○ ○ ○ ○ ○ ○ ○ ○ ○ ○ ○ ○ ○ ○ Met de knoppen ([A], [B], [C], [1] of [2]) kunt u, terwijl u de [SHIFT]-knop ingedrukt houdt, de cursor ( ) naar de betreffende parameter in het scherm verplaatsen, zonder de waarde ervan te wijzigen. EF BYPASS ▼ Gewoonlijk worden met het indrukken van de [ENTER]-knop de parameterwaarden ingevoerd. In sommige gevallen echter, verschijnt het volgende scherm, waarin u gevraagd wordt om de [ENTER]knop in te drukken.
[DATA]-knop ○ ○ ○ ○ ○ ○ ○ ○ ○ ○ ○ ○ ○ ○ ○ ○ ○ ○ ○ ○ ○ ○ ○ ○ ○ ○ ○ ○ ○ Wijzig met deze knop de waarde van de parameter waarop de cursor staat. Draai de knop met de klok mee om de waarde met één (stap) te verhogen, of tegen de klok in om de waarde te verlagen. Soorten Parameters (Absoluut en Relatief) Er zijn verschillende manieren om parameters in te stellen. Bij sommige parameters moet u direct numerieke instellingen of letterkarakters invoeren.
De Demo Afspelen Er worden verschillende demosongs bij deze synthesizer meegeleverd. U kunt ze als volgt afspelen. N.B. Verzeker u ervan dat de synthesizer gereed is voor het afspelen. Zie voor details het gedeelte “Alvorens de CS6x Te Gebruiken” op pag. 12. N.B. In het “SEQ Demo” scherm worden alle data in het interne geheugen van het instrument (System, Internal Voices, Phrase Clip e.d.) overschreven door de data van de demo song. Belangrijke data moeten eerst op Memory Card worden opgeslagen (pag.
Voices en Performances Een Voice Bespelen Gebaseerd op AWM2 synthese, biedt deze synthesizer u verschillende soorten vooringestelde Voices (256 Normal Voices en 8 Drum Voices). U kunt tevens uw eigen Voices creëren en opslaan in het interne geheugen (INT) van het instrument of op een externe Memory Card (EXT). Het interne en externe geheugen kan elk maar liefst 128 Normal Voices en 2 Drum Voices bevatten.
De Drum Voices worden in een apart gedeelte van ieder geheugen bewaard, en kunnen als volgt worden opgeroepen. Nu kunt u, als u het toetsenbord van de CS6x of een extern toetsenbord dat is aangesloten op de CS6R bespeelt, de geselecteerde Voice bespelen. Luister ook eens naar de andere Voices. • Om naar de Preset Drum Geheugens (PRE:DR1 ~ DR8) te gaan: Druk tegelijkertijd op de MEMORY [PRE1] en [PRE2]-knoppen.
Een Performance Bespelen In de Performance Play Mode kunt u elk van de 128 interne en 64 externe (Memory Card) Performances selecteren en bespelen. Een Performance is een set Voices die met de ingebouwde (of externe) sequencer kan worden gebruikt. Met Performances kunt u uw synthesizer tevens instellen voor multitimbrale werking. Iedere Performance kan maximaal 16 Parts bevatten, toegewezen met verschillende Voices, plus extra Parts voor Phrase Clip, A/D INPUT en Plug-in Boards.
3 Selecteer een Performancenummer met de [DATA]-knop of de [INC/YES]○ ○ ○ ○ ○ ○ ○ ○ ○ ○ en ○ ○ ○[DEC/NO]-knoppen ○ ○ ○ ○ ○ ○ ○ ○ ○ ○ ○ ○ ○ ○ ○ ○ Draai de [DATA]-knop met de klok mee of druk op de [INC/YES]-knop om het Performance nummer te verhogen. Draai de knop tegen de klok in of druk op de [DEC/NO]-knop om het Performance nummer te verlagen.
Een Overzicht van de CS6x/CS6R In dit gedeelte wordt een overzicht gegeven van de vele functies van de CS6x/CS6R. De CS6x/CS6R-hardware bestaat uit een aantal gedeelten, zoals in het volgende diagram wordt getoond.
Toongeneratorgedeelte In dit gedeelte worden geluiden voortgebracht aan de hand van de informatie die wordt ontvangen van het toetsenbord en de controllers. Het volgende voorbeeld toont welke weg het signaal van een Element in de Voice Mode aflegt. Toongeneratorgedeelte OSC (Oscillator) PITCH FILTER AMP (Amplitude) Naar Effect Units Verstuurt de golfvorm van de verschillende Elementen. Iedere Voice bestaat uit maximaal vier Elementen.
• Advanced DX/TX Plug-in Board (PLG150-DX) De geluiden van de DX7 zijn op dit Plug-in Board te vinden. In tegenstelling tot op PCM gebaseerde oplossingen, maakt dit Plug-in Board geen gebruik van gesampelde golfvormen. Het maakt in plaats daarvan gebruik van het FM-klankopwekkingssysteem van de DX-serie synthesizers en geeft een volledig betrouwbare weergave. De geluiden hiervan zijn compatibel met die van de DX7, en het Plug-in Board kan zelfs DX7-data ontvangen via MIDI bulk dump.
Effectengedeelte Het geluid van een Voice of Performance kan met effecten worden bewerkt. Het instrument bevat twee Insertie Effect Units plus een Reverb Effect Unit (met 12 soorten reverb) en een Chorus Effect Unit (met 23 soorten chorus). Elk van de Insertie Effect Units biedt een verscheidenheid aan effecten, en de units zelf kunnen parallel of in serie worden geschakeld.
Over de Modes De CS6x/CS6R bevat verschillende Modes die u kunt selecteren voor de handeling die u wilt verrichten.
Voices Een Voice is een geluid dat wordt gecreëerd middels de vele in de synthesizer in te stellen parameters. In de Voice Play Mode kunt u deze Voices selecteren en afspelen. In de Performance Play Mode kunnen verschillende Voices (in deze Mode worden ze Parts genoemd) worden gestapeld en tegelijk met een toetsenbord of een sequencer worden afgespeeld. Er zijn vier groepen Voices beschikbaar (Preset 1, Preset 2, Internal en External).
Een Overzicht van Voices/Waves Iedere Voice bestaat uit maximaal vier Elementen. Ieder Element maakt gebruik van een golfvorm van hoge kwaliteit. Voice Element 1~4 Element Golfvorm AWM2: 479 Preset golfvormen Intern zijn er twee soorten Voices: Normal Voices en Drum Voices. Normal Voices zijn voornamelijk muziekinstrument-achtige geluiden die over het hele bereik van het toetsenbord kunnen worden bespeeld.
Waves Waves zijn golfvormen die worden gebruikt in de Elementen die de Voice vormen. Er zijn 479 preset Waves van hoge kwaliteit beschikbaar. Zoals in de volgende illustratie wordt getoond, kunt u bij het creëren van een Voice de Wave selecteren die als Element moet worden gebruikt en vervolgens het niveau, de toonhoogte, klankkleur en andere parameters ervan instellen.
Performances Een Performance bestaat uit maximaal 20 Parts. Deze Parts kunnen bestaan uit een Normal Voice, Drum Voice, Phrase Clip, A/D Input Part of een Plug-in 1/2 Part. Als u de Layer-schakelaar van de verschillende Parts (maximaal vier) aanzet, dan kunt u rijke, gestapelde geluiden in Performance Play Mode bespelen. U kunt ook splits creëren waarin verschillende Parts kunnen worden toegewezen aan verschillende delen op het toetsenbord.
Gemakkelijke Realtime Bewerking Sound ○ ○ ○ ○ ○ ○Controlknoppen ○ ○ ○ ○ ○ ○ ○ ○ ○ ○ ○ ○ ○(alleen ○ ○ ○ ○ ○ ○op ○ ○ de ○ ○ ○CS6x) ○ ○ ○ ○ ○ ○ ○ ○ ○ ○ ○ ○ ○ ○ ○ ○ ○ ○ ○ ○ ○ ○ ○ ○ ○ ○ ○ ○ ○ Met de Sound Controlknoppen kunt u onder het spelen het karakter van de klank wijzigen en u kunt effecten wijzigen die worden toegepast op de huidig geselecteerde Voice of Part van een Performance. De functies van elk van de knoppen worden hieronder uitgelegd.
Ideaal bij Live-Optredens Veel functies en kenmerken van de synthesizer maken deze ideaal voor gebruik bij live-optredens. De functies worden hieronder uitgelegd. 2 1 Het Gebruik van Scene-knoppen (CS6x) (Pag. 45) Met de Sound Controlknoppen kunt u geluiden met gemak bewerken.
1 Arpeggiator De arpeggiator is in het bijzonder geschikt voor dance/techno-muziekgenres. U kunt ieder van de 128 Arpeggio-soorten aan iedere Voice, Performance of Clip Kit toewijzen en het tempo aanpassen. U kunt ook de Arpeggio Mode (de wijze waarop de arpeggio afspeelt als u een toets aanslaat) en de Play Effecten instellen om uw eigen originele groove te creëren. Arpeggio-informatie kan via de MIDI OUT-aansluiting worden verstuurd. N.B.
5 Zet de arpeggiator met Knop [1] of de [ARPEGGIO]-knop op het regelpaneel aan. Als u vervolgens op het toetsenbord speelt dan hoort u het drumpatroon. Het Selecteren van het Arpeggio Type 1 Druk op de [EDIT]-knop in de Voice Play Mode. Hierop gaat u naar de Voice Edit Mode en het scherm waar u de laatste bewerkingen maakte verschijnt. MODE VOICE N.B. U kunt meerdere patronen tegelijk afspelen door meerdere toetsen op het toetsenbord aan te slaan.
Buiten het Nootlimiet-bereik kunt u het toetsenbord normaal bespelen, zonder dat arpeggio wordt toegepast. U kunt dus met uw linkerhand blokakkoorden spelen met de Arpeggiator en met uw rechterhand melodielijnen in het rechtergedeelte (upper) van het toetsenbord spelen. Het Instellen van Tempo Met Knop [C] kunt u het tempo tussen 25 en 300 BPM instellen. Deze parameterinstelling wordt door de Arpeggiator gebruikt.
2 Scene Knoppen (CS6x) 2 Creëer het geluid dat u als een Scene wilt opslaan met de Sound Controlknoppen en de Assignable Knoppen [1]/[2]. Scenes worden gebruikt om de posities van de FILTER [CUTOFF]/[RESONANCE]-knoppen, EG [ATTACK]/[DECAY]-knoppen en Assignable Knoppen [1]/[2] in het geheugen op te slaan. Ze kunnen later met één druk op een knop worden opgeroepen.
Het Gebruik van de SCENE [CONTROL]-knoppen ○ ○ ○ ○ ○ ○ ○ ○ ○ ○ ○ ○ ○ ○ ○ ○ ○ ○ ○ ○ ○ ○ ○ ○ ○ ○ ○ ○ ○ Met de SCENE [CONTROL]-knoppen kunt u een soepele overgang van de ene naar de andere Scene creëren, of zelfs een mix van de instellingen van beide Scenes creëren. De illustratie hieronder toont bijvoorbeeld twee verschillende groepen knopinstellingen (A en B), toegewezen aan respectievelijk de SCENE [1]- en [2]-knop.
3 Het Gebruik van de Controllers 3 Selecteer met Knop [B] “04:FootCtrl” (voetpedaal) CTRL Scene) Sys SHIFT PAGE A Scene Control 04[FootCtrl] B C 1 2 De CS6x is uitgerust met een Pitch Bend Wiel, een Modulatie Wiel en een Ribbon Controller. Zowel de CS6x als de CS6R is uitgerust met regelpaneelknoppen [A], [B], [C], [1], en [2], waarmee vele parameters bestuurd kunnen worden. DATA PART/ELEMENT 4 Ga met de [PAGE]-knop naar het CTL Assign2 (Voice Control Assign 2) scherm.
Ribbon Voetpedaal ○ ○ ○ ○ ○ ○ Controller ○ ○ ○ ○ ○ ○ ○ ○ ○(CS6x) ○ ○ ○ ○ ○ ○ ○ ○ ○ ○ ○ ○ ○ ○ ○ ○ ○ ○ ○ ○ ○ ○ ○ ○(CS6x) ○ ○ ○ ○ ○ ○ ○ ○ ○ ○ ○ ○ ○ ○ ○ ○ ○ ○ ○ De Ribbon Controller is een aanslaggevoelige controller waarmee u bijv. Filter Cutoff in realtime kunt besturen door met uw vinger lichtjes van links naar rechts over het oppervlak te gaan. Normaal gesproken zal de waarde van de eraan toegewezen parameter toenemen als uw vinger naar rechts gaat, maar u kunt het ook andersom instellen.
Aftertouch ○ ○ ○ ○ ○ ○ ○ ○ ○ ○ ○ ○ ○ ○ ○ ○ ○ ○ ○ ○ ○ ○ ○ ○ ○ ○ ○ ○ ○ Door Control Sets te creëren, kunt u de geluiden op vele manieren wijzigen. Met aftertouch kunt u bijv. vibrato aan een geluid toevoegen door meer druk op een toets op het toetsenbord uit te oefenen als u deze vasthoudt. (Bij de CS6R moet een aftertouch-gevoelig toetsenbord worden aangesloten). Dit biedt realtime expressie en besturing. Met aftertouch kan een grote reeks parameters worden bestuurd (pag. 84).
Parameters Toewijzen aan Knoppen [A], [B] en [C] In de volgende procedure wordt uitgelegd hoe u een gewenste parameter kunt toewijzen aan Knop [A], [B] of [C]. U kunt alle algemene systeemparameters toewijzen (voor alle Play Modes) en alle MIDI Control Change Nummers. In het voorbeeld wordt Knop [A] ingesteld om Reverb Return te besturen. Control Sets en Externe MIDI Control In een Control Set worden de controllers aan interne parameters van de synthesizer toegewezen.
5 Wijs met Knop [C] PCH-Crs (Pitch:Coarse) toe aan de Bestemming (Dest) parameter. Parameters Toewijzen aan Knop [1] en [2] In de volgende procedure wordt uitgelegd hoe u een gewenste parameter aan Knop [1] of [2] kunt toewijzen. U kunt aan iedere Voice (of Part in een Performance) of Clip Kit controllers toewijzen.
3 Selecteer met Knop [C] “01:ModWheel” (Modulatie Wiel). Parameters met een Voetpedaal Besturen Door een los verkrijgbaar voetpedaal (zoals de FC7) op de FOOT CONTROLLER-aansluiting op het achterpaneel van de synthesizer aan te sluiten, kunt u allerlei parameters met uw voet besturen, waardoor u uw handen vrij heeft. In het volgende voorbeeld laten we u zien hoe u het voetpedaal als Modulatie Wiel kunt gebruiken.
4 Phrase Clips 1 Druk, om naar de Utility Mode te gaan, op de [UTILITY]-knop. Echte (bestaande) geluiden kunnen worden opgenomen of geladen op de synthesizer en afgespeeld als muziekinstrumentgeluiden. De golfvormdata die in de synthesizer worden vastgehouden worden Phrase Clips genoemd. Deze Phrase Clips worden gecreëerd en afgespeeld in de Phrase Clip Mode (pag. 142). Een basisoverzicht van Phrase Clips volgt hieronder.
Sample Phrase ○ ○ ○ ○ ○ ○ ○Frequentie ○ ○ ○ ○ ○ ○ ○ ○ ○en ○ ○ Bit ○ ○ ○Resolutie ○ ○ ○ ○ ○ ○ ○ ○ ○ ○ ○ ○ ○ ○ Clips ○ ○ ○ ○ ○Afspelen ○ ○ ○ ○ ○ ○ ○ ○ ○ ○ ○ ○ ○ ○ ○ ○ ○ ○ De illustratie toont als voorbeeld een sinus golfvorm. Bij het opnemen (samplen) van de sinus golfvorm, neemt de A/D converter feitelijk “foto’s” van de golfvormniveaus op vaststaande tijdsintervallen. U kunt uw Phrase Clips op de volgende drie manieren afspelen: Ten eerste, het “loop” afspelen.
Een ○ ○ ○ ○Clip ○ ○ ○ Kit ○ ○ ○Creëren ○ ○ ○ ○ ○ ○ ○ ○ ○ ○ ○ ○ ○ ○ ○ ○ ○ ○ ○ 2 Druk nu op de PHRASE CLIP-knop (de bijbehorende LED gaat branden) om naar de Phrase Clip Mode te gaan. U kunt Phrase Clips aan toetsen op het toetsenbord toewijzen (C0 t/m C6) en deze live of met een sequencer afspelen. U kunt ook allerlei parameters in de verschillende Phrase Clips bewerken. De toewijzing op het toetsenbord van Phrase Clips wordt Clip Kit genoemd en u kunt er vier creëren.
7 Druk op de [ENTER]-knop en u bevindt zich in de Recording Standby status. In het scherm verschijnt “Waiting for trigger...” EF BYPASS EXIT Ga, in de Phrase Clip Edit Mode, met de [PAGE]knop naar het OSC Asgn-scherm. Gewoonlijk zult u de Phrase Clip aan een toets op het toetsenbord toewijzen (de Clip Toets).
B Controleer of C1 is geselecteerd en druk vervolgens op de [ENTER]-knop. De variatieparameters van [Clip 001] worden getoond. N.B. F Selecteer vervolgens ‘Variation 2’ maar stel de Play parameter deze keer in op ‘loop’. Als u hierop de D1-toets aanslaat, dan wordt de Phrase Clip als een loop tussen het Start- en Eindpunt van de opname afgespeeld. Als u wilt dat er een deel van de Phrase Clip als loop wordt afgespeeld, dan moet u de Start/Loop/ Eindpunten instellen.
[Clip 001] is nu omgekeerd als ‘Variation 1’ en één maat lang geloopt als ‘Variation 2’, en beide Variaties kunnen worden afgespeeld door het aanslaan van de C1- en D1-toetsen. Op dezelfde manier kunt u de punten wijzigen van variaties 3 t/m 8 en andere loops instellen als de loops van variaties 1/2. M Stel met Knop [1] de Type parameter in, die het soort loopwijziging bepaalt (oftewel welk deel van de loop wordt gemodificeerd).
5 Andere Bruikbare Functies Portamento ○ ○ ○ ○ ○ ○ ○ ○ ○ ○ ○ ○ ○ ○ ○ ○ ○ ○ ○ ○ ○ ○ ○ ○ ○ ○ ○ ○ ○ Portamento creëert een soepele overgang in toonhoogte van de ene noot naar de volgende voortgebrachte noot, en deze functie kan in de Voice Mode of de Performance Mode worden gebruikt. U kunt portamento aan/uitzetten met de PORTAMENTO [ON/OFF]-knop op het regelpaneel. Als deze wordt aangezet, dan gaat de LED van de PORTAMENTO [ON/OFF]-knop branden.
Voice Edit Er zijn 256 Normal Voice presets en 8 Drum Voice presets beschikbaar. U kunt deze bewerken om nieuwe Voices te creëren, of nieuwe Voices opbouwen vanuit het niets. U kunt maximaal 128 van deze nieuwe/bewerkte Normal Voices en 2 nieuwe/ bewerkte Drum Voices in het interne gebruikersgeheugen of op de externe Memory Card opslaan. 1 Het Selecteren van een Voice om te Bewerken Ga, door op de [VOICE]-knop te drukken, naar de Voice Play Mode.
Heen en Weer Schakelen Tussen Schermen en Naar Instellingen Gaan Nadat u een Common Edit scherm of een editscherm van een Element (1 t/m 4) heeft geselecteerd, kunt u met de [PAGE]-knop naar andere schermen gaan. Element1 Element2 COMMON AMP Scale)Ofst1 EL12_34 + 0 Element3 SHIFT PAGE A B Ofst2 + 0 C Pfst3 - 21 1 Ofst4 - 35 2 DATA Element4 PART ELEMENT Er zijn vele parameters in een scherm beschikbaar.
4 OSC (Oscillator Schermen) • QED (Common Quick Edit) Deze parameters besturen voornamelijk het volume en de klankkleur van de Voice en u kunt er gemakkelijk het algehele geluid mee wijzigen. Veel van deze parameters kunnen direct worden ingesteld met de Sound Controlknoppen op het regelpaneel van de CS6x. QEDíLevel) C 1234 Vol 127 In deze schermen kunt u voornamelijk de parameters instellen die de golfvormen besturen waarop de Voice is gebaseerd.
OSCíLimit) EL1234 Note Limit C-2 - G 8 6 FLT (Filter) en FEG (Filter EG) Schermen Vel Limit 1 - 127 Met het filter kunt u de klankkleur van de verschillende Elementen wijzigen, door boventonen (harmonischen) in de golfvorm van het Element aan te passen. Er zijn verschillende soorten filters, maar het basisprincipe is hetzelfde.
7 AMP (Amplitude) en AEG (Amplitude EG) schermen 8 LFO (Low Frequency Oscillator) Schermen Stelt het volume in van de verschillende Elementen na toepassing van de OSC (Oscillator), PITCH en FILT (Filter) parameters, en tevens het uiteindelijke algehele volume van het signaal dat naar de uitgangen wordt gestuurd. Het signaal van de verschillende Elementen wordt op het gespecificeerde volume naar de volgende Effect Unit verstuurd.
Effecten Effecten ○ ○ ○ ○ ○ ○ ○ in ○ ○ de ○ ○ ○Voice ○ ○ ○ ○ ○Mode ○ ○ ○ ○ ○ ○ ○ ○ ○ ○ ○ ○ In de laatste stappen van het programmeren kunt u de effectparameters instellen om het karakter van het geluid nog meer te wijzigen. Systeem Effecten worden op het algehele geluid toegepast, of het nu om een Voice, Performance, Song of iets anders gaat. Insertie Effecten worden daarentegen individueel op iedere Voice toegepast.
Systeem Effecten Mengpaneel Reverb Chorus Insertie Effect 1/2 1 2 3 4 5 16 6 Part 1~16 Effect Bypass Hier kunt u effecten tijdelijk uit- of aanzetten met de [EF BYPASS]-knop. Alvorens u deze functie gebruikt, moet u het uit te schakelen effect selecteren in het MSTR EF Bypass scherm van de Utility Mode (pag. 164). U kunt ook meerdere effecten selecteren.
Het Gebruik als Master Keyboard (Performance Mode) 2 Selecteer “Common” met Knop [A], en ga naar het GEN M.Kbd (General Master Keyboard) scherm met de [PAGE]-knop. Zoals eerder is uitgelegd biedt deze Synthesizer verscheidene handige functies die goed gebruikt kunnen worden bij live optredens. In dit gedeelte worden een paar voorbeelden gegeven van combinaties van deze functies, die aan uw specifieke wensen kunnen voldoen. GENíM.
9 Ga met de [PAGE]-knop naar het ARP Type (Arpeggio Type) scherm. Selecteer aan (“on”) bij “Switch”. ARPíType) Type Tempo Part01 UpOct1:Sq 120 Switch on ZONE4 ZONE1 Hold off In stappen 6 t/m 9 heeft u de instellingen van het linkergedeelte voor de Arpeggiator performance gemaakt. Het bespeelt de Voice die is toegewezen aan Part 1, gebaseerd op MIDI-ontvangstkanaal 1. N.B. N.B. Zie pag. 82 voor gedetailleerde instellingen van Arpeggiator. N.B. N.B.
A Draai aan Knop [A] en selecteer een Part voor een Zone. In dit voorbeeld selecteren we Phrase Clip Part voor Zone 1, Part 2 en 3 voor respectievelijk Zone 2 en 3. We selecteren geen intern Part voor Zone 4 aangezien Zone 4 alleen is ingesteld om speeldata te versturen via de MIDI OUT-aansluiting. Selecteer eerst Phrase Clip Part (PartCL) voor Zone 1. Na het selecteren van een Zone krijgt u het MKB Transmit scherm te zien. U kunt een subscherm met de [PAGE]-knop selecteren om een Zone op te zetten.
2 Selecteer “Common” met Knop [A] en ga met de [PAGE]-knop naar het GEN M. Kbd (General Master Keyboard) scherm. U hoeft verder geen instellingen voor Zone 4 te maken, aangezien deze niet is bedoeld voor een intern Part en reeds is ingesteld om spelinformatie uit te sturen via de MIDI OUT-aansluiting in stappen 5 t/m 0.
8 Stel op dezelfde manier als in stappen 5 t/m 7 het Upper Part in. Selecteer “PartP1” als Lower Part, ga met de [PAGE]-knop naar het MIX Vce (Mix Voice) scherm en selecteer een andere Voice (Plug-in Voice) als de Voice van het Lower Part. Ga naar het LYR Mode (Layer Mode) scherm om de Layer-schakelaar (Layer) uit (“off”) te zetten en stel RcvCh (MIDI-ontvangstkanaal) in op “2”. N.B. Over Note Limit (Nootlimiet) Nootlimiet instellingen zijn beschikbaar in de Master Keyboard Mode, Part en Voice.
De CS6x als Multitimbrale Toongenerator Gebruiken (Performance Mode) 4 Ga vervolgens met de [PAGE]-knop naar het Mix Niveau-scherm, stel het volume van het piano part in en, indien nodig, ook de panpositie, chorus- en reverb sendniveaus. Details zijn te vinden op pag. 130. In de Performance Mode kunt u de CS6x als een multitimbrale toongenerator gebruiken, in combinatie met muzieksoftware op een computer of met externe sequencers.
Live Spelen Terwijl er een Songfile Afspeelt ○ ○ ○ ○ ○ ○ ○ ○ ○ ○ ○ ○ ○ ○ ○ ○ ○ ○ ○ ○ ○ ○ ○ ○ ○ ○ ○ ○ ○ Als u de songfile met de eerder toegewezen piano-, bas- en drumparts afspeelt, dan kunt u de Performance zo instellen dat u een ander Part live kunt bespelen. Performance Part 1 Solo Voice Stuurkan. 2 Part 2 Track 2 Bass Stuurkan. 3 Part 3 Basachtige Voice Ontvangstkan. 3 Track 3 Drums Stuurkan. 10 Part 10 Solo Voice Layer=on Stuurkan. 2 Part 2 Track 2 Stuurkan.
Referentiegedeelte De Voice Mode Geheugen/Voice Programnummer Voice Play PRE1 verwijst naar Preset 1, PRE2 naar Preset 2, PRE naar Preset Drums, INT naar Intern, EXT naar Extern, PLG1 naar Plug-in Board 1 en PLG2 naar Plug-in Board 2. Het Voice Program-bereik is genummerd van 001 t/m 128. Het Drum Voicebereik is genummerd van DR1 t/m DR8.
3. Voice Categorie/Naam Voice ○ ○ ○ ○ ○ Program ○ ○ ○ ○ ○ ○ ○ ○Selectie ○ ○ ○ ○ ○ ○ ○ ○ ○ ○ ○ ○ ○ ○ ○ ○ Voice Categorie Er zijn vier manieren om een Voice te selecteren. De twee karakters links van de Voice Naam geven aan tot welke instruments- of geluidscategorie de voice behoort. • • • • Met Met Met Met de de de de BANK/PROGRAM-knoppen (CS6x) [DEC/NO]- en [INC/YES]-knoppen [DATA]-knop Category Search-functie Details over Categorienamen zijn te vinden op pag. 80. N.B.
3 Druk op een PROGRAM-knop ([1] t/m [16]) om een Programnummer te selecteren. Het ○ ○ ○ ○Selecteren ○ ○ ○ ○ ○ ○ ○ ○ van ○ ○ ○ ○Drum ○ ○ ○ ○ ○Voices ○ ○ ○ ○ ○ ○ ○ ○ Het selecteren van een Drum Voice gaat anders dan het selecteren van een Normal Voice Voices kunnen worden geselecteerd door de Memory-, Bank- en Programnummers in te stellen hetgeen in de drie stappen hierboven uit wordt gelegd. In de LCD wordt ook de geselecteerde voice getoond.
Het Selecteren van User Drums (INT: DR1/2) en (EXT: DR1/2) Met de Voice Category Search-functie • Druk de MEMORY [INT]- en [EXT]-knoppen tegelijk in om het Interne/Externe (INT/EXT) Geheugen van de User Drum Voice te selecteren. Druk vervolgens op de PROGRAM-knoppen [1] t/m [4] (alleen op de CS6x) om respectievelijk User Drum Voice INT:DR1 (Internal Drum 1), INT:DR2 (Internal Drum 2), EXT:DR1 (External Drum 1) en EXT:DR2 (External Drum 2) te selecteren.
[DATA]-knop (of [INC/YES]/[DEC/NO]-knop) Hier kunt u door de Voices in alle Geheugens in de gespecificeerde Categorie scrollen. Als u de [DATA]knop met de klok mee draait (of als u op de [INC/ YES]-knop drukt), springt u naar het volgende Voicenummer in dezelfde Categorie, in omhooglopende volgorde. Als u de [DATA]-knop tegen de klok indraait (of op de [DEC/NO]-knop drukt), dan springt u naar het vorige Voicenummer, in aflopende volgorde.
Voice Store De bewerkte instellingen van de huidige Voice gaan verloren zodra u een andere Voice of Mode selecteert. Sla, om verlies van belangrijke data te voorkomen, met de Voice Store-functie de bewerkte Voice op. Details over de Voice Store-procedure zijn eerder gegeven (pag. 116). Element1 Element2 COMMON N.B.
PEG Release PCH Scale (Pitch Scale) Element Filter FLT Type (Filter Type) FLT HPF (High Pass Filter) FLT Sens (Filter Sensitivity) FEG VelSens (FEG Velocity Sensitivity) FEG Time FEG Level FEG Release FLT KeyFlw (Filter Key Follow) FLT Scale (Filter Scale Break Point) FLT Scale (Filter Scale Offset) Element Amplitude AEG VelSens (AEG Velocity Sensitivity) AEG Time AEG Level AEG Release AEG KeyFlw (AEG Key Follow) AEG Scale (AEG Scale Break Point) AEG Scale (AEG Scale Offset) Element LFO (Low Frequency Oscil
GEN Other (Algemeen Overigen) Common Quick Edit Er zijn verschillende parameters beschikbaar voor Micro Tuning en om te bepalen hoe het gegenereerde geluid wordt uitgestuurd. Verschillende parameters besturen de geluidseigenschappen van de Voice. Veel daarvan kunnen worden bewerkt met de Sound Controlknoppen op het regelpaneel van de CS6x. Er zijn vier schermen. GENíOther) Mode C 1234 poly Assign single MicroTuning 31:Indian QED QED QED QED ■ Mode Selecteert het monofoon of polyfoon afspelen.
■ Sustain Stelt het niveau in waarop de Voice blijft klinken als u de toets op het toetsenbord ingedrukt houdt. U kunt de parameter ook wijzigen met de [SUSTAIN] knop op het regelpaneel van de CS6x. QED Filter (Snel Filter Bewerken) Deze parameters besturen de filters die de klankkleur van de Voice beïnvloeden. Als u tegelijk de LPF (Low Pass Filter) en HPF (High Pass Filter) gebruikt, dan beïnvloeden de parameters op de QED Filter pagina alleen de LPF.
■ Switch (schakelaar) Schakelt de Arpeggiator aan of uit. U kunt dit ook met de [ARPEGGIO ON/OFF]-knop op het regelpaneel van de CS6x doen. ■ Vel Mode (Aanslaggevoeligheidsmode) Stelt de aanslaggevoeligheid van de Arpeggio in. Er zijn 2 modes. ❏ Instellingen: ❏ Instellingen: off, on original: Er worden vooringestelde aanslaggevoeligheidswaarden gebruikt in de Arpeggio Sequence. thru: Aanslaggevoeligheidsinformatie van de door u aangeslagen toetsen worden in de Arpeggio sequence gebruikt.
Common Controller CTL Bend (Pitch Bend) Er zijn acht Control Instellingen beschikbaar. U kunt de Controller parameters instellen van Portamento, het Pitch Bend Wiel en van de verschillende Elementen in een Voice. Hier kunt u de hoeveelheid instellen waarmee het Pitch Bend Wiel de toonhoogte van de Voice wijzigt.
■ Src (Bron) Stelt de Controller in waarmee de functie wordt bestuurd die is geselecteerd in 'Dest'. De vol gende negen controllers zijn beschikbaar: Common LFO (Low Frequency Oscillator) Er zijn verschillende instellingen mogelijk voor de LFO. De LFO genereert lage frequentie-signalen en kan, indien toegepast op pitch/filter/amplitude/enz. parameters, worden gebruikt om vibrato, wah, tremelo en andere effecten mee te creëren.
■ Key Reset (Toetsaanslag Reset) Stelt in of de LFO iedere keer wordt gereset als er een toets wordt aangeslagen. De volgende drie instellingen zijn beschikbaar. trpzd (trapeze) ❏ Instellingen: off, each-on, 1st-on off (uit) De LFO is automatisch (geen synchronisatie) en start een golfvorm op elk moment dat u op het toetsenbord speelt.
■ Hold (aanhouden) Stelt de tijdslengte in waarin de LFO op het maximum niveau blijft. Een hogere waarde betekent een langere Hold Tijd. LFO Fade LFOíFade) Delay C 1234 127 FadeIn 127 Hold FadeOut 127 127 ❏ Instellingen: 0 ~ 127 ■ Delay (vertraging) Stelt de tijd in alvorens de LFO effectief wordt. Een hogere waarde betekent een grotere vertraging.
■ Ctgry (Effect Categorie) Stelt de Categorie van het Effect in. Selecteer een gewenste Categorie en druk op de [ENTER]-knop. Het eerste Effect Type in die Categorie wordt automatisch opgeroepen. ■ Dest (Bestemming) Stelt de parameters in die worden bestuurd (gemoduleerd) door de LFO Wave. ❏ Instellingen: AMD, PMD, FMD, RESO (Resonantie), PAN, ELFOSpd (Element LFO Snelheid) ❏ Instellingen: Details zijn te vinden in de Effect Type-lijst van de aparte Datalijst.
EFF Rev (Reverb) Element OSC (Oscillator) Hier kunt u het Reverb Effect Type selecteren en vervolgens op de [ENTER]-knop drukken om de parameters ervan in te stellen. Hier kunt u de parameters instellen van de Elementen (Waves) waaruit de Voice bestaat. Iedere Voice kan uit maximaal vier Elementen bestaan, en de volgende vier schermen zijn voor alle Elementen beschikbaar.
OSC Limit (Oscillator Limiet) Lange Delay Hier kunt de parameters instellen die het nootbereik van de verschillende Elementen en de aanslaggevoeligheid besturen. OSCíLimit) EL1234 Toets aangeslagen ■ InsEF (Insertie Effect) Stelt het Insertie Effect in waar het signaal van de verschillende Elementen naartoe wordt gestuurd. Het Insertie Effect wordt gepasseerd als u Thru selecteert. ❏ Instellingen: C-2 ~ G8 (voor de laagste en hoogste noten). N.B.
■ Hold (Hold Tijd) Stelt de Hold Tijd in. ■ Coarse (grof) Stemt de toonhoogte van de verschillende Elementen in halve tonen. ❏ Instellingen: 0 ~ 127 ❏ Instellingen: -48 ~ 0 ~ +48 ■ Attack (Attack Tijd) Stelt de Attack Tijd in. ■ Fine (fijn) Stemt de toonhoogte van de verschillende Elementen fijn af. ❏ Instellingen: 0 ~ 127 ■ Decay 1 (Decay 1 Tijd) Stelt Decay 1 Tijd in.
■ Time (Release Tijd) Stelt de Release Tijd in. ■ Center (Middentoets) Stelt de basistoonhoogte in die door de Pitch parameter wordt gebruikt. ❏ Instellingen: 0 ~ 127 ❏ Instellingen: C-2 ~G8 ■ Level (Release Niveau) Stelt het Release Niveau in. N.B. ❏ Instellingen: 0 ~ 127 U kunt deze parameter ook instellen door de respectievelijke toets op het toetsenbord aan te slaan terwijl u de [SHIFT]-knop ingedrukt houdt.
LPF24D Een 4-pole (-24dB/oct) dynamische LPF met een sterke Resonantie. Element Filter Hier kunt u de Filter parameters instellen om de klankkleur van de verschillende Elementen te wijzigen. De volgende tien schermen zijn beschikbaar.
• HPF (High Pass Filter) Deze geeft alleen signalen boven de Cutoff frequentie door. U kunt vervolgens het geluid meer karakter geven met de Reso (Resonantie) parameter. Er zijn twee soorten HPF’s beschikbaar. BPF6 Een combinatie van een -6dB/oct HPF en LPF. Niveau Cutoffbereik Doorgelaten bereik Cutoffbereik Niveau -6db/oct Frequentie BPF12D Een combinatie van een -12dB/oct HPF en LPF.
■ EGDepth (EG Sterkte) Hiermee stelt u de gevoeligheid van het filter in op aanslaggevoeligheid. Een positieve instelling produceert grotere filterwijzigingen voor harder aangeslagen toetsen, en bij de instelling nul wijzigt het filter niet. Bij negatieve instellingen wordt de EG-envelope omgekeerd. ■ Cutoff Stelt de Cutoff Frequentie in. Deze wordt als basisfrequentie gebruikt voor het geselecteerde Filter Type.
FEG Time (FEG Tijd) FEG Release Hier kunt u verschillende Tijd parameters van de Filter Envelope Generator (FEG) instellen. Gecombineerd met de FEG Niveau- en FEG Release instellingen kunt u hiermee de wijzigingen in geluid bepalen vanaf het moment dat een toets op het toetsenbord wordt aangeslagen tot het moment dat deze wordt losgelaten. U kunt per Element verschillende waarden instellen. Hier kunt u de Release Tijd en Release Niveau parameters van de Filter Envelope Generator (FEG) instellen.
■ Cutoff Stelt de Filter Key Follow ratio van de verschillende Elementen in (de hoeveelheid waarmee de Filter Cutoff varieert hangt af van de nootpositie). De Middentoets-instelling C3 wordt door de Cutoff parameter als basisinstelling gebruikt. Een positieve instelling verlaagt de Cutoff Frequentie bij lagere noten en verhoogt deze voor hogere noten. Een negatieve instelling heeft het tegenovergestelde effect.
■ Attack (Attack Tijd) Stelt de Attack Tijd in. Element Amplitude ❏ Instellingen: 0 ~ 127 Hier kunt u de Amplitude parameters instellen die het signaalniveau van de verschillende Elementen beïnvloeden. De volgende zeven schermen zijn beschikbaar. ■ Decay1 (Decay 1 Tijd) Stelt de Decay 1 Tijd in.
■ Level (Release Niveau) Toont het Release Niveau. (Vastgesteld op nul.) ■ Center Deze toont dat noot C3 het basisniveau is. Op deze noot blijft het signaalniveau ongewijzigd. Bij andere noten varieert het signaalniveau overeenkomstig de Niveau instellingen. De Center instelling kan niet worden gewijzigd.
AMP Scale (AMP Scaling Break Point) Hier kunt u vier Amplitude Scaling Break Points instellen per Element. Amplitude Scaling bestuurt de amplitude afhankelijk van de positie van de toetsen op het toetsenbord. Er zijn vier Break Points waarmee verschillende instellingen op het toetsenbord kunnen worden verdeeld en toegewezen. De Niveaus (Offsets) van de verschillende Break Points worden in het AMP Scale-scherm ingesteld.
■ Speed (snelheid) Stelt de snelheid van de LFO golfvorm in. Een hogere instelling betekent een hogere snelheid. ❏ Instellingen: 0 ~ 63 Snelheid = hoger ■ AMod (Amplitude Modulatie Sterkte) Stelt de mate (sterkte) in waarmee de LFO golfvorm de amplitude van het geluid varieert (moduleert). Een hogere instelling betekent een grotere modulatiesterkte. ❏ Instellingen: 0 ~ 127 Element EQ (Equalizer) Tijd Hier kunt u de volgende twee Equalizer parameters per Element instellen.
■ LoFreq (Lage Frequentie) Stelt de lage frequentie in van het Shelving Filter. Frequenties onder dit punt worden verzwakt of versterkt door ‘LoGain’. ❏ Instellingen: 50.1Hz ~ 2.00kHz ❏ Instellingen: -32 ~ 0 ~ +32 ■ thru Als u dit selecteert, dan worden de equalizers gepasseerd en wordt het gehele signaal niet beïnvloed. ■ Hi Freq (Hoge Frequentie) Stelt de hoge frequentie in van het Shelving Filter. Frequenties boven dit punt worden verzwakt of versterkt door ‘HiGain’.
Drum Key Drum Key OSC (Oscillator) OSC Wave (Oscillator Wave) OSC Out (Oscillator Out) OSC Pan (Oscillator Pan) OSC Other (Oscillator Other) Drum Key Pitch PCH Tune (Pitch Tune) Drum Key Filter FLT Cutoff (Filter Cutoff) Drum Key Amplitude AMP AEG (Amplitude Envelope Generator) AMP VelSens (Amplitude Velocity Sensitivity) Drum Key EQ (Equalizer) EQ Type (EQ Type) EQ Param (EQ Parameter) 104 104 105 105 105 106 106 106 106 106 107 107 101 101 101 Drum Common General Bij Drum Voices is alleen het hieronder
■ Attack Stelt de Attack Tijd in (de tijd vanaf het moment dat de toets wordt aangeslagen tot het moment waarop het maximum signaalniveau is bereikt). Met de [ATTACK]-knop op het regelpaneel van de CS6x kan de Attack Tijd ook direct worden aangepast. ❏ Instellingen: -64 ~ 0 +63 ■ Decay Stelt de Decay Tijd in (de tijd vanaf het moment dat het signaalniveau maximaal is tot het moment dat deze helemaal is uitgestorven).
OSC Out (OSC Uit) Stelt de signaalinstellingen in van de Wave of Normal Voice voor de verschillende Drum Toetsen. OSCíOut) Key=C 3 Level 127 InsEF RevSend ChoSend thru 64 127 ■ Level (niveau) Stelt het signaalniveau in van de verschillende Waves of Normal Voices. Hiermee kan het signaal van de verschillende Drum Toetsen worden aangepast. ■ Pan (positie in het stereobeeld) Stelt de Panpositie in van de verschillende geluiden in een Drum Voice (Drum Kit).
■ RevNtOff (Noot Ontvangst ‘Off’) Selecteert of de MIDI Note Off boodschappen door de verschillende Drum Toetsen kunnen worden ontvangen. Drum Key Filter Hier kunt u de filterinstellingen op de Drum Voice toepassen. Een Low Pass Filter en High Pass Filter kunnen per Wave worden toegepast om de klankkleur te wijzigen. ❏ Instellingen: off, on N.B. Deze parameter is afhankelijk van het Type Drum Toets Wave dat in het OSC Wave-scherm is geselecteerd.
■ AMP AEG (Amplitude Envelope Generator) De Amplitude Envelope Generator bestuurt de wijziging in amplitude vanaf het moment dat een toets op het toetsenbord wordt aangeslagen tot het moment dat deze wordt losgelaten. Door de Attack Tijd, Decay 1 Tijd en het Decay 1/2 Niveaus in te stellen, kunt u bepalen hoe snel het geluid zijn top-amplitude bereikt en hoe dit uitsterft. Parameters kunnen per Drum Toets worden ingesteld. N.B. Amplitude Envelope Generator Instellingen.
Plug-in ○ ○ ○ ○ ○ ○ Voices ○ ○ ○ ○ ○ ○ ○ ○ ○ ○ ○ ○ ○ ○ ○ ○ ○ ○ ○ ○ ○ ○ ○ De Voices van Plug-in Boards (Single Part) noemen we Board Voices. Een Plug-in Voice is een Board Voice die in de Voice Edit Mode in de synthesizer is bewerkt. Er zijn zes Common Edit schermen en vier schermen voor het bewerken van een Element van een Plug-in Voice beschikbaar. U kunt 64 bewerkte Plug-in Voices opslaan in Banken A t/m D van het PLG1/2-geheugen.
Plug-in Common General QED Filter (Snel Filter Bewerken) De General (algemene) parameters zijn in de volgende twee schermen te vinden. De parameters en instellingen zijn hetzelfde als bij de Normal Voices. Zie pag. 82 voor meer details. GEN Name (General Name) GEN Other (General Other) QED EG (Snel Envelope Generator Bewerken) GEN Name (Algemeen Naam) De parameters en instellingen zijn hetzelfde als bij de Normal Voices. Zie pag. 80 voor meer details.
Plug-in Common Controller Hier kunt u het Pitch Bend Wiel, Modulatie Wiel en andere Controller parameters instellen van de Plugin Voices in de volgende negen schermen.
■ PMod (Pitch Modulatie Sterkte) Stelt de mate in waarmee de Control Change boodschappen (geselecteerd met de Bronparameter) de pitch modulatie besturen. Hoe hoger de instelling, hoe sterker de besturing. CTL AT Modulation (AT Modulatie Sterkte) Hier kunt u de mate instellen waarin keyboard aftertouch de pitch-, filter- en amplitude modulatie van de Plug-in Voice bestuurt.
■ Delay (Vertraging) Stelt de vertragingstijd in tussen het moment dat u een toets op het toetsenbord aanslaat en het moment dat de LFO gaat werken. Zoals in de illustratie wordt getoond, verlengt een positieve instelling de vertraging en verkort een negatieve instelling deze. OSC Assign (Oscillator Toewijzen) Hier kunt u de Board Voice selecteren die het Element in een Plug-in Voice moet gebruiken. Selecteer met Knop [C] de Bank en met Knop [1] de Board Voice.
PCH PEG (Pitch Envelope Generator) PCHíPEG)InitLvl Elem +63 EQ Param EQíParam)LoFreq Elem 2.0k Attack Release---Level +63 +63 -64 ■ InitLvl (oorspronkelijke niveau) Stelt het oorspronkelijke (initial) niveau in. LoGain +12dB HiFreq 16.0k HiGain -12dB + ❏ Instellingen: -64 ~ 0 ~ +63 ■ Attack Stelt de Attack Tijd in. 0 Frequentie ❏ Instellingen: -64 ~ 0 ~ +63 - ■ Release Stelt de Release Tijd in.
Als een Board Voice in de Custom Bank is bewerkt in de Voice Edit Mode, dan kunt u deze opslaan als een Plug-in Voice in Geheugenbank A t/m D van PLG1 of PLG2. Er kunnen maximaal 64 Voices per Bank worden opgeslagen. Het Bewerken van Plug-in Board Voices Plug-in Voices zijn gebaseerd op Board Voices. De Board Voices zelf kunnen met de computer en de bijgeleverde editor software worden bewerkt. Er zijn verschillende soorten editor software beschikbaar voor de verschillende Plug-in Boards. N.B.
VCE Initialize Voice Job Mode Hier kunt u alle parameters van een Voice resetten (initialiseren) naar de standaard instellingen. U kunt tevens alleen bepaalde parameters initialiseren, zoals de Common instellingen, instellingen van de verschillende Elementen/Drum Toetsen, enz. Houd er rekening mee dat dit de Voice niet terug doet keren naar zijn originele staat van vóór het bewerken. Deze functie is echter handig bij het vanuit het niets creëren van een nieuwe Voice.
■ 1 Bron Voice Geheugen Selecteert het Voice Geheugen die de (Bron) Voice bevat waarvan u parameterinstellingen wilt kopiëren. ❏ Instellingen: PRE1/2 (Preset 1/2), INT (Intern Normal), EXT (Extern Normal), PLG1/2 (Plug-in 1/2), PRE (Preset Drum), INT (Intern Drum), EXT (Extern Drum) ■ 2 Bron Voice Nummer Selecteert het Voice Nummer van de Bron Voice. De naam van de Voice staat bovenin de display.
Performance Mode Performance Play In de 3e t/m 7e schermen kunt u de signaalniveaus, stereo panposities en andere algemene parameters van de verschillende Parts (Multi Part Edit) instellen. Deze zijn handig als u de synthesizer in combinatie met een sequencer gebruikt. Details zijn te vinden op pag. 119. In de Performance Play Mode kunnen meerdere Voices (tot maximaal vier Parts) worden gestapeld om brede geluiden te creëren die u in realtime of met een sequencer kunt afspelen.
Performance Nummer Bank Program Nummer Performance Nummer Bank Program Nummer 001 002 003 004 005 006 007 008 009 010 011 012 013 014 015 016 017 018 019 020 021 022 023 024 025 026 027 028 029 030 031 032 033 034 035 036 037 038 039 040 041 042 043 044 045 046 047 048 049 050 051 052 053 054 055 056 057 058 059 060 061 062 063 064 A A A A A A A A A A A A A A A A B B B B B B B B B B B B B B B B C C C C C C C C C C C C C C C C D D D D D D D D D D D D D D D D 1 2 3 4 5 6 7 8 9 10 11 12 13 14 15 16 1 2
Performance ○ ○ ○ ○ ○ ○ ○ ○ ○ ○ ○Program ○ ○ ○ ○ ○ ○ ○ Selectie ○ ○ ○ ○ ○ ○ ○ ○ ○ ○ ○ Er zijn vier manieren waarop u een Performance kunt selecteren. Met Met Met Met de de de de BANK/PROGRAM-knoppen (CS6x) [DEC/NO]- en [INC/YES]-knoppen [DATA]-knop Category Search N.B. 3 Druk, om een Programnummer te selecteren, op een PROGRAM-knop ([1] - [16]). Performances kunnen worden geselecteerd door de Geheugenbank en het Programnummer, zoals in bovenstaande drie stappen uitgelegd is, in te stellen.
3 Pas de parameterinstellingen van de verschillende parts aan met Knop [B], de [DATA]-knop of de [DEC/NO]- en [INC/YES]-knoppen. ■ 3e scherm: PFM Mlt) Volume (Performance Multi: Volume) Stelt het signaalniveau (volume) in van de verschillende Parts. 4 Herhaal stappen 2 en 3 bij de andere Parts. PFM*Mlt) Volume Part01 127 Sla, om verlies van instellingen te voorkomen, de Performance op alvorens u naar een andere Mode gaat of een andere Performance selecteert.
Performance Edit De Performance Edit Mode schermen kunnen worden onderverdeeld in het Common Edit scherm en schermen voor het bewerken van de individuele parts. Bij het bewerken van een individueel part hangt het van het geselecteerde part af welk scherm u te zien krijgt. Als de synthesizer zich in Master Keyboard Mode (pag. 8 en 67) bevindt, dan kunt per Zone parameters instellen.
Toongenerator Mode: LED van de [MASTER KEYBOARD]-knop brandt. De “Compare” functie Luister hiermee naar het verschil tussen uw Performance met bewerkte instellingen en dezelfde Performance alvorens het bewerken van de betreffende instellingen. MIDI IN MIDI-kanaal Octaaf Transpositie Nootlimiet enz. 1 Druk vanuit de Performance Edit Mode op de [EDIT/COMPARE]-knop. De í indicator links bovenin het scherm wijzigt in een î indicator en de LED van de [EDIT/COMPARE]-knop gaat knipperen.
Common General Gen M.kbd (Master Keyboard Algemeen) Hier kunt u de Parameter Naam, het MIDI-kanaal en andere algemene parameters in de Common Edit schermen instellen. De volgende drie schermen bevatten algemene instellingen. Hier kunt u toetsenbordsplits en layers instellen als u gebruik maakt van een Performance in de Master Keyboard Mode. GEN Name (General Name) GEN MIDI (General MIDI) Gen M.
■ Point (splitpunt) Als de Mode (zie eerder) is ingesteld op “split”, dan wordt hiermee het splitpunt ingesteld. De daadwerkelijke toets van het splitpunt hoort bij het rechterhandgedeelte (upper). QED Level (Snel Niveau Bewerken) U kunt het splitpunt ook selecteren door de toets aan te slaan terwijl u de [SHIFT]-knop ingedrukt houdt. N.B. Hier kunt u de signaalniveau- en panparameters van de verschillende Layer Parts instellen. De instellingen zijn tevens beschikbaar in de Part Edit-schermen.
■ Time (tijd) Stelt de overgangstijd van de toonhoogte wijzigingen in. Hogere waarden betekenen langere overgangstijden. U kunt dit ook instellen met de [PORTAMENTO]-knop op het regelpaneel van de CS6x. ❏ Instellingen: -64 ~ 0 ~ +63 ❏ Instellingen: -64 ~ 0 ~ +63 QED Filter (Snel Filter Bewerken) Deze parameters besturen de filters die de klankkleur van de Voice bepalen.
CTL Assign1 (Controller Toewijzing 1) Hier kunt u met Knoppen [C], [1] en [2] Controlnummers toewijzen aan respectievelijk de Breath Controller, Knop [1] en Knop [2]. De geselecteerde functie wordt links in de display afgebeeld. Control Change Naam CTLíAssign1) Common [FootCtrl] SHIFT PAGE A B ■ Mode Stelt het gedrag van de Ribbon Controller in. Als u “hold” selecteert, dan behoudt de parameter de door de Ribbon Controller bestuurde waarde, zelfs nadat u de Ribbon Controller loslaat.
■ Freq (frequentie) Stelt de middenfrequentie in. Frequenties rond dit punt worden door de Gain instelling verzwakt/ versterkt. peak (Peaking) + ❏ Instellingen: 100Hz ~ 10.0 kHz Gain 0 ■ Q (frequentiekarakteristiek) Dit varieert het signaalniveau op de Frequentie instelling hetgeen verschillende frequentiecurvekarakteristieken creëert. Frequentie - ❏ Instellingen: 0.1 ~ 12.0 Freq EQ High (EQ Hoogbereik) ■ Gain Stelt de Gain in. Dit verzwakt of versterkt de frequenties rond de Frequentie instelling.
■ InsEF (Insertie Effect) Wijst een Part aan een Insertie Effect toe. Selecteer “off” als u de Part niet aan een Insertie Effect toe wilt wijzen. Als er Plug-in Boards zijn geïnstalleerd, dan zijn deze selecteerbaar als Plug-in Parts 1 en 2. ❏ Instellingen: Normal Part: Part01 ~ Part16, Part AD (A/D Input Part), Part CL (Phrase Clip ZPart), off Plug-in Part (indien geïnstalleerd): PartP1 (Plug-in Part 1), PartP2 (Plug-in Part 2), off ■ PLG-EF (Plug-in Effect) Wijst een Part aan het Plug-in Effect toe.
Part ○ ○ ○ ○ (Instellingen ○ ○ ○ ○ ○ ○ ○ ○ ○ ○ ○van ○ ○ ○ de ○ ○ ○Parts) ○ ○ ○ ○ ○ ○ ○ ○ Hier kunt u de verschillende Parts in een Performance bewerken. Selecteer het Part met Knop [A] en stel daarna de parameters in. De volgende zes schermen zijn beschikbaar, waarbij de inhoud afhangt van het geselecteerde Part.
• Als PartAD (A/D Input Part) is geselecteerd Een audiobron die is aangesloten op de A/D INPUTaansluiting kan als een Part worden gebruikt. Er zijn 13 verschillende templates voor Effect Type- en Gain instellingen. Selecteer de A/D Input Part-bron en de template. MIXíTemplate)Src Number PartAD keybaord --[InsEF off ] ■ Src (bron) Selecteert de bron die is aangesloten op de A/D INPUT-aansluiting.
■ Reso (Resonantie) Stelt de mate van Resonantie (harmonische versterking) in die wordt toegepast op het signaal op de Cutoff frequentie. Hiermee kunt u het geluid meer karakter geven. ❏ Instellingen: -64 ~ 0 ~ +63 ■ Release Stelt de Release Tijd in (de tijd die het volume van het Part nodig heeft om naar nul uit te sterven nadat de toets is losgelaten). Een positieve waarde verlengt de overgangstijd en een negatieve waarde verkort deze. N.B.
Offset (Velocity Offset) Zoals hieronder wordt getoond, wordt de aanslaggevoeligheid verhoogd met de geselecteerde hoeveelheid. TON Other (Overigen) Hier kunt u de Pitch Bendbereik- en de aanslaggevoeligheidsparameters van de verschillende Parts instellen. N.B. Wijzigingen op de velocity curve overeenkomstig VelDepth (met een ingestelde offset van 64) Deze schermen zijn niet beschikbaar in het A/D Input Part.
■ Mode Selecteert of de verschillende Parts monofoon (alleen enkele noten) of polyfoon (meerdere noten tegelijk) worden afgespeeld. N.B. ■ Vel Limit (aanslaggevoeligheidslimiet) Stelt de minimum en maximum waarden van het aanslaggevoeligheidsbereik in waarbinnen de verschillende Parts reageren. Een Part klinkt alleen als er gespeeld wordt in het geselecteerde aanslaggevoeligheidsbereik. Deze parameter is alleen beschikbaar in de Normal Voice Parts 1 t/m 16 en de Plug-in 1/2 Parts.
■ InsEF (Insertie Effect) Toont de aan/uit status van de Insertie Effecten. Als er “on” wordt getoond, dan wordt het signaal van het Part naar de Insertie Effect Unit verstuurd. N.B. Parts 1 t/m 16 Drum Voice Part Phrase Clip Part RCVíSw2) Part01 Insertie Effect schakelaars van de verschillende Parts worden in het EFF Part-scherm ingesteld (pag. 127).
Part Controller Hier kunt u verschillende Controller parameters instellen in het A/D Input Part en de Multi Plug-in Parts 17 t/m 32. Er zijn twee schermen beschikbaar voor de A/D Input Part parameters en zes schermen voor Multi Plug-in Part parameters. ■ Dest. (bestemming) Stelt de parameter in die wordt bestuurd door de Controller die is geselecteerd in "Src". ❏ Instellingen: Zie de aparte Controllijst. ■ Depth (sterkte) Stelt de mate in waarmee de parameter die is geselecteerd in "Dest.
■ FMod (Filter Modulatie Sterkte) Stelt de mate in waarmee de Filter Cutoff frequentie wijzigt bij gebruik van het Modulatie Wiel. ■ FMod (Filter Modulatie Sterkte) Stelt de mate in waarmee de Filter Cutoff frequentie wijzigt bij gebruik van aftertouch. ❏ Instellingen: 0 ~ 127 ❏ Instellingen: 0 ~ 127 ■ AMod (Amplitude Modulatie Sterkte) Stelt de mate in waarmee de amplitude modulatie wijzigt bij gebruik van het Modulatie Wiel.
■ FMod (Filter Modulatie Sterkte) Stelt de hoeveelheid in waarmee de Filter Cutoff frequentie wijzigt bij gebruik van de controller (Bron). Effect Parameter Instellingen Deze parameters zijn beschikbaar als u bij bepaalde Effect Typen op de [ENTER]-knop drukt. Schakel met de [PAGE]-knop tussen de schermen heen en weer, en stel de verschillende parameters in met de [INC/YES]- en [DEC/NO]knoppen. Als u op de [EXIT]-knop drukt, dan keert u terug naar het Effect Type selectiescherm.
Master Keyboard MKB Transmit (Master Keyboard Data Versturen) Hier kunt u parameters instellen om keyboard data te versturen als u in Master Keyboard Mode bent. MKBíTransmit) Zone01 TrnsCh 1 TG on Per zone kunt u het versturen van boodschappen van het Pitch Bend Wiel, Modulatie Wiel, Knoppen [A] t/m [C] en Knoppen [1]/[2] aan- of uitzetten. MKBíTxSw1) Zone01 MIDI on ■ TrnsCh (verstuurkanaal) Stelt het MIDI-verstuurkanaal in van de verschillende zones.
MKB TxPreset1 (Master Keyboard Verstuurvoorinstelling 1) ■ PC (MIDI Program Change) Stelt het Programnummer in dat wordt verstuurd als u naar een andere Bank/Program gaat. ❏ Instellingen: 0 ~ 127 Hier kunt u het oorspronkelijk (initial) volume en de paninstellingen van de verschillende zones instellen bij het wisselen van Performance Bank/Program. MKBíTxPreset1) Zone01 Volume 127 N.B. Pan C N.B. ■ Vol (volume) Stelt het signaalniveau van de zone in. ❏ Instellingen: 0 ~ 127 N.B.
Performance Job Mode PFM Initialize U kunt verschillende handelingen (Jobs) verrichten in de Performance Job Mode. U kunt bijvoorbeeld Performances initialiseren (met inbegrip van degene die u huidig bewerkt), of vorige bewerkingen oproepen. Als u naar de Performance Job Mode gaat, dan krijgt u eerst het Initialize-scherm te zien. De volgende vier schermen zijn beschikbaar in de verschillende Performance Jobs. N.B.
2 Bron Performance nummer Selecteert het nummer van de Bron Performance. De naam van de Performance wordt in de bovenste regel van de display getoond. ❏ Instellingen: 001 ~ 128 (INT), 001 ~ 064 (EXT) N.B. Als u kopiëert, kunt u het huidige Performance Nummer (bestemming) instellen als Bron Performance nummer. In dit geval, als u verschillende instellingen van de huidige Performance heeft bewerkt, zult u deze recente instellingen kopiëren, niet de opgeslagen instellingen (vóór bewerking).
Phrase Clip Mode Clip Kit Naam Hier wordt de naam van de Clip Kit getoond (bestaande uit maximaal 10 karakters). Phrase Clip Play In de Phrase Clip Play Mode kunt u één van de vier Clip Kits selecteren. Een Clip Kit is een verzameling Phrase Clips (externe geluiden die met een microfoon, vanaf audio apparatuur of vanaf andere bronnen zijn opgenomen) die zijn toegewezen aan toetsen op het toetsenbord waarmee ze afgespeeld kunnen worden.
Met de [DEC/NO]- en [INC/YES]-knoppen Phrase Clip Record-functie Als u op de [INC/YES]-knop drukt, dan wordt de volgende Clip Kit geselecteerd en getoond. Een druk op de [DEC/NO]-knop selecteert de vorige Clip Kit. In de Phrase Clip Record Mode kunt u geluiden als Phrase Clips in de synthesizer opnemen met een microfoon of vanaf audio apparatuur.
■ Source (bron) Selecteert de bron waarvan u wilt opnemen. Het Niveauscherm Als u van een “mic” of “line” niveaubron in de Phrase Clip Record Mode opneemt, kunt u met de [PAGE]-knop het volgende scherm oproepen. U ziet de ingangsniveau- en triggerniveaumeters. Hier kunt u met behulp van de ingangsniveau- en triggerniveau-meters het triggerniveau en het signaalniveau van de A/D INPUT-aansluiting afregelen. Als u “level” heeft geselecteerd in de Trigger Mode, kunt u het Trigger Niveau instellen met Knop [1].
5 Volg nu de procedure overeenkomstig de instellingen die u in stap 3 maakte. 2 Stel, terwijl u de [REC]-knop nog steeds ingedrukt houdt, de Clip Toets in met Knop [C] of sla een toets op het toetsenbord aan. Als u de [REC]-knop loslaat, ziet u het opnamescherm. Indien ingesteld op “manual”: Opname begint als u op de [ENTER]-knop drukt. 3 Selecteer een opnamebron door de waarde (pclip, voice, of perform) te selecteren met de bronparameter in het opnamescherm.
Phrase Clip Edit De beschikbare parameters voor het bewerken van een Clip Kit worden hier uitgelegd. Een Clip Kit is een verzameling Phrase Clips die op het toetsenbord (aan C0 t/m C6) zijn toewezen. Er zijn vijf Common Edit schermen (om parameters in de huidige Clip Kit te wijzigen) beschikbaar voor het bewerken van een Clip Kit. Er zijn tevens vijf schermen beschikbaar met Clip Toets parameters (om Phrase Clips aan toetsen op het toetsenbord toe te wijzen). N.B.
Menu Display Het volgende scherm verschijnt als u aan de [PAGE]knop draait terwijl u de [SHIFT]-knop houdt ingedrukt. Verplaats de cursor met de [PAGE]-knop naar de parameter die u wilt bewerken, en laat vervolgens de [SHIFT]-knop los om naar het scherm te springen waarin u zich bevond. Cursor OSC Out) Key=C 3 SHIFT PAGE A Com:>GEN≥QED>ARP>CTL> Key:>OSC>PCH>FLT>AMP> B C 1 Clip Common General GEN Name (Naam Algemeen) U kunt een Clip Kit Naam van maximaal 10 karakters invoeren.
■ ChoSend (Chorus Send) Stelt het Sendniveau in van het signaal dat van Insertie Effect 1/2 (of signaal dat onbeïnvloedt passeert) naar het Chorus Effect wordt verstuurd. U kunt deze parameter ook aanpassen met de [CHORUS]-knop op het regelpaneel van de CS6x. ❏ Instellingen: 0 ~ 127 QED EG (Snel Envelope Generator Bewerken) Deze twee parameters besturen de wijzigingen in het signaalniveau van een Clip Kit tijdens het afspelen van de noot.
CTL Bend (Pitch Bend) Clip Common Effect U kunt de mate van toonhoogtewijziging instellen die door het Pitch Bend Wiel wordt bestuurd. U kunt twee soorten Insertie Effecten, plus twee Systeem Effecten (Reverb en Chorus) instellen. De volgende vijf schermen zijn beschikbaar. De parameters zijn hetzelfde als de Voice Edit Mode parameters. Details zijn te vinden op pag. 88.
Variatie Instellingen U kunt een Phrase Clip op acht verschillende manieren (Variaties) afspelen. Deze staan, zoals in de illustratie wordt getoond, in verband met de Clip Kit. Clip1~256 ■ Play (Afspeelmode) Selecteert de manier waarop de Phrase Clip afgespeeld wordt. Er zijn drie modes beschikbaar. ❏ Instellingen: Loop Als u een toets op het toetsenbord aanslaat, dan wordt de Phrase Clip helemaal afgespeeld vanaf het Startpunt.
■ ChoSend (Chorus Send) Stelt het Sendniveau in van het Clip Toets signaal dat van Insertie Effect 1/2 (of van het onbeïnvloede signaal) wordt verstuurd naar het Chorus Effect. Geloopt Gedeelte ❏ Instellingen: 0 ~ 127 N.B. Details over Effecten zijn op pag. 65 te vinden. OSC Pan (Oscillator Panpositie) Looppunt Startpunt Eindpunt ❏ Instellingen: Hangt af van de lengte van de Phrase Clip ■ End (Eindpunt) Stelt het Eindpunt in van het geloopte gedeelte van de Phrase Clip.
■ KeyOn Selecteert de ‘Key On’ (toetsaanslag) methode. Er zijn twee methodes: normal en hold. ❏ Instellingen: normal: Het aanslaan van een Clip Toets start het afspelen van een Clip. Het afspelen gaat door tot de toets wordt losgelaten. hold: Het aanslaan van een Clip Toets triggert het afspelen van een Clip. Het afspelen gaat door nadat de toets is losgelaten, totdat er een andere Clip Toets aan wordt geslagen. Clip Key Filter Hier kunt u de filterinstellingen van de Clip Toetsen wijzigen.
AMP AEG (Amplitude Envelope Generator Amplitude Envelope Generator Instellingen De Amplitude Envelope Generator is voorzien van drie Tijd parameters en één Niveau parameter. Deze besturen de overgangen tussen signaalniveaus in de tijd dat de noot klinkt. De Attack Tijd is de tijd die het geluid nodig heeft om het hoogste signaalniveau te bereiken vanaf het moment dat een toets op het toetsenbord wordt aangeslagen.
5 Als u op de [ENTER]-knop drukt, dan wordt om bevestiging gevraagd. Phrase Clip Job Mode In deze mode kunt u verschillende Jobs op de Phrase Clips uitvoeren die u in de Phrase Clip Edit Mode heeft gecreëerd/bewerkt, zoals wissen, kopiëren en normaliseren. Als u naar de Phrase Clip Job Mode gaat, dan verschijnt het 1e scherm (PCLP Status). De volgende 14 Phrase Clip Job-schermen zijn beschikbaar. Voordat u een Phrase Clip Job in Phrase Clip Job Mode uitvoert, moet u eerst een Clip Kit selecteren (pag.
PCLP Rename PCLP LoopDivide Hier kunt u de Phrase Clip Naam van de verschillende Phrase Clips wijzigen. Een Phrase Clip Naam kan uit maximaal acht karakters bestaan. Selecteer, om de Phrase Clip te selecteren, met Knop [A] de Clip Toets en met Knop [B] het Phrase Clip Nummer. U kunt de Variatie-lengte van de verschillende Phrase Clips als een percentage instellen. De Phrase Clip kan worden onderverdeeld in een aantal gelijke delen die tezamen de Variatie Set vormen.
■ Length (lengte) Stelt de Variatie lengte-ratio in. U kunt de lengte van alle gelijke delen wijzigen met de hier ingestelde hoeveelheid. Als u “toEnd” selecteert, dan wordt het Eindpunt van de Bron Phrase Clip als Eindpunt van de Variatie gebruikt (nadat deze is verdeeld). 1 U kunt in dit scherm de huidig geselecteerde Phrase Clip als een loop afspelen. 2 Stel de Startpunten van Variaties 1 t/m 8 in door de toetsen C3 t/m C4 op het toetsenbord aan te slaan.
■ Start (Startpunt) Stelt het Startpunt in waar de Phrase Clip wordt afgespeeld. Door het Startpunt fijn af te stellen, kunt u het afspelen van ruis voor het Startpunt vermijden. Deze instelling elimineert de ruis in de oorspronkelijke Clip echter niet. 4 Als u op de [ENTER]-knop drukt, dan wordt om bevestiging gevraagd. Druk op de [INC/YES]knop om de Loop Remix job uit te voeren. De Job wordt geannuleerd als u op de [DEC/NO]knop drukt.
■ TargetVari (bestemmingsvariatie) Selecteert de gedeelten die met PCLP Extract moeten worden verwijderd. PCLP FreqConvert Hier kunt u de frequenties converteren van de verschillende Phrase Clips. Dit halveert de samplefrequentie en dus de grootte. ❏ Instellingen: all Ongebruikte gedeelten van alle acht Variaties worden verwijderd. 1~8 Ongebruikte gedeelten van de hier geselecteerde Variaties worden verwijderd.
PCLP Copy PCLP AutoKeyMap Hier kunt u de data van de verschillende Phrase Clips naar andere Phase Clips kopiëren. Met Auto Key Map kunt u automatisch Variaties van een Phrase Clip aan toetsen op het toetsenbord toe wijzen, te beginnen met de Clip Toets. Selecteer, om een Phrase Clip te selecteren, de Clip Toets met Knop [A] of het Phrase Clip Nummer met Knop [B]. Druk na het selecteren van de Phrase Clip op de [ENTER]-knop om deze te kopiëren naar een automatisch toegewezen (leeg) Phrase Clip Nummer.
■ Destination Clip Key (Bestemming Clip Toets) Selecteert de Clip Toets waar de Bron Clip Toets naartoe wordt gekopiëerd. Clip Kit Store U kunt als volgt vier bewerkte Clip Kits in het interne geheugen opslaan. ❏ Instellingen: C0 ~ C6 PCLP Kit Key Initialize U kunt de verschillende Clip Toetsen initialiseren, waarbij ze terugkeren naar hun oorspronkelijke standaardstatus. Hiermee kunt u een nieuwe Phrase Clip vanuit het niets creëren, voordat u gaat bewerken.
Sequence Play Mode N.B. In deze Mode kunt u de ingebouwde demo-songs en de op de Memory Card opgeslagen Songfiles afspelen. Er kunnen maar liefst 100 Songfiles achter elkaar worden afgespeeld met de Keten Stapfunctie. Deze Keten Stap data kunnen ook op Memory Card worden opgeslagen. N.B. Een Memory Card met Songfiles moet in de Card-sleuf gestoken zijn. N.B. Basisdetails over de sequencer zijn te vinden op pag. 31. 3 Druk op de [PLAY/STOP]-knop om de geselecteerde song vanaf het begin af te spelen.
■ Song File Nummer Wijst een Songfile aan de Keten Stap toe. Alle Songfiles met “.MID” extenties kunnen worden geselecteerd. Als u hier een filenummer selecteert, dan wordt de filenaam in de eerste regel van de display getoond. Bij het doorlopend (in keten) afspelen van meerdere Keten Stappen, kunt u bepalen hoe de huidige Keten Stap af moet spelen, na het afspelen van de Keten Stap ervoor, met een keuze uit de mogelijkheden “skip”, “end” en “stop”.
Utility Mode Hier worden de parameters van de Utility Mode uitgelegd. De Utility Mode is ruwweg verdeeld in drie schermen; een scherm met instellingen die gelden voor het gehele systeem, één scherm met Voice Mode instellingen en één scherm met Plug-in Board instellingen. Het eerste scherm dat verschijnt als u naar de Utility Mode gaat, is het onderstaande scherm. Elk van de drie Utility Mode schermen bevatten meerdere subschermen.
■ Vel (Toetsenbord Aanslaggevoeligheidscurve) Stelt de aanslaggevoeligheidscurve in die bepaalt in welke mate het geluidssignaal beïnvloed wordt door aanslaggevoeligheid. ❏ Instellingen: norm, soft, hard, wide, fixed norm (normaal) De aanslaggevoeligheid is in verhouding met het volumeniveau. MSTR EF Bypass (Algehele Effect Bypass) Stelt de parameters in die in verband staan met de [EF BYPASS]-knop op het regelpaneel.
■ BCCurve (TG Breath Curve) Stelt de Breath Curve in die bepaalt hoe de kracht waarmee u in de Breath Controller blaast het geluidsniveau beïnvloedt. ■ CC# (Controlnummer) Wijst MIDI Control Change nummers aan de Knoppen [A] t/m [C] toe. ❏ Instellingen: 000 ~ 095 (zie de aparte Datalijst voor details) ❏ Instellingen: thru, soft, hard, wide ■ Dest (Control Bestemming) Stelt de functie in die door de Assignable Knoppen [A] t/m [C] moet worden bestuurd.
MIDI (Systeem MIDI) Hier kunt u de MIDI parameters instellen die gelden voor het algehele systeem. De volgende vijf schermen zijn beschikbaar. MIDI MIDI MIDI MIDI MIDI Ch (MIDI Channel) ARp (MIDI Arpeggio) RxSW (MIDI Receive Switch) Other GM/XG Receive Trans 1 Local on ❏ Instellingen: off (uit), on (aan) ■ Ch (Vce) (Arpeggio verstuurkanaal) Selecteert het MIDI-kanaal waarop de Arpeggio data wordt verstuurd.
■ PgmChng (Program Change) Activeert of inactiveert het ontvangen van Program Change-boodschappen. Als deze parameter aanstaat, kan het instrument Program Changeboodschappen ontvangen en versturen naar een extern MIDI-apparaat bij het selecteren van Voices of Performances (met de [PROGRAM/ PART]-knop, enz.) op het regelpaneel. ❏ Instellingen: off (uit), on (aan) ■ Control Stelt de MIDI verstuur/ontvangst parameters in van de 14 Sound Controlknoppen van de CS6x.
■ Gain Stelt de Gain in. Dit verzwakt of versterkt frequenties rond de Frequentie instelling. M.EQ Low (Algehele EQ Laag) Deze Equalizer bestuurt de lage frequenties. U kunt het signaalniveau op de geselecteerde frequentie aanpassen. U kunt tevens verschillende Equalizer Shapes (vormen) selecteren. M.EQ Low) Shape Vce peak Gain +12dB Freq 50Hz ❏ Instellingen: -12dB ~ 0dB ~ +12dB ■ Freq (Frequentie) Stelt de middenfrequentie in. Frequenties rond dit punt worden verzwakt/versterkt met de Gain instelling.
CTRL Assign 1 (Controller 1 Toewijzen) Wijs met Knoppen [C], [1] en [2] Control Change nummers toe aan respectievelijk de Breath Controller, Knop [1] en Knop [2]. De geselecteerde naam van de Control Change verschijnt links in de display. CTRL Assign1) Vce [FootCtrl] BC 02 Control Change Naam Knob1 16 Knob2 17 Control Change Nummer ■ BC (Breath Controller) Wijst een Control Change nummer toe aan de Breath Controller. De Breath Controller kan worden aangesloten op de BREATH-aansluiting (pag.
■ Clock Bepaalt of er MIDI Clock-boodschappen naar het Plug-in Board worden verstuurd. Utility Job Mode In de Utility Job Mode kunt u de fabrieksinstellingen (Factory Set) van uw sythesizer terugroepen (resetten). Er is maar één scherm in deze Mode beschikbaar. ❏ Instellingen: off, on ■ DevNo (Device Nummer) Stelt het MIDI Device nummer in van het Plug-in Board.
Card Mode In de Card Mode kunt u met een Memory Card - een zgn. SmartMediaTM kaart die te krijgen is in elektronica winkels - data van/naar uw instrument laden/opslaan of andere soorten data-uitwisseling verrichten tussen de geheugens van het instrument en de Card. U kunt met gebruik van Card Filer software de data op uw Memory Card met de computer rangschikken en bijhouden. U kunt tevens data tussen de computer en de Memory Card uitwisselen.
■ SMF (Standaard MIDI Files) Format 0 Standaard MIDI Files (SMF’s) kunnen in Song Mode worden afgespeeld. Ze kunnen echter niet worden opgeslagen. Als u naar de Card Mode gaat, dan verschijnt het eerste scherm (Status). De volgende zeven schermen zijn beschikbaar, elk voor andere handelingen. 1e 2e 3e 4e 5e 6e 7e scherm: scherm: scherm: scherm: scherm: scherm: scherm: Status Save Load Rename Delete MkDir (Directory maken) Format ❏ Extentie: “MID” N.B.
Card Status ○ ○ ○ ○ Mode ○ ○ ○ ○ ○ handelingen ○ ○ ○ ○ ○ ○ ○ ○ ○ ○ ○ ○ ○ ○ ○ ○ ○ ○ ○ 1 Plaats de Memory Card in de CARD-sleuf. 2 Druk op de [CARD]-knop op naar Card Mode te gaan. 3 Ga met de [PAGE]-knop naar het scherm die de handeling bevat die u wilt verrichten. Save) Card SHIFT PAGE A Type all B File A-? Cursor ***[NEWFILE .S2A] C 1 2 DATA Hier wordt de hoeveelheid beschikbaar en gebruikt geheugen op de Memory Card getoond. Er kan hier niets ingesteld worden. Status) Card Used 2.
4 Druk op de [INC/YES]-knop om de file op te slaan. Na het opslaan verschijnt “Completed.” in de display en keert u terug naar het vorige scherm. Het opslaan kan geannuleerd worden door tijdens het opslaan op de [DEC/NO]-knop te drukken. 1 Selecteer met Knop [B] het File Type van de data die moeten worden geladen. 2 Selecteer met Knop [C] het Filenummer.
voice Load) Card [Pf:Init Voice] [Pf:Init Voice] EXT:064(D16) > INT:128(H16) Voice Geheugen van Voice Geheugen waarin de de te laden file (bron) file wordt geladen (bestemming) Voice-nummer van de te laden file (bron) Voice-nummer waarin de file wordt geladen (bestemming) 4Druk op de [INC/YES]-knop om de file te laden. Nadat deze is geladen, verschijnt “Completed” in de display en keert u terug naar het vorige scherm. Het laden kan worden geannuleerd door op de [DEC/NO]-knop te drukken. N.B.
3Druk, om de directory te creëren, op de [ENTER]knop. “Completed.” verschijnt na het creëren in de display en u keert terug naar het vorige scherm. Delete (Wissen) Hier kunt u files op de Memory Card wissen. N.B. Delete) Type Card all File Type File:/VOICEDIR/SUBDIR-1/ 001[NEWFILE .S2A] File Nummer File Naam Directories worden aangegeven met “DIR” naast de directorynaam. Open de directory door met Knop [C] de cursor er naar toe te verplaatsen en vervolgens op de [ENTER]-knop te drukken.
Over de Plug-in Boards (Los verkrijgbaar) Het Installeren van de los verkrijgbare Plug-in Board Een aantal niet bijgeleverde Plug-in Boards zijn los verkrijgbaar om de Voice-bibliotheek van uw instrument uit te breiden. De volgende soorten Plug-in Boards kunnen worden gebruikt op uw instrument. De manier van installatie hangt af van het type instrument, het toetsenbord (CS6x) en de ETA module-grootte (CS6R). Beide manieren worden hieronder apart uitgelegd.
Het installeren van een Plug-in Board (vanaf het moment dat u de klep verwijdert totdat u de klep weer terugplaatst) moet worden uitgevoerd terwijl de stekker niet in het stopcontact zit. 5 Verwijder het snoer uit de haakvormige bundel op de plaat. 8 Plaats het Plug-in Board op de plaat, zoals in de volgende stappen wordt uitgelegd a. Plaats één kant van het Plug-in Board (waar de aansluiting zit) in haken 1, zoals getoond wordt in de illustratie. Haken 1 Haak 1 Haak 1 b.
Het verwijderen van het Plug-in Board van het toetsenbord 1 Verwijder het snoer uit de haakvormige bundel. 2 Druk de haken naar beneden zoals is aangegeven in de illustratie en neem het Board uit de haken door het aan één kant op te pakken. Installatie ○ ○ ○ ○ ○ ○ ○ ○ ○op ○ ○ de ○ ○ ○CS6R ○ ○ ○ ○ ○ ○ ○ ○ ○ ○ ○ ○ ○ ○ ○ N.B. Zie pag. 177 voor informatie over installatie op de CS6x. 1 Zet het toetsenbord uit en haal de stekker uit het stopcontact.
6 Stop de snoeraansluiting voorzichtig in de aansluiting van het Plug-in Board tot de twee inkepingen van de snoeraansluiting in de holtes van het Board klikken, zoals getoond wordt in de illustratie. Het verwijderen van het Plug-in Board van het toetsenbord 1 Druk de haken naar beneden zoals getoond wordt in de illustratie en neem het Board uit de haken, door het aan één kant op te pakken. Haken 2 2 PLG 7 Plaats het Plug-in Board op de plaat, zoals in de volgende stappen wordt uitgelegd a.
Display Boodschappen Boodschap << ! << ! << ! << ! << ! MIDI buffer full. >> MIDI data error. >> MIDI checksum error. >> Change internal battery. >> Card full. >> << ! File not found. >> << ! Bad card. >> << ! Card not ready. << ! Card unformatted. << ! >> >> Card write protected. >> << ! Illegal Card. >> << ! File already exists. >> << ! Data not exist. >> Illegal file. >> << ! << ! << ! Illegal file name. Read only file. >> >> << ! Can't make "EXT" file.
Problemen Oplossen De volgende tabel geeft u tips die de problemen op kunnen lossen en refereert naar pagina’s waar u over het bewuste probleem meer informatie kunt vinden. De meeste problemen zijn eenvoudigweg het resultaat van verkeerde instellingen. Lees, alvorens het instrument ter reparatie aan te bieden, eerst onderstaande adviezen door om te zien of u de oorzaak van het probleem kunt vinden en deze misschien zelf op kunt lossen.
Geluiden ○ ○ ○ ○ ○ ○ ○ ○klinken ○ ○ ○ ○ ○ ○vervormd. ○ ○ ○ ○ ○ ○ ○ ○ ○ ○ ○ ○ ○ ○ ○ ○ ○ ○ ○ ○ ○ ○ ○ ○ ○ ○ ○ ○ ○ ○ ○ ○ ○ ○ ○ ○ ○ ○ ○ ○ ○ ○ ○ ○ ○ • Zijn de effecten juist ingesteld? (pag. 81, 88, 89, 127, 130, 151) • Is het volume te hoog ingesteld? (pag. 6 en 20) • Is de GAIN-knop van de A/D INPUT te hoog ingesteld? (pag. 11) Het ○ ○ ○ ○geluid ○ ○ ○ ○ ○is ○ ○erg ○ ○ ○zacht.
Het ○ ○ ○ ○Plug-in ○ ○ ○ ○ ○ ○Board ○ ○ ○ ○ ○ werkt ○ ○ ○ ○ ○ niet. ○ ○ ○ ○ ○ ○ ○ ○ ○ ○ ○ ○ ○ ○ ○ ○ ○ ○ ○ ○ ○ ○ ○ ○ ○ ○ ○ ○ ○ ○ ○ ○ ○ ○ ○ ○ ○ ○ ○ • Is het Effect Plug-in Board geïnstalleerd in PLG2? (pag. 177) • Is het Multi-Part Plug-in Board geïnstalleerd in PLG1? (pag. 177) • Als er een Effect Plug-in Board is geïnstalleerd, is de PLG-EF parameter in het EFF-Part-scherm van de Performance op iets anders ingesteld als “OFF”? (pag.
Specificaties CS6x TOETSENBORD Aantal toetsen Touch TOONGENERATIE SYSTEEM CS6R 61 - Aanslaggevoelig, Aftertouch Toongenerators Polyfonie VOICE Aantal Voices - AWM2, Phrase Clip.
Index 0-9 4 Zones ............................................................................ 68 A A/D Input aansluitingen ..................................................11 Aansluiten op Externe Audio Apparatuur ...................... 13 Aansluiten op een Mengpaneel ...................................... 13 Aansluiten op een Personal Computer .......................... 16 Aansluiten van een Microfoon of Andere Audio Apparatuur ............................................................................
Effect Bypass .................................................................... 66 EFFECT-knoppen .............................................................. 6 Effect Parameter Instellingen .......................... 88, 128, 137 Effect Plug-in Boards ....................................................... 33 Effecten ............................................................ 6, 34, 40, 65 Effecten in de Performance Mode .................................. 65 Effecten in de Voice Mode ...............
MW Control Sterkte ................................................ 110, 135 MW Modulatie Sterkte ........................................... 110, 135 N Normal Voice ....................................................................79 O OCTAVE [UP]- en [DOWN]-knoppen (alleen CS6x) ........ 6 Octaaf en Midi Versttuurkanaalinstellingen ........... 75, 118 Octaaf Opschuiven (alleen op de CS6x) ....................... 28 Opslaan (Save) ...............................................................
SEQ Demo (Sequence Demo) ....................................... 161 Sequence Play Mode ......................................... 22, 35, 161 [SHIFT}-knop ............................................................... 8, 23 Single Part Plug-in Boards ............................................... 32 Song File afspelen .......................................................... 162 Soorten Parameters (Absoluut en Relatief) ..................... 25 Sound Controlknoppen (alleen op de Cs6x) ............
MEMO 190
BELANGRIJKE VEILIGHEIDSINSTRUCTIES IN DEZE OPSOMMING STAAT INFORMATIE IN VERBAND MET GEVAAR VOOR UZELF, SCHOKKEN EN BRANDGEVAAR. WAARSCHUWING- Als u gebruik maakt van elektrische- of elektronische producten moet u altijd de voorzorgsmaatregelen opvolgen. Hieronder valt o.a., al is dit niet alles: 1. Lees alle Veiligheidsinstructies, Installatie Instructies, het Speciale Boodschappen Gedeelte en de Assemblage Instructies ALVORENS aansluitingen te maken, incl. aansluiten op het stopcontact. 2 .
Copyright 2000: Yamaha Corporation - Geprint in Nederland Productie Nederlandstalige handleiding: TerrActs (www.terracts.