
User Manual
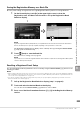

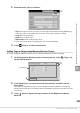
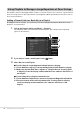

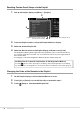
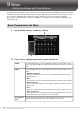
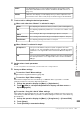

Table Of Contents
- PRECAUTIONS
- NOTICE
- Information
- Compatible formats for this instrument
- About the Manuals
- Included Accessories
- Contents
- Welcome to the World of CVP!
- Panel Controls
- Starting Up
- Basic Operations
- Display Structure
- Display Configuration
- Closing the Current Display
- Display-based Controls
- Using the ASSIGNABLE Buttons
- File Management
- Entering Characters
- Using the Pedals
- Using the Metronome
- Adjusting the Tempo
- Setting the Touch Sensitivity of the Keyboard
- Transposing the Pitch in Semitones
- Adjusting the Volume Balance
- Restoring the Factory-programmed Settings (Initializing)
- Data Backup
- Piano Room – Enjoying the Piano Performance –
- Voices – Playing the Keyboard –
- Styles – Playing Rhythm and Accompaniment –
- Song Playback – Playing and Practice Songs –
- Song Recording – Recording Your Performance –
- Microphone – Adding Vocal Harmony Effects to Your Singing –
- Registration Memory/Playlist – Saving and Recalling Custom Panel Setups –
- Mixer – Editing the Volume and Tonal Balance –
- Connections – Using Your Instrument with Other Devices –
- I/O Connectors
- Connecting USB Devices ([USB TO DEVICE] terminal)
- Connecting to a Computer ([USB TO HOST] terminal)
- Connecting to a Smart Device ([AUX IN] jack/Bluetooth/[USB TO HOST] terminal/Wireless LAN)
- Listening to Audio Playback by the External Device through the Instrument’s Speaker ([AUX IN] jack/Bluetooth/[USB TO HOST] terminal)
- Using an External Speaker System for Playback (AUX OUT [L/L+R]/[R] jacks)
- Connecting External MIDI Devices (MIDI terminals)
- Viewing the Instrument’s Display on an External Monitor
- Connecting a Microphone or Guitar ([MIC/LINE IN] jack)
- Connecting a Footswitch/Foot Controller ([AUX PEDAL] jack)
- Menu Display Function List
- CVP-909 (Grand piano type) Assembly
- CVP-909 Assembly
- CVP-905 Assembly
- Troubleshooting
- Specifications
- Index

CVP-909/CVP-905 Owner’s Manual
100
4. Touch (Save) to call up the Song Selection display, and then save as a
Song file (page 32).
To save the “Audio” Mixer settings:
Saving operation is not necessary. Audio Mixer settings are retained even when the power is
turned off.
To store the “Master” Mixer settings:
Your original edits can be stored as a Master Compressor type and Master EQ type. If you want
to recall the settings for future use, select the corresponding type at the upper right of each
display.
1. Touch (Save) in the “Compressor” display or “EQ” display.
2. Select one of User1 – User30, and then touch [Save] to call up the Character
Entry window.
3. On the Character Entry window, change the name as necessary, and then
touch [OK] to save the data.
The Mixer display lets you turn each channel of the current Style or MIDI Song on or off.
1 In the Mixer display, touch the [Style] tab, [Song Ch 1-8] tab or [Song Ch 9-16]
tab.
2 Touch the Channel which you want to turn on or off.
If you want to solo a specific channel, touch and hold the desired channel until the number turns
green. To cancel solo, simply touch the (green) channel number again.
3 As necessary, make other settings then save them as a Style file or Song file
(step 5 on page 99).
Turning Each Channel of the Style or MIDI Song On/Off
To change the Voice for each channel:
Touch the instrument icon below the channel number to call up the Voice Selection display, and
then select the desired Voice.
Channel
Voice