
User Manual
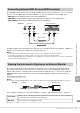
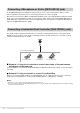
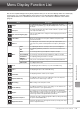
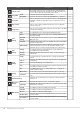
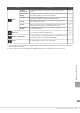

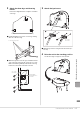
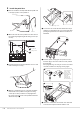
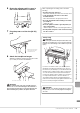

Table Of Contents
- PRECAUTIONS
- NOTICE
- Information
- Compatible formats for this instrument
- About the Manuals
- Included Accessories
- Contents
- Welcome to the World of CVP!
- Panel Controls
- Starting Up
- Basic Operations
- Display Structure
- Display Configuration
- Closing the Current Display
- Display-based Controls
- Using the ASSIGNABLE Buttons
- File Management
- Entering Characters
- Using the Pedals
- Using the Metronome
- Adjusting the Tempo
- Setting the Touch Sensitivity of the Keyboard
- Transposing the Pitch in Semitones
- Adjusting the Volume Balance
- Restoring the Factory-programmed Settings (Initializing)
- Data Backup
- Piano Room – Enjoying the Piano Performance –
- Voices – Playing the Keyboard –
- Styles – Playing Rhythm and Accompaniment –
- Song Playback – Playing and Practice Songs –
- Song Recording – Recording Your Performance –
- Microphone – Adding Vocal Harmony Effects to Your Singing –
- Registration Memory/Playlist – Saving and Recalling Custom Panel Setups –
- Mixer – Editing the Volume and Tonal Balance –
- Connections – Using Your Instrument with Other Devices –
- I/O Connectors
- Connecting USB Devices ([USB TO DEVICE] terminal)
- Connecting to a Computer ([USB TO HOST] terminal)
- Connecting to a Smart Device ([AUX IN] jack/Bluetooth/[USB TO HOST] terminal/Wireless LAN)
- Listening to Audio Playback by the External Device through the Instrument’s Speaker ([AUX IN] jack/Bluetooth/[USB TO HOST] terminal)
- Using an External Speaker System for Playback (AUX OUT [L/L+R]/[R] jacks)
- Connecting External MIDI Devices (MIDI terminals)
- Viewing the Instrument’s Display on an External Monitor
- Connecting a Microphone or Guitar ([MIC/LINE IN] jack)
- Connecting a Footswitch/Foot Controller ([AUX PEDAL] jack)
- Menu Display Function List
- CVP-909 (Grand piano type) Assembly
- CVP-909 Assembly
- CVP-905 Assembly
- Troubleshooting
- Specifications
- Index

CVP-909/CVP-905 Owner’s Manual
112
To the [MIC/LINE IN] jack (standard 1/4" phone jack), you can connect a microphone, guitar, or other
various equipment. For instructions on connecting a microphone, refer to page 86.
Note that you need to select “MIC” or “LINE IN” depending on the connected equipment. When the output
level of the connected equipment (such as a microphone, guitar, bass) is low, set the [MIC/LINE] switch to
“MIC.” When the output level of the connected equipment (such as a synthesizer, keyboard, CD player) is
high, set the [MIC/LINE] switch to “LINE.”
The FC4A or FC5 footswitches and the FC7 foot controller (sold separately) can be connected to [AUX
PEDAL] jack. A footswitch can be used for switching functions on and off, while a foot controller controls
continuous parameters such as volume.
Example 1: Using a foot controller to control the volume of the performance
data played on the keyboard.
Connect an FC7 foot controller to the [AUX PEDAL] jack. With the initial factory settings, no special setup is
necessary.
Example 2: Using a footswitch to control Song Start/Stop.
Connect a footswitch (FC4A or FC5) to the [AUX PEDAL] jack. To assign the function to the connected
pedal, select “Song Play/Pause” in the operation display: [Menu] [Assignable] [Pedal].
NOTE
• Make sure to connect or disconnect the pedal only when the power is off.
• Do not press the footswitch/foot pedal while turning the power on. Doing this changes the recognized polarity of the footswitch, resulting
in reversed footswitch operation.
Connecting a Microphone or Guitar ([MIC/LINE IN] jack)
Connecting a Footswitch/Foot Controller ([AUX PEDAL] jack)
Foot Pedals (sold separately)
Footswitch FC4A Footswitch FC5 Foot Controller FC7