
User Manual
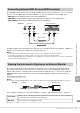
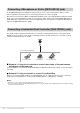
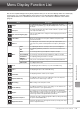
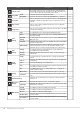
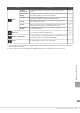


Table Of Contents
- PRECAUTIONS
- NOTICE
- Information
- Compatible formats for this instrument
- About the Manuals
- Included Accessories
- Contents
- Welcome to the World of CVP!
- Panel Controls
- Starting Up
- Basic Operations
- Display Structure
- Display Configuration
- Closing the Current Display
- Display-based Controls
- Using the ASSIGNABLE Buttons
- File Management
- Entering Characters
- Using the Pedals
- Using the Metronome
- Adjusting the Tempo
- Setting the Touch Sensitivity of the Keyboard
- Transposing the Pitch in Semitones
- Adjusting the Volume Balance
- Restoring the Factory-programmed Settings (Initializing)
- Data Backup
- Piano Room – Enjoying the Piano Performance –
- Voices – Playing the Keyboard –
- Styles – Playing Rhythm and Accompaniment –
- Song Playback – Playing and Practice Songs –
- Song Recording – Recording Your Performance –
- Microphone – Adding Vocal Harmony Effects to Your Singing –
- Registration Memory/Playlist – Saving and Recalling Custom Panel Setups –
- Mixer – Editing the Volume and Tonal Balance –
- Connections – Using Your Instrument with Other Devices –
- I/O Connectors
- Connecting USB Devices ([USB TO DEVICE] terminal)
- Connecting to a Computer ([USB TO HOST] terminal)
- Connecting to a Smart Device ([AUX IN] jack/Bluetooth/[USB TO HOST] terminal/Wireless LAN)
- Listening to Audio Playback by the External Device through the Instrument’s Speaker ([AUX IN] jack/Bluetooth/[USB TO HOST] terminal)
- Using an External Speaker System for Playback (AUX OUT [L/L+R]/[R] jacks)
- Connecting External MIDI Devices (MIDI terminals)
- Viewing the Instrument’s Display on an External Monitor
- Connecting a Microphone or Guitar ([MIC/LINE IN] jack)
- Connecting a Footswitch/Foot Controller ([AUX PEDAL] jack)
- Menu Display Function List
- CVP-909 (Grand piano type) Assembly
- CVP-909 Assembly
- CVP-905 Assembly
- Troubleshooting
- Specifications
- Index

CVP-909/CVP-905 Owner’s Manual 113
Menu Display Function List
Menu Display Function List
This section explains simply and very briefly explains what you can do in the displays which are called up by
touching each icon on the Menu display. Some functions are described in this Owner’s Manual on the
pages indicated below. For details about each function, refer to the Reference Manual on the website
(page 9).
Menu Description Pages
Tempo
For adjusting the tempo of MIDI Song, Style or Metronome. The same
operation as using TEMPO [−]/[+] and [TAP TEMPO] buttons can be done on
the display.
39
Transpose
For transposing the pitch of the entire sound in semitones, or just the sound
of the keyboard or MIDI Song.
41
Split Point & Fingering Type
Lets you set the Split Point or change the Chord Fingering type and Chord
Detection Area.
54, 65
Chord Tutor
Shows you an example of how to play a chord that corresponds to the
specified chord name.
–
Balance
For adjusting the volume balance among the keyboard parts (Main, Layer,
Left), Style, Song, and the sound input via the microphone, [AUX IN] jack,
etc.
42
Mixer
Filter
For adjusting the Harmonic Content (resonance) and sound brightness.
98
EQ
For adjusting equalization parameters to correct the tone or timbre of the
sound.
Effect
For selecting an Effect type and adjusts its depth for each part.
Chorus/Reverb
For selecting a Chorus/Reverb type and adjusts its depth for each part.
Pan/Volume
For adjusting panning and volume for each part.
(Master)
Compressor
Lets you turn on/off the Master Compressor, and edit related parameters.
(Master) EQ
For editing the Master EQ.
Score
For displaying the music notation (score) of the current MIDI Song. 70
Lyrics
For displaying the lyrics of the current MIDI Song. 71
Text Viewer
For displaying text files created on your computer. –
Keyboard Harmony
For adding the Harmony effect to the right-hand section of the keyboard.
Parameters such as Harmony type can be set.
–
Mic Setting
Makes settings for the microphone sound. –
Vocal Harmony
For adding Vocal Harmony effects to your singing. You can edit the Vocal
Harmony and save as your original harmony.
87
Playlist
For creating your own repertoire list in which the links to the Registration
Memory Bank file for each performance are registered. You can conveniently
select just the panel settings you want (as a Record) for your performance
from the huge number of Registration Memory Bank files.
89
Registration Sequence
Determines the order for calling up Registration Memory settings when using
the pedal or ASSIGNABLE button.
–
Registration Freeze
Determines the item(s) to be unchanged even when you call up panel setups
from the Registration Memory.
–