
User Manual
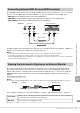
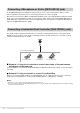
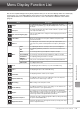
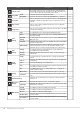

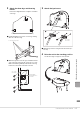
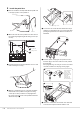
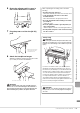

Table Of Contents
- PRECAUTIONS
- NOTICE
- Information
- Compatible formats for this instrument
- About the Manuals
- Included Accessories
- Contents
- Welcome to the World of CVP!
- Panel Controls
- Starting Up
- Basic Operations
- Display Structure
- Display Configuration
- Closing the Current Display
- Display-based Controls
- Using the ASSIGNABLE Buttons
- File Management
- Entering Characters
- Using the Pedals
- Using the Metronome
- Adjusting the Tempo
- Setting the Touch Sensitivity of the Keyboard
- Transposing the Pitch in Semitones
- Adjusting the Volume Balance
- Restoring the Factory-programmed Settings (Initializing)
- Data Backup
- Piano Room – Enjoying the Piano Performance –
- Voices – Playing the Keyboard –
- Styles – Playing Rhythm and Accompaniment –
- Song Playback – Playing and Practice Songs –
- Song Recording – Recording Your Performance –
- Microphone – Adding Vocal Harmony Effects to Your Singing –
- Registration Memory/Playlist – Saving and Recalling Custom Panel Setups –
- Mixer – Editing the Volume and Tonal Balance –
- Connections – Using Your Instrument with Other Devices –
- I/O Connectors
- Connecting USB Devices ([USB TO DEVICE] terminal)
- Connecting to a Computer ([USB TO HOST] terminal)
- Connecting to a Smart Device ([AUX IN] jack/Bluetooth/[USB TO HOST] terminal/Wireless LAN)
- Listening to Audio Playback by the External Device through the Instrument’s Speaker ([AUX IN] jack/Bluetooth/[USB TO HOST] terminal)
- Using an External Speaker System for Playback (AUX OUT [L/L+R]/[R] jacks)
- Connecting External MIDI Devices (MIDI terminals)
- Viewing the Instrument’s Display on an External Monitor
- Connecting a Microphone or Guitar ([MIC/LINE IN] jack)
- Connecting a Footswitch/Foot Controller ([AUX PEDAL] jack)
- Menu Display Function List
- CVP-909 (Grand piano type) Assembly
- CVP-909 Assembly
- CVP-905 Assembly
- Troubleshooting
- Specifications
- Index

CVP-909/CVP-905 Owner’s Manual
119
CVP-909 (Grand piano type) Assembly
6 Rotate the adjuster until it comes in
firm contact with the floor surface.
7 Plug the power cord into the [AC IN]
jack.
8 Attach the headphone hanger.
Attach the headphone hanger using two thin screws
(4 × 10 mm) as shown in the illustration.
CAUTION
To disassemble the unit, reverse the assembly sequence.
Failure to do so can result in damage to the instrument or
personal injury. In particular, if you lay down the main unit
without detaching the pedal box, the pedals will break.
Right leg on the bottom
of the main unit, when
viewed from front.
4 × 10 mm thin screws
After completing the assembly, please check the
following.
• Are there any parts left over?
Review the assembly procedure and correct any errors.
• Is the instrument clear of doors and other
movable fixtures?
Move the instrument to an appropriate location.
• Does the instrument make a rattling noise when
you shake it?
Tighten all screws.
• Does the pedal box rattle or give way when you
step on the pedals?
Turn the adjuster so that it is set firmly against the floor.
• Are the pedal and power cords inserted securely
into the sockets?
Transporting
CAUTION
When moving the instrument, always hold the bottom of the
main unit. Do not hold the key cover or top portion. Improper
handling can result in damage to the instrument or personal
injury.
If you move to another location, you can transport the
instrument along with other belongings. You can move
the unit as it is (assembled) or you can disassemble the
unit down to the condition it was in when you first took it
out of the box. Transport the keyboard horizontally. Do
not lean it up against a wall or stand it up on its side. Do
not subject the instrument to excessive vibration or
shock. When transporting the assembled instrument,
make sure all screws are properly tightened and have not
been loosened by moving the instrument.
CAUTION
If the unit creaks or is otherwise unsteady when you play on
the keyboard, refer to the assembly diagrams and retighten
all screws.
Do not hold
here.
Do not hold here.