
User Manual
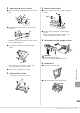
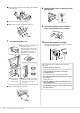
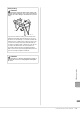

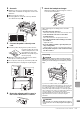
Table Of Contents
- PRECAUTIONS
- NOTICE
- Information
- Compatible formats for this instrument
- About the Manuals
- Included Accessories
- Contents
- Welcome to the World of CVP!
- Panel Controls
- Starting Up
- Basic Operations
- Display Structure
- Display Configuration
- Closing the Current Display
- Display-based Controls
- Using the ASSIGNABLE Buttons
- File Management
- Entering Characters
- Using the Pedals
- Using the Metronome
- Adjusting the Tempo
- Setting the Touch Sensitivity of the Keyboard
- Transposing the Pitch in Semitones
- Adjusting the Volume Balance
- Restoring the Factory-programmed Settings (Initializing)
- Data Backup
- Piano Room – Enjoying the Piano Performance –
- Voices – Playing the Keyboard –
- Styles – Playing Rhythm and Accompaniment –
- Song Playback – Playing and Practice Songs –
- Song Recording – Recording Your Performance –
- Microphone – Adding Vocal Harmony Effects to Your Singing –
- Registration Memory/Playlist – Saving and Recalling Custom Panel Setups –
- Mixer – Editing the Volume and Tonal Balance –
- Connections – Using Your Instrument with Other Devices –
- I/O Connectors
- Connecting USB Devices ([USB TO DEVICE] terminal)
- Connecting to a Computer ([USB TO HOST] terminal)
- Connecting to a Smart Device ([AUX IN] jack/Bluetooth/[USB TO HOST] terminal/Wireless LAN)
- Listening to Audio Playback by the External Device through the Instrument’s Speaker ([AUX IN] jack/Bluetooth/[USB TO HOST] terminal)
- Using an External Speaker System for Playback (AUX OUT [L/L+R]/[R] jacks)
- Connecting External MIDI Devices (MIDI terminals)
- Viewing the Instrument’s Display on an External Monitor
- Connecting a Microphone or Guitar ([MIC/LINE IN] jack)
- Connecting a Footswitch/Foot Controller ([AUX PEDAL] jack)
- Menu Display Function List
- CVP-909 (Grand piano type) Assembly
- CVP-909 Assembly
- CVP-905 Assembly
- Troubleshooting
- Specifications
- Index

CVP-909/CVP-905 Owner’s Manual
124
CVP-905 Assembly
CAUTION
• Assemble the unit on a hard and flat floor with ample space.
• Be careful not to confuse or misplace the parts, and be sure to
install all parts in the correct orientation. Please assemble the
unit in accordance with the sequence described here.
• Assembly should be carried out by at least two persons.
• Be sure to use only the included screws of the specified sizes.
Do not use any other screws. Use of incorrect screws can cause
damage or malfunction of the product.
• Be sure to tighten all screws upon completing assembly of each
unit.
• To disassemble the unit, reverse the assembly sequence.
Remove all parts from the package and make sure you
have all of the items.
1 Attach C to D and E.
1 Place C, D and E as shown in the illustration.
2 Untie and straighten out the bundled pedal cord.
Do not discard the vinyl tie. You will need the vinyl tie
later in step 5.
3 Secure D and E to C using four screws F.
Press D and E toward C while securing.
2 Attach B.
1 Align the holes on the upper side of B with the bracket
holes on D and E, then attach the upper corners of B
to D and E by finger-tightening two screws G. These
screws will be securely tightened in step 4-3.
2 Secure the bottom end of B using four screws H.
3 Mount A.
Be sure to place your hands at least 15 cm from
either end of A when positioning it. The projections
on top of D and E should be inserted to the holes on
the bottom of A.
CAUTION
• Be extra careful not to drop the unit or let your fingers be
pinched by the main unit.
• Do not hold the main unit in any position other than the position
specified here.
Have a Phillips-head (+) screwdriver of the appropriate size
ready.
B
C
DE
6 × 20 mm × 10
4 × 12 mm × 2
4 × 20 mm × 4
4 × 10
mm
× 2
F
G
H
J
Remove foamed styrol pads from the package, position them on
the floor, then place A on top of them. Position the pads so that
they will not block the speaker box on the bottom of A.
Bundled pedal cord inside here.
Cord holders × 2
Headphone hanger
Power cord
Speaker box
F
F
2
3 3
1
2
H
G
D
B
E
4-
3
Projections
15 cm or further in