
User Manual

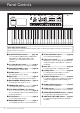

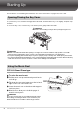

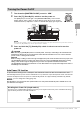
Table Of Contents
- PRECAUTIONS
- NOTICE
- Information
- Compatible formats for this instrument
- About the Manuals
- Included Accessories
- Contents
- Welcome to the World of CVP!
- Panel Controls
- Starting Up
- Basic Operations
- Display Structure
- Display Configuration
- Closing the Current Display
- Display-based Controls
- Using the ASSIGNABLE Buttons
- File Management
- Entering Characters
- Using the Pedals
- Using the Metronome
- Adjusting the Tempo
- Setting the Touch Sensitivity of the Keyboard
- Transposing the Pitch in Semitones
- Adjusting the Volume Balance
- Restoring the Factory-programmed Settings (Initializing)
- Data Backup
- Piano Room – Enjoying the Piano Performance –
- Voices – Playing the Keyboard –
- Styles – Playing Rhythm and Accompaniment –
- Song Playback – Playing and Practice Songs –
- Song Recording – Recording Your Performance –
- Microphone – Adding Vocal Harmony Effects to Your Singing –
- Registration Memory/Playlist – Saving and Recalling Custom Panel Setups –
- Mixer – Editing the Volume and Tonal Balance –
- Connections – Using Your Instrument with Other Devices –
- I/O Connectors
- Connecting USB Devices ([USB TO DEVICE] terminal)
- Connecting to a Computer ([USB TO HOST] terminal)
- Connecting to a Smart Device ([AUX IN] jack/Bluetooth/[USB TO HOST] terminal/Wireless LAN)
- Listening to Audio Playback by the External Device through the Instrument’s Speaker ([AUX IN] jack/Bluetooth/[USB TO HOST] terminal)
- Using an External Speaker System for Playback (AUX OUT [L/L+R]/[R] jacks)
- Connecting External MIDI Devices (MIDI terminals)
- Viewing the Instrument’s Display on an External Monitor
- Connecting a Microphone or Guitar ([MIC/LINE IN] jack)
- Connecting a Footswitch/Foot Controller ([AUX PEDAL] jack)
- Menu Display Function List
- CVP-909 (Grand piano type) Assembly
- CVP-909 Assembly
- CVP-905 Assembly
- Troubleshooting
- Specifications
- Index

CVP-909/CVP-905 Owner’s Manual
14
Panel Controls
1 [USB TO DEVICE] terminal .........page 103
For connecting a USB flash drive, USB wireless
LAN adaptor or USB display adaptor. This
terminal is also located at the bottom of the
instrument.
2 [P] (Standby/On) switch ...............page 19
For turning the power on or setting it to standby.
3 [MASTER VOLUME] control .........page 20
For adjusting the overall volume.
4 [DEMO] button ...............................page 13
For calling up the Demo display.
5 [MIC] lamp.......................................page 86
For checking the input level of the microphone.
6 [METRONOME ON/OFF] button ...page 39
For turning the metronome on or off.
7 TRANSPOSE buttons ....................page 41
For transposing the pitch in semitone steps.
8 [TAP TEMPO]/TEMPO [−]/[+] buttons
.........................................................page 39
For controlling the tempo for Style, MIDI Song and
metronome playback.
9 STYLE buttons ..............................page 58
For selecting a Style category.
) ASSIGNABLE buttons....................page 31
For assigning shortcuts to often used functions.
! STYLE CONTROL buttons............ page 60
For controlling Style playback.
@ LCD (touch screen) ....................... page 24
Allows you to select or change the parameters by
simply touching the ‘virtual’ buttons or sliders on
the display.
# Data dial ......................................... page 30
For selecting an item or changing the value.
$ [HOME] button............................... page 30
For calling up the Home display, or the first
display when the power is turned on.
% [PIANO ROOM] button .................. page 44
For instantly calling up the optimum piano-related
settings for playing the instrument simply as a
piano.
^ SONG CONTROL buttons............. page 69
For controlling Song playback.
& VOICE buttons ............................... page 49
For selecting a keyboard part or a Voice category.
* REGISTRATION MEMORY buttons... page 89
For registering and recalling panel setups.
( ONE TOUCH SETTING buttons .... page 63
For calling up the appropriate panel settings for
the Style.
Panel Setup (Panel Settings)
These settings of the instrument made by using the controls on the panel are together referred to as “panel setup” or
“panel settings” in this manual.
A-1 B-1 C0 D0 E0 F0 G0 A0 B0 C1 D1 E1 F1 G1 A1 B1 C2 D2 E2 F2 G2 A2 B2 C3 D3 E3
1
2 3 45 67 9 ) @
!
8