
User Manual

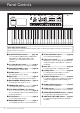

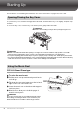
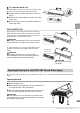

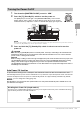
Table Of Contents
- PRECAUTIONS
- NOTICE
- Information
- Compatible formats for this instrument
- About the Manuals
- Included Accessories
- Contents
- Welcome to the World of CVP!
- Panel Controls
- Starting Up
- Basic Operations
- Display Structure
- Display Configuration
- Closing the Current Display
- Display-based Controls
- Using the ASSIGNABLE Buttons
- File Management
- Entering Characters
- Using the Pedals
- Using the Metronome
- Adjusting the Tempo
- Setting the Touch Sensitivity of the Keyboard
- Transposing the Pitch in Semitones
- Adjusting the Volume Balance
- Restoring the Factory-programmed Settings (Initializing)
- Data Backup
- Piano Room – Enjoying the Piano Performance –
- Voices – Playing the Keyboard –
- Styles – Playing Rhythm and Accompaniment –
- Song Playback – Playing and Practice Songs –
- Song Recording – Recording Your Performance –
- Microphone – Adding Vocal Harmony Effects to Your Singing –
- Registration Memory/Playlist – Saving and Recalling Custom Panel Setups –
- Mixer – Editing the Volume and Tonal Balance –
- Connections – Using Your Instrument with Other Devices –
- I/O Connectors
- Connecting USB Devices ([USB TO DEVICE] terminal)
- Connecting to a Computer ([USB TO HOST] terminal)
- Connecting to a Smart Device ([AUX IN] jack/Bluetooth/[USB TO HOST] terminal/Wireless LAN)
- Listening to Audio Playback by the External Device through the Instrument’s Speaker ([AUX IN] jack/Bluetooth/[USB TO HOST] terminal)
- Using an External Speaker System for Playback (AUX OUT [L/L+R]/[R] jacks)
- Connecting External MIDI Devices (MIDI terminals)
- Viewing the Instrument’s Display on an External Monitor
- Connecting a Microphone or Guitar ([MIC/LINE IN] jack)
- Connecting a Footswitch/Foot Controller ([AUX PEDAL] jack)
- Menu Display Function List
- CVP-909 (Grand piano type) Assembly
- CVP-909 Assembly
- CVP-905 Assembly
- Troubleshooting
- Specifications
- Index

CVP-909/CVP-905 Owner’s Manual
19
Starting Up
1 Turn down the [MASTER VOLUME] control to “MIN.”
2 Press the [P] (Standby/On) switch to turn the power on.
The [MIC] lamp located at right of the [MASTER VOLUME] control and the
display light up. After a while, the Home display (page 26) is shown and the
instrument starts up. Adjust the volume as desired while playing the keyboard.
NOTE
Before the Home display is shown, no sound is emitted when the keys are pressed. Moreover, the power does not turn off
even when the [P] (Standby/On) switch is pressed in this condition.
3 Press and hold the [P] (Standby/On) switch for about a second to turn the
power off.
CAUTION
Even when the [P] (Standby/On) switch is in standby status, electricity is still flowing to the instrument at the
minimum level. Remove the electric plug from the outlet when the instrument is not to be used for extended
periods of time, or during electrical storms.
NOTICE
While recording or editing, or while a message is displayed, the power cannot be turned off even if you press the
[P] (Standby/On) switch. If you want to turn off the power, press the [P] (Standby/On) switch after recording,
editing, or after the message has disappeared. If you need to force-quit the instrument, hold down the
[P] (S
tandby/On) switch for longer than three seconds. Note that the force-quit operation might cause data loss
and damage to the instrument.
Auto Power Off function
To prevent unnecessary power consumption, this instrument features an Auto Power Off function that
automatically turns the power off if the instrument is not operated for a specified period of time. The amount
of time that elapses before the power is automatically turned off is approximately 30 minutes by default;
however, you can change the setting (page 22).
NOTICE
Any data which is not saved via the Save operation will be lost if the power automatically turns off. Make sure to save
your data before this happens.
Turning the Power On/Off
Disabling Auto Power Off (simple method)
Turn the power on while holding down the lowest key on the keyboard. An “Auto power off disabled” message
appears briefly and Auto Power Off is disabled.
+
A-1