
User Manual


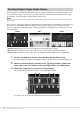
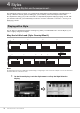
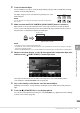
Table Of Contents
- PRECAUTIONS
- NOTICE
- Information
- Compatible formats for this instrument
- About the Manuals
- Included Accessories
- Contents
- Welcome to the World of CVP!
- Panel Controls
- Starting Up
- Basic Operations
- Display Structure
- Display Configuration
- Closing the Current Display
- Display-based Controls
- Using the ASSIGNABLE Buttons
- File Management
- Entering Characters
- Using the Pedals
- Using the Metronome
- Adjusting the Tempo
- Setting the Touch Sensitivity of the Keyboard
- Transposing the Pitch in Semitones
- Adjusting the Volume Balance
- Restoring the Factory-programmed Settings (Initializing)
- Data Backup
- Piano Room – Enjoying the Piano Performance –
- Voices – Playing the Keyboard –
- Styles – Playing Rhythm and Accompaniment –
- Song Playback – Playing and Practice Songs –
- Song Recording – Recording Your Performance –
- Microphone – Adding Vocal Harmony Effects to Your Singing –
- Registration Memory/Playlist – Saving and Recalling Custom Panel Setups –
- Mixer – Editing the Volume and Tonal Balance –
- Connections – Using Your Instrument with Other Devices –
- I/O Connectors
- Connecting USB Devices ([USB TO DEVICE] terminal)
- Connecting to a Computer ([USB TO HOST] terminal)
- Connecting to a Smart Device ([AUX IN] jack/Bluetooth/[USB TO HOST] terminal/Wireless LAN)
- Listening to Audio Playback by the External Device through the Instrument’s Speaker ([AUX IN] jack/Bluetooth/[USB TO HOST] terminal)
- Using an External Speaker System for Playback (AUX OUT [L/L+R]/[R] jacks)
- Connecting External MIDI Devices (MIDI terminals)
- Viewing the Instrument’s Display on an External Monitor
- Connecting a Microphone or Guitar ([MIC/LINE IN] jack)
- Connecting a Footswitch/Foot Controller ([AUX PEDAL] jack)
- Menu Display Function List
- CVP-909 (Grand piano type) Assembly
- CVP-909 Assembly
- CVP-905 Assembly
- Troubleshooting
- Specifications
- Index

CVP-909/CVP-905 Owner’s Manual
56
The instrument uses advanced digital technology to recreate the legendary sound of vintage organs. Just
as on a traditional organ, you can create your own sound by increasing and decreasing the levels of the
flute footages. The created Voice can be saved for future recall.
NOTE
The term “footage” is a reference to the sound generation of traditional pipe organs, in which the sound is produced by pipes of different
lengths (in feet).
There are three organ types, and each organ type has its own display, which beautifully recreates the actual
appearance of an actual instrument. Each type provides realistic, intuitive control over the sound with
special footage levers, tabs and switches—letting you adjust the sound with much the same feel as on an
actual instrument.
• Vintage: Simulating the iconic sound of an American vintage jazz and rock organ.
• Euro: A well known European Pops organ with the iconic rotary sound captured in the sample.
• Home: A traditional American tabs organ of the 70s and 80s suited for middle-of-the road standards.
1 On the Voice Selection display, select the desired Organ Flutes Voice.
Touch the [Organ Flutes] tab in the [Organ] category, and then select the desired Organ Voice.
2 Return to the Home display, and then touch (Organ Flutes) located at the
upper right of the Voice name to call up the Organ Flutes Voice Edit display.
3 Slide the Footage levers to adjust the footage settings.
The footage settings determine the basic sound of the Organ Flutes.
If you want, you can change the settings such as Rotary Speaker and Vibrato.
Creating Original Organ Flutes Voices
Vintage Euro
Home
2 4
1
35
3