
User Manual

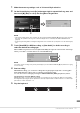
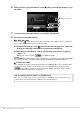
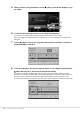
Table Of Contents
- PRECAUTIONS
- NOTICE
- Information
- Compatible formats for this instrument
- About the Manuals
- Included Accessories
- Contents
- Welcome to the World of CVP!
- Panel Controls
- Starting Up
- Basic Operations
- Display Structure
- Display Configuration
- Closing the Current Display
- Display-based Controls
- Using the ASSIGNABLE Buttons
- File Management
- Entering Characters
- Using the Pedals
- Using the Metronome
- Adjusting the Tempo
- Setting the Touch Sensitivity of the Keyboard
- Transposing the Pitch in Semitones
- Adjusting the Volume Balance
- Restoring the Factory-programmed Settings (Initializing)
- Data Backup
- Piano Room – Enjoying the Piano Performance –
- Voices – Playing the Keyboard –
- Styles – Playing Rhythm and Accompaniment –
- Song Playback – Playing and Practice Songs –
- Song Recording – Recording Your Performance –
- Microphone – Adding Vocal Harmony Effects to Your Singing –
- Registration Memory/Playlist – Saving and Recalling Custom Panel Setups –
- Mixer – Editing the Volume and Tonal Balance –
- Connections – Using Your Instrument with Other Devices –
- I/O Connectors
- Connecting USB Devices ([USB TO DEVICE] terminal)
- Connecting to a Computer ([USB TO HOST] terminal)
- Connecting to a Smart Device ([AUX IN] jack/Bluetooth/[USB TO HOST] terminal/Wireless LAN)
- Listening to Audio Playback by the External Device through the Instrument’s Speaker ([AUX IN] jack/Bluetooth/[USB TO HOST] terminal)
- Using an External Speaker System for Playback (AUX OUT [L/L+R]/[R] jacks)
- Connecting External MIDI Devices (MIDI terminals)
- Viewing the Instrument’s Display on an External Monitor
- Connecting a Microphone or Guitar ([MIC/LINE IN] jack)
- Connecting a Footswitch/Foot Controller ([AUX PEDAL] jack)
- Menu Display Function List
- CVP-909 (Grand piano type) Assembly
- CVP-909 Assembly
- CVP-905 Assembly
- Troubleshooting
- Specifications
- Index

CVP-909/CVP-905 Owner’s Manual
76
Song Recording
– Recording Your Performance –
This instrument allows you to record your performance in the following two methods.
• MIDI Recording
With this method, recorded performances are saved to the User memory of the instrument or a USB flash drive as
an SMF (format 0) MIDI file. If you want to re-record a specific section or change Voices and edit other
parameters, use this method. Also if you want to record your performance to each channel one by one, execute
Multi Track Recording of the MIDI recording method. Since a MIDI Song can be converted to an Audio Song after
recording (page 85), you may want to use MIDI recording (with overdubbing and multiple parts) to first create a
complex arrangement you would not otherwise be able to play live, and then convert it to an Audio Song. This
instrument allows you to record approximately 3 MB per Song.
• Audio Recording
With this method, recorded performances are saved to the User memory of the instrument or a USB flash drive as
Audio files. Since they are saved in stereo WAV format of normal CD quality resolution (44.1 kHz/16-bit) by
default, they can be transmitted to and played on portable music players by using a computer. The sound input
from [MIC/LINE IN] jack, [AUX IN] jack, etc. is also recorded, so you can record your singing voice through the
microphone or the sound played back on the connected audio device. The file format can be changed to MP3 via
[Menu] [SongSetting] [Rec] [Audio Rec Format]. This instrument allows you to record up to 80 minutes per
single recording.
NOTE
For a general overview of MIDI and how you can effectively use it, refer to “MIDI Basics” on the website (page 9).
Before recording, make the necessary settings such as Voice/Style selection (for MIDI Recording and Audio
Recording) and the microphone connection (only for Audio Recording, if you want to record your vocal). As
necessary, connect the USB flash drive to the [USB TO DEVICE] terminal, especially if you want to execute
Audio Recording.
NOTE
Before using a USB flash drive, be sure to read “Connecting USB Devices” on page 103.
Quick and easy recording of your piano performance
If you simply want to play a piano piece and record it without having to make any complicated settings, you
can do this by recording in the Piano Room. In this special display, you can start recording with just a single
touch. For details, refer to page 48.
Basic Procedure for Recording (MIDI/Audio Recording)
Before starting Audio Recording:
In Audio Recording, the performance data is automatically saved to the USB flash drive or User memory while
recording. If you want to save the data to a USB flash drive, connect the USB flash drive to the [USB TO
DEVICE] terminal beforehand. If it is not connected, the recorded data is automatically saved to User memory.
6