
User Manual
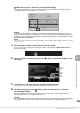
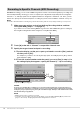
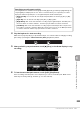
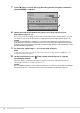
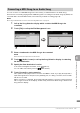


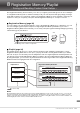
Table Of Contents
- PRECAUTIONS
- NOTICE
- Information
- Compatible formats for this instrument
- About the Manuals
- Included Accessories
- Contents
- Welcome to the World of CVP!
- Panel Controls
- Starting Up
- Basic Operations
- Display Structure
- Display Configuration
- Closing the Current Display
- Display-based Controls
- Using the ASSIGNABLE Buttons
- File Management
- Entering Characters
- Using the Pedals
- Using the Metronome
- Adjusting the Tempo
- Setting the Touch Sensitivity of the Keyboard
- Transposing the Pitch in Semitones
- Adjusting the Volume Balance
- Restoring the Factory-programmed Settings (Initializing)
- Data Backup
- Piano Room – Enjoying the Piano Performance –
- Voices – Playing the Keyboard –
- Styles – Playing Rhythm and Accompaniment –
- Song Playback – Playing and Practice Songs –
- Song Recording – Recording Your Performance –
- Microphone – Adding Vocal Harmony Effects to Your Singing –
- Registration Memory/Playlist – Saving and Recalling Custom Panel Setups –
- Mixer – Editing the Volume and Tonal Balance –
- Connections – Using Your Instrument with Other Devices –
- I/O Connectors
- Connecting USB Devices ([USB TO DEVICE] terminal)
- Connecting to a Computer ([USB TO HOST] terminal)
- Connecting to a Smart Device ([AUX IN] jack/Bluetooth/[USB TO HOST] terminal/Wireless LAN)
- Listening to Audio Playback by the External Device through the Instrument’s Speaker ([AUX IN] jack/Bluetooth/[USB TO HOST] terminal)
- Using an External Speaker System for Playback (AUX OUT [L/L+R]/[R] jacks)
- Connecting External MIDI Devices (MIDI terminals)
- Viewing the Instrument’s Display on an External Monitor
- Connecting a Microphone or Guitar ([MIC/LINE IN] jack)
- Connecting a Footswitch/Foot Controller ([AUX PEDAL] jack)
- Menu Display Function List
- CVP-909 (Grand piano type) Assembly
- CVP-909 Assembly
- CVP-905 Assembly
- Troubleshooting
- Specifications
- Index

CVP-909/CVP-905 Owner’s Manual
85
Song Recording – Recording Your Performance –
6
You can convert a recorded MIDI Song in the User memory or USB flash drive to an Audio Song.
Conversion is executed by playing back the MIDI Song and re-recording it as an Audio Song. By default, the
converted data is saved in WAV format, in the same way as Audio recording (page 76).
NOTE
Before using a USB flash drive, be sure to read “Connecting USB Devices” on page 103.
1 Call up the Song Selection display which contains the MIDI Song to be
converted.
2 Touch [File] to call up the File Management icons.
3 Enter a checkmark to the MIDI Song to be converted.
NOTE
Audio Conversion can only be done one file at a time.
4 Touch (Audio Convert) to call up the Song Selection display for selecting
the Save destination.
5 Specify the Save destination location.
To show the next higher level folder, touch (Above).
You can add a new folder by touching (New Folder).
6 Touch [Convert] to start conversion.
This operation starts playback and conversion from MIDI to audio. If you play the keyboard or
input audio signals via a microphone, the [AUX IN] jack, etc. during conversion, these sounds
will also be recorded.
When conversion is completed, the message indicating that the conversion is being executed
will no longer be shown in the display, and the newly created new Audio Song is shown in the
Song Selection display.
Converting a MIDI Song to an Audio Song
2 43