SPECIAL MESSAGE SECTION This product utilizes batteries or an external power supply (adapter). DO NOT connect this product to any power supply or adapter other than one described in the manual, on the name plate, or specifically recommended by Yamaha. This product may also use “household” type batteries. Some of these may be rechargeable. Make sure that the battery being charged is a rechargeable type and that the charger is intended for the battery being charged.
FCC INFORMATION (U.S.A.) 1. IMPORTANT NOTICE: DO NOT MODIFY THIS UNIT! This product, when installed as indicated in the instructions contained in this manual, meets FCC requirements. Modifications not expressly approved by Yamaha may void your authority, granted by the FCC, to use the product. 2. IMPORTANT: When connecting this product to accessories and/or another product use only high quality shielded cables. Cable/s supplied with this product MUST be used. Follow all installation instructions.
ZALECENIA PRZECZYTAJ UWAŻNIE PRZED PODJĘCIEM DALSZYCH CZYNNOŚCI * Przechowuj niniejszą instrukcję w bezpiecznym miejscu do wykorzystania w przyszłości. OSTRZEŻENIE Zawsze przestrzegaj opisanych poniżej podstawowych zaleceń dotyczących bezpieczeństwa, aby zapobiec poważnym zranieniom lub nawet śmierci na skutek porażenia prądem elektrycznym, zwarcia, urazów, pożaru lub innych zagrożeń.
Połączenia Zapisywanie danych • Przed podłączeniem instrumentu do innych komponentów elektronicznych odłącz je od zasilania. Przed włączeniem lub wyłączeniem zasilania wszystkich komponentów ustaw wszystkie poziomy głośności na minimum. Upewnij się, że poziomy głośności wszystkich komponentów zostały ustawione na minimum, a następnie stopniowo zwiększaj głośność w trakcie gry na instrumencie, aby osiągnąć żądany poziom odsłuchu.
Informacja o prawach autorskich Poniżej zamieszczono tytuły, autorów i informacje o prawach autorskich dotyczące trzech utworów zapisanych fabrycznie w tym instrumencie: Mona Lisa from the Paramount Picture CAPTAIN CAREY, U.S.A.
Dziękujemy za zakup Yamaha DGX-620/520, YPG-625/525 Portable Grand! Przed użyciem instrumentu zalecamy uważne przeczytanie niniejszego Podręcznika użytkownika, aby w pełni skorzystać z rozmaitych funkcji. Zalecamy przechowywanie podręcznika w bezpiecznym i łatwo dostępnym miejscu również po jego przeczytaniu, aby można było z niego szybko skorzystać w celu lepszego zrozumienia lub przypomnienia sobie określonego działania lub funkcji instrumentu.
Funkcje specjalne DGX-620/520, YPG-625/525 Standardowa klawiatura typu Graded Hammer (tylko DGX-620/YPG-625) Jako największy światowy producent fortepianów akustycznych firma Yamaha stworzyła klawiaturę, której działanie zasadniczo nie różni się od działania klawiatury prawdziwego fortepianu. Tak jak w tradycyjnym fortepianie akustycznym, klawisze niższych dźwięków wymagają większej siły nacisku, a klawisze wyższych dźwięków łatwo reagują na lżejszy nacisk.
Spis treści Informacja o prawach autorskich ....................................................6 Znaki graficzne na panelu instrumentu ...........................................6 Wyposażenie ...................................................................................7 Funkcje specjalne DGX-620/520, YPG-625/525............................. 8 Konfiguracja 10 Wymagania dotyczące zasilania ...................................................10 Podłączanie słuchawek (gniazdko [PHONES/OUTPUT]) ........
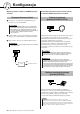
Konfiguracja Wykonaj poniższe czynności ZANIM włączysz zasilanie. Wymagania dotyczące zasilania Upewnij się, że przełącznik [STANDBY/ON] jest ustawiony w pozycji STANDBY. Wszystkie połączenia opisane poniżej należy ustanowić PRZED włączeniem zasilania. Podłączanie słuchawek (gniazdko [PHONES/OUTPUT]) • Korzystaj WYŁĄCZNIE z zasilacza sieciowego PA-5D firmy Yamaha (lub z innych zasilaczy wyraźnie zaleconych przez firmę Yamaha) w celu zasilania instrumentu z sieci prądu zmiennego.
Konfiguracja Podłączanie do komputera (port USB) ● Pulpit pod nuty Włóż pulpit pod nuty w szczeliny, tak jak pokazano na rysunku. Połącz port USB instrumentu z portem USB w komputerze, aby przesyłać dane muzyczne (str. 99). Aby korzystać z funkcji przesyłania danych przez port USB, postępuj w następujący sposób: • Najpierw upewnij się, że przycisk POWER w instrumencie ustawiony jest na OFF, a następnie podłącz instrument do komputera przy użyciu kabla USB.
Kontrolery na panelu i złącza Lista kategorii utworów (str. 31) Lista kategorii stylów (str. 130) u e i o q r w t y !0 !1 !2 !3 !4 !5 !6 !7 !8 !9 #4 Panel przedni q Przełącznik [STANDBY/ON] .............. str. 11 w Pokrętło [MASTER VOLUME] .......str. 11, 62 !4 Przycisk [REPEAT & LEARN]/ [ACMP ON/OFF] ............................str. 52, 24 e Przyciski FILE CONTROL [MENU], [EXECUTE] .....................................str. 91–96 !5 Przycisk [A-B REPEAT]/ [INTRO/ENDING/rit.]..........
Kontrolery na panelu i złącza Wyświetlacz (str. 64, 65) Lista muzycznej bazy danych (str. 131) Lista kategorii brzmień (str. 124) @7 @0 @1 @4 @2 @3 @8 @6 @5 #0 #1 #2 #3 @9 Panel tylny #5 #6 #7 #8 #9 Panel tylny @5 Przyciski CATEGORY [ ] i [ ] ... str. 63, 87 #6 Porty USB TO DEVICE, TO HOST ........................................ str. 11, 99 r #5 Gałka CONTRAST ...............................str. 65 f @4 Dial................................................. str.
Zmiana ustawień języka na wyświetlaczu Krótki przewodnik Na wyświetlaczu instrumentu mogą się pojawiać komunikaty w języku angielskim lub japońskim. Domyślnym językiem jest język angielski. Po przełączeniu na język japoński teksty odtwarzanych utworów, nazwy plików i niektóre komunikaty będą wyświetlane w języku japońskim. r 2 Naciśnij kilkakrotnie przyciski CATEGORY [ ] i [ ], aż pojawi się parametr „Language”. f 1 Naciśnij przycisk [FUNCTION].
Gra różnymi brzmieniami Oprócz brzmień fortepianu, organów i innych „standardowych” instrumentów klawiszowych, instrument jest wyposażony w brzmienia gitary, basu, smyczków, saksofonu, trąbki, instrumentów perkusyjnych oraz w inne efekty dźwiękowe — oferuje ogromną różnorodność muzycznych barw. Wybór brzmienia — MAIN Procedura ta wybiera główne brzmienie, którym będziesz grać na klawiaturze. 1 Naciśnij przycisk [VOICE]. Pojawi się okno wyboru głównego brzmienia.
Gra różnymi brzmieniami Gra dwoma brzmieniami jednocześnie — DUAL Można wybrać drugie brzmienie, które zostanie dodane do brzmienia głównego w momencie gry na klawiaturze. To drugie brzmienie nazywane jest brzmieniem Dual. 1 Naciśnij przycisk [DUAL ON/OFF]. Przycisk [DUAL ON/OF] włącza lub wyłącza brzmienie Dual. Po jego wciśnięciu w oknie MAIN pojawi się brzmienie DUAL. Gdy zagrasz na klawiaturze, do brzmienia głównego zostanie dodane aktualnie wybrane brzmienie Dual.
Gra różnymi brzmieniami 4 Zagraj na klawiaturze. Jednocześnie usłyszysz dwa brzmienia. Wybieraj i graj różnymi brzmieniami Dual. Naciśnij przycisk [EXIT], aby powrócić do głównego okna. Gra różnymi brzmieniami dla lewej i prawej ręki — SPLIT W trybie Split można grać różnymi brzmieniami na lewej i prawej stronie klawiatury rozdzielonej przez „punkt podziału” (split).
Gra różnymi brzmieniami 3 Wybierz żądane brzmienie Split. 4 Zagraj na klawiaturze. Obserwuj wyświetlane brzmienia Split i obracaj pokrętłem do momentu, aż wybrane zostanie brzmienie, którego chcesz użyć. Wybrane w tym momencie brzmienie staje się brzmieniem Split i będzie ono brzmiało po lewej i prawej stronie punktu podziału klawiatury. Przykładowo wybierz brzmienie „038 Folk Guitar”. Wybieraj i graj różnymi brzmieniami Split. Naciśnij przycisk [EXIT], aby powrócić do głównego okna.
Zabawne dźwięki Instrument ten zawiera paletę dźwięków perkusyjnych oraz niezwykłych efektów dźwiękowych, które mogą dostarczyć świetnej zabawy. Śmiech, bąbelki, odgłosy odrzutowca, efekty grozy i wiele innych. Te brzmienia mogą być dobrym sposobem na wywołanie odpowiedniego nastroju na imprezach. Zestawy perkusyjne Zestawy perkusyjne to kolekcje bębnów i instrumentów perkusyjnych.
Metronom Instrument wyposażony jest w metronom, umożliwiający regulację tempa i metrum. Zagraj i ustaw takie tempo, jakie jest dla Ciebie najwygodniejsze. Uruchom metronom Włącz metronom i uruchom go, naciskając przycisk [METRONOME ON/OFF]. Metronom wyłącza się przez ponowne naciśnięcie przycisku [METRONOME ON/OFF]. MEASURE 1 Wskazuje numer miary w takcie Ustawianie tempa metronomu 1 Naciśnij przycisk [TEMPO/TAP], aby wywołać ustawianie tempa.
Metronom Ustawianie ilości miar w takcie i długości trwania każdej miary W tym przykładzie użyjemy metrum 5/8. 1 Naciśnij i przytrzymaj przycisk [METRONOME ON/OFF] dłużej niż przez sekundę, aby wybrać funkcję „Time Signature-Numerator” (Metrum-licznik). Licznik (ilość miar w takcie) Mianownik (długość jednej miary) Przytrzymaj dłużej niż sekundę. 2 Obracaj pokrętłem, aby wybrać ilość miar w takcie.
Metronom Regulowanie głośności metronomu r 2 Użyj przycisków CATEGORY [ ] i [ ], aby wybrać parametr Metronome Volume (Głośność metronomu). f 1 Naciśnij przycisk [FUNCTION]. Głośność metronomu 3 22 Obracaj pokrętłem, aby ustawić żądaną głośność metronomu.
Odtwarzanie stylów Instrument posiada funkcję automatycznego akompaniamentu, która generuje akompaniament (rytm + bas + akordy) w wybranym przez Ciebie stylu, dopasowując go do akordów granych lewą ręką. Możesz wybierać spośród 150 różnych stylów, obejmujących różnorodne gatunki i metrum muzyczne (kompletną listę dostępnych stylów znajdziesz na str. 130). W tym paragrafie nauczysz się, jak wykorzystywać funkcje automatycznego akompaniamentu. Wybór rytmu stylu Większość stylów zawiera partię rytmiczną.
Odtwarzanie stylów Granie z użyciem wybranego stylu Wiesz już, jak wybierać rytm stylu. Teraz możesz się dowiedzieć, jak do podstawowego rytmu dodać bas i akompaniament akordowy i uzyskać pełny i bogaty akompaniament, przy którym możesz grać. 1 2 Naciśnij przycisk [STYLE] i wybierz żądany styl. Włącz akompaniament automatyczny. Naciśnij przycisk [ACMP ON/OFF]. Ponowne naciśnięcie tego przycisku wyłączy akompaniament automatyczny. Ta ikona pojawi się, gdy włączony jest akompaniament automatyczny.
Odtwarzanie stylów Gdy start synchroniczny jest włączony, bas oraz akompaniament akordowy stylu zaczną brzmieć w momencie naciśnięcia klawisza po lewej stronie punktu podziału. Naciśnij ponownie ten przycisk, aby wyłączyć funkcję startu synchronicznego. 4 Zagraj lewą ręką akord, aby rozpocząć odtwarzanie stylu. Możesz „grać” akordy nawet wtedy, gdy ich nie znasz. Instrument będzie rozpoznawał akord nawet w pojedynczym dźwięku.
Odtwarzanie stylów Gra z użyciem stylów jest bardziej satysfakcjonująca, jeśli rozumiesz akordy Akordy, tworzone przez jednoczesne granie wielu dźwięków, są podstawą harmonicznego akompaniamentu. W tym paragrafie przyjrzymy się sekwencjom różnych akordów granych jeden po drugim lub „sekwencjom akordowym”. Ponieważ każdy akord ma swoją wyjątkową „barwę”— nawet wtedy, gdy ten sam akord ma różne palcowanie — wybierane do sekwencji akordy mają olbrzymi wpływ na ogólny klimat granej muzyki.
Odtwarzanie stylów 138 Piano Boogie Zalecany styl — 3-akordowe boogie-woogie — Naciśnij przycisk [INTRO/ENDING/rit.]. C F C G F C Naciśnij przycisk [INTRO/ENDING/rit.]. Ta sekwencja zapewni urozmaicony podkład harmoniczny przy wykorzystaniu jedynie trzech akordów. Kiedy osiągniesz pewną wprawę, spróbuj zmieniać akordy w różnej kolejności! 086 Bossa Nova Zalecany styl — Bossa nova z akordami w stylu jazzowym — Naciśnij przycisk [INTRO/ENDING/rit.].
Odtwarzanie stylów Granie akordów akompaniamentu automatycznego Istnieją dwa sposoby grania akordów akompaniamentu automatycznego: ● Łatwe akordy ● Akordy standardowe Instrument automatycznie rozpozna różne typy akordów. Funkcja ta nazywa się Multi Fingering. Naciśnij przycisk [ACMP ON/OFF], aby włączyć akompaniament automatyczny (str. 24). Część klawiatury po lewej stronie punktu podziału klawiatury (domyślnie: 54/F#2) staje się „obszarem akompaniamentu”.
Korzystanie z utworów W tym znaczeniu pojęcie „utwór” (song) odnosi się do danych tworzących utwór muzyczny. Możesz w łatwy sposób słuchać 30 wewnętrznych utworów lub korzystać z nich na wiele możliwych sposobów — wykorzystując m.in. technologię Performance Assistant i lekcje do nauki gry. Utwory są uporządkowane według kategorii. W tym paragrafie nauczysz się, jak wybierać i odtwarzać utwory oraz poznasz 30 dostępnych utworów.
Korzystanie z utworów 001–030 3 Wbudowane utwory (zobacz na następnej stronie) 031–035 Utwory użytkownika (utwory nagrywane samodzielnie) 036– Utwory wczytane do instrumentu z komputera (str. 102–104) lub utwory przechowywane w pamięci flash (str. 91) Odsłuchaj utwór. Naciśnij przycisk [START/STOP], aby rozpocząć odtwarzanie wybranego utworu. Możesz zatrzymać odtwarzanie w dowolnym momencie, naciskając ponownie przycisk [START/STOP].
Korzystanie z utworów ● Lista utworów Lista zawiera utwory, które demonstrują funkcję Easy Song Arranger, utwory, które są idealne do wykorzystania z funkcją technologii Performance Assistant oraz inne. Kolumna „Sugerowane zastosowanie” zawiera propozycje, jak bardziej efektywnie korzystać z danych utworów.
Korzystanie z utworów Rodzaje utworów Następujące trzy rodzaje utworów występują w DGX-620/520, YPG-625/525. ● Utwory wstępnie zdefiniowane (30 utworów fabrycznie zaprogramowanych w instrumencie ............................................... numery utworów 001–030. ● Utwory użytkownika (nagrania własnych wykonań) ...................... numery utworów 031–035. ● Zewnętrzne pliki z utworami (dane z utworami muzycznymi wczytane z komputera*)...................................................................
Korzystanie z utworów Wyświetlanie zapisu nutowego utworu Instrument może wyświetlać zapis nutowy odtwarzanych utworów. Wyświetlany jest zapis nutowy 30 wewnętrznych utworów wstępnie zdefiniowanych oraz utworów przechowywanych w pamięci flash urządzenia magazynującego USB lub w pamięci flash.
Korzystanie z utworów Wyświetlanie tekstu utworu Jeśli utwór zawiera dane tekstowe, słowa utworu mogą pojawiać się na wyświetlaczu. Jeśli utwór nie zawiera danych tekstowych, słowa nie będą wyświetlane, nawet jeśli wciśnięty jest przycisk [LYRICS]. 1 Wybierz utwór. 2 Naciśnij przycisk [LYRICS]. Wybierz utwór 16, 20 lub 30, wykonując kroki 1 i 2 opisane na str. 29. Na wyświetlaczu pojawi się tytuł, autor tekstu oraz kompozytor utworu.
Łatwy sposób gry na pianinie Instrument posiada funkcję Performance Assistant, która umożliwia grę razem z odtwarzanym utworem, a efekt brzmienia jest jak u doskonałego pianisty (nawet jeśli robisz wiele błędów)! Możesz nawet grać dowolne dźwięki i nadal brzmi to dobrze! Możesz też nacisnąć jeden klawisz i uzyskać piękną melodię. Nawet jeśli nie potrafisz grać na pianinie i nie umiesz czytać nut, to i tak możesz się świetnie bawić. Technologia Performance Assistant zawiera cztery rodzaje.
Łatwy sposób gry na pianinie Rodzaj CHORD Type — Granie obiema rękami 1 Naciśnij przycisk [P.A.T. ON/OFF]. 2 Wybierz rodzaj CHORD. Spowoduje to włączenie funkcji technologii Performance Assistant. Gdy włączona jest funkcja technologii Performance Assistant, dioda jest podświetlona. Przytrzymaj dłużej niż sekundę. Wybierz Chord. Naciśnij i przytrzymaj przycisk [P.A.T. ON/OFF] dłużej niż przez sekundę tak, aby pojawił się rodzaj technologii Performance Assistant.
Łatwy sposób gry na pianinie 4 Naciśnij przycisk [START/STOP]. Rozpocznie się odtwarzanie utworu. Schemat podstawowy (pattern) będzie się powtarzał. Słuchaj podstawowego schematu przez pierwsze cztery takty i zacznij grać, zaczynając od taktu piątego. Na wyświetlaczu pokazane zostaną klawisze, które należy naciskać. 5 Zagraj na klawiaturze. Przed Po Spróbuj zagrać obiema rękami zapis nutowy po lewej stronie klawiatury. Możesz nawet naciskać na te same klawisze: C, E, G, C, E, G, C, E.
Łatwy sposób gry na pianinie Rodzaj CHORD/FREE — Stosowanie rodzaju Chord tylko dla lewej ręki 1 Naciśnij przycisk [P.A.T. ON/OFF]. 2 Wybierz rodzaj CHORD/FREE. Spowoduje to włączenie funkcji technologii Performance Assistant. Gdy włączona jest funkcja technologii Performance Assistant, dioda jest podświetlona. Przytrzymaj dłużej niż sekundę. Wybierz Chord/Free. Naciśnij i przytrzymaj przycisk [P.A.T. ON/OFF] dłużej niż przez sekundę, tak aby pojawił się rodzaj technologii Performance Assistant.
Łatwy sposób gry na pianinie 4 Naciśnij przycisk [START/STOP]. Rozpocznie się odtwarzanie utworu. Na wyświetlaczu pokazane zostaną klawisze, które należy naciskać lewą ręką. 5 Graj na klawiaturze. Graj prawą ręką po prawej stronie punktu podziału klawiatury, a lewą ręką po lewej stronie. Punkt podziału W tym przypadku nuty grane po lewej stronie punktu podziału klawiatury będą brzmieć o oktawę wyżej. Graj melodię „Nocturne” prawą ręką.
Łatwy sposób gry na pianinie MELODY Type — Granie jednym palcem Na str. 44 znajdziesz wskazówki dotyczące grania melodii. 1 Naciśnij przycisk [P.A.T. ON/OFF]. 2 Wybierz rodzaj MELODY. Spowoduje to włączenie funkcji technologii Performance Assistant. Gdy włączona jest funkcja technologii Performance Assistant, dioda jest podświetlona. Przytrzymaj dłużej niż sekundę. Wybierz Melody. Naciśnij i przytrzymaj przycisk [P.A.T.
Łatwy sposób gry na pianinie 4 Naciśnij przycisk [START/STOP]. Rozpocznie się odtwarzanie utworu. Ponieważ wybrany został rodzaj Melody, melodia utworu nie będzie słyszalna. Możesz samemodzielnie grać melodię (krok 5). Rozpoczęcie utworu! 5 Graj na klawiaturze. Przed rozpoczęciem, spróbuj poczuć rytm utworu. Następnie uderz klawisz jednym palcem prawej ręki do rytmu z muzyką. Możesz nacisnąć dowolny klawisz.
Łatwy sposób gry na pianinie CHORD/MELODY — Chord dla lewej ręki, a Melody dla prawej ręki 1 Naciśnij przycisk [P.A.T. ON/OFF]. 2 Wybierz rodzaj CHORD/MELODY. Spowoduje to włączenie funkcji technologii Performance Assistant. Gdy włączona jest funkcja technologii Performance Assistant, dioda jest podświetlona. Przytrzymaj dłużej niż sekundę. Wybierz Chord/Melody. Naciśnij i przytrzymaj przycisk [P.A.T. ON/OFF] przez dłużej niż sekundę, tak aby pojawił się rodzaj technologii Performance Assistant.
Łatwy sposób gry na pianinie 4 Naciśnij przycisk [START/STOP]. Rozpocznie się odtwarzanie utworu. Schemat podstawowy będzie się powtarzać. Posłuchaj ośmiu taktów, starając się zapamiętać schemat podstawowy. Zacznij grać od dziewiątego taktu. 5 Graj na klawiaturze. Graj prawą ręką po prawej stronie punktu podziału klawiatury, a lewą ręką po lewej stronie. Punkt podziału W tym przypadku, nuty grane po lewej stronie punktu podziału klawiatury będą brzmiały o oktawę wyżej.
Łatwy sposób gry na pianinie Dzięki funkcji Performance Assistant możesz grać jak profesjonalista! Tutaj znajdziesz kilka wskazówek dotyczących rodzaju Chord. Jeśli wybierzesz rodzaj Chord/Free lub Chord/Melody, lewa strona klawiatury stanie się stroną typu Chord, więc skorzystaj z tych wskazówek dla lewej strony punktu podziału klawiatury. Przed rozpoczęciem spróbuj poczuć rytm utworu.
Łatwy sposób gry na pianinie Wykorzystanie zapisu nutowego w rodzaju Melody. Jeśli chcesz grać melodię we właściwym rytmie, zastosuj funkcję wyświetlania zapisu nutowego. Wyświetlanie zapisu nutowego. Po wykonaniu kroków 1–4 ze str. 40 naciśnij przycisk [SCORE]. Pojawi się zapis nutowy melodii. Znacznik Akord Melodia Podczas odtwarzania znacznik będzie wskazywać aktualną pozycję w zapisie nutowym.
Łatwy sposób gry na pianinie Zmiana tempa utworu W trakcie stosowania technologii Performance Assistant lub w każdej innej sytuacji, w której tempo utworu jest zbyt szybkie lub zbyt wolne, możesz dowolnie regulować tempo muzyczne. Naciśnij przycisk [TEMPO/TAP]. Na wyświetlaczu pojawi się wartość tempa. Posługując się pokrętłem, przyciskami [+] i [-] lub [0] do [9], możesz dowolnie je ustawić w zakresie od 011 do 280 miar ćwierćnutowych na minutę.
Wybór utworu do ćwiczenia Yamaha Education Suite Możesz wybrać dowolny utwór do ćwiczenia partii lewej lub prawej ręki albo obu rąk. Możesz także wykorzystać utwory (tylko w formacie SMF 0) pobrane z internetu i zapisane w pamięci flash (str. 102). Podczas lekcji możesz grać tak wolno, jak chcesz, a nawet możesz grać niewłaściwe dźwięki. Odtwarzanie utworu zostanie zwolnione tak, aby dopasować się do prędkości, która jest dla Ciebie dogodna.
Wybór utworu do ćwiczenia 3 Wybierz partię, którą chcesz ćwiczyć. Naciśnij przycisk [R], aby ćwiczyć prawą rękę, przycisk [L], aby ćwiczyć lewą rękę albo oba przyciski [R] i [L] w celu ćwiczenia obu rąk. Aktualnie wybrana partia zostanie pokazana w prawym górnym rogu wyświetlacza. Wybierz R, aby ćwiczyć prawą rękę. Wybierz L, aby ćwiczyć lewą rękę. Wybierz LR, aby ćwiczyć obie ręce. 4 Rozpocznij Lekcję 1. Naciśnij przycisk LESSON [START], aby wybrać Lekcję 1.
Wybór utworu do ćwiczenia Graj dźwięki pokazane w zapisie nutowym na wyświetlaczu. Następna nuta do zagrania oznaczona jest kropką (●) na właściwym klawiszu na klawiaturze graficznej. Gdy zagrasz właściwą nutę, znacznik przesunie się do następnego klawisza. Odtwarzanie zostanie wstrzymane do momentu, aż zagrasz właściwą nutę. Trójkątny znacznik (▼) nad zapisem nutowym wskazuje postęp odtwarzania utworu.
Wybór utworu do ćwiczenia Lekcja 2 — Your Tempo Naucz się grać właściwe nuty we właściwym rytmie. Tempo odtwarzania utworu będzie się dopasowywało do prędkości Twojej gry. Utwór zostanie zwolniony, jeśli zagrasz niewłaściwe dźwięki, więc możesz się uczyć we własnym tempie. 1 Wybierz utwór i partię, którą chcesz ćwiczyć (kroki 1 i 3 ze str. 47). 2 Rozpocznij Lekcję 2.
Wybór utworu do ćwiczenia Lekcja 3 — Minus One Teraz możesz doskonalić swoją technikę gry. Utwór będzie odtwarzany w normalnym tempie oprócz partii wybranej do grania. Graj, słuchając utworu. 1 Wybierz utwór i partię, którą chcesz ćwiczyć (kroki 1 i 3 ze str. 47). 2 Rozpocznij Lekcję 3. Za każdym razem, gdy naciśniesz przycisk LESSON [START], tryby nauki będą pojawiać się kolejno: Lekcja 1 → Lekcja 2 → Lekcja 3 → Koniec lekcji → Lekcja 1 ...
Wybór utworu do ćwiczenia Praktyka czyni mistrza — powtarzanie i nauka Skorzystaj z funkcji, jeśli chcesz ćwiczyć fragment, w którym popełniony został błąd lub inny, który sprawia problemy. W trakcie lekcji naciśnij przycisk [REPEAT & LEART]. Utwór cofnie się o cztery takty od punktu, w którym naciśnięto przycisk, a odtwarzanie rozpocznie się po jednotaktowym wstępie.
Granie z muzyczną bazą danych Chcesz grać muzykę w swoim ulubiony stylu, ale nie masz pewności, jak dobrać najlepsze brzmienie i styl do rodzaju muzyki, który chcesz grać? Wybierz odpowiedni styl z muzycznej bazy danych. Ustawienia panelu zostaną automatycznie dostosowane, aby uzyskać idealną kombinację brzmienia i stylu. 1 Naciśnij przycisk [MUSIC DATABASE]. Na wyświetlaczu pokaże się lista muzycznej bazy danych. 2 Wybierz muzyczną bazę danych. 3 Graj akordy lewą, a melodię prawą ręką.
Zmiana stylu utworu Oprócz stylu domyślnego funkcja Easy Song Arranger umożliwia wybranie innego stylu dla każdego utworu. Oznacza to, że utwór, który normalnie jest balladą, możesz grać jako bossa novę, hip-hop itd. Możesz stworzyć zupełnie nową aranżację, zmieniając styl, na podstawie którego odtwarzany jest utwór. Możesz także zmienić brzmienie melodii utworu oraz brzmienie klawiatury, osiągając zupełnie inny charakter utworu.
Zmiana stylu utworu 3 Odsłuchaj utwór. Naciśnij przycisk [START/STOP], aby rozpocząć odtwarzanie utworu. Podczas odtwarzania utworu przejdź do następnego kroku. • Podczas odtwarzania utworów o numerach 010, 011 oraz 020–030 przy użyciu funkcji Easy Song Arranger ścieżka melodii zostanie automatycznie wyciszona i melodia nie będzie słyszalna. Aby usłyszeć ścieżki melodyczne, należy nacisnąć przyciski SONG MEMORY [3]–[5]. Rozpoczęcie utworu! 4 Naciśnij przycisk [EASY SONG ARRANGER].
Nagranie własnego wykonania Możesz nagrać do pięciu własnych wykonań i zapisać je jako utwory użytkownika o numerach 031-035. Po zapisaniu utwory mogą być przekonwertowane na pliki formatu SMF i zapisane w pamięci flash USB (str. 94), a następnie używane z funkcją wyświetlania zapisu nutowego. Gdy poczujesz natchnienie i stworzysz świetną melodię, możesz ją zapisać zarówno w formie nagrania, jak i w formie zapisu nutowego.
Nagranie własnego wykonania Procedura nagrywania 1 W oknie MAIN naciśnij przycisk [SONG], a następnie obracaj pokrętłem, aby wybrać numer utworu użytkownika (031–035), który chcesz nagrywać. Obróć pokrętłem, aby wybrać numer utworu między 031 a 035. 2 Wybierz ścieżkę lub ścieżki, na które chcesz nagrywać, i potwierdź wybór na wyświetlaczu. ◆ Nagraj jednocześnie ścieżkę melodii i ścieżkę akompaniamentu Naciśnij przycisk ścieżki melodii [1]–[5], na którą chcesz nagrywać, przytrzymując przycisk [REC].
Nagranie własnego wykonania 3 Nagrywanie rozpocznie się, gdy zagrasz na klawiaturze. Nagrywanie można również uruchomić, naciskając przycisk [START/STOP]. Podczas nagrywania na wyświetlaczu będzie pokazany aktualny takt. Aktualny takt Rozpoczęcie nagrywania 4 Zatrzymaj nagrywanie, naciskając przycisk [START/STOP] lub [REC]. lub Jeśli naciśniesz przycisk [INTRO/ENDING/rit.] podczas nagrywania ścieżki stylu, odegrany zostanie odpowiedni schemat zakończenia i nagrywanie zostanie zatrzymane.
Nagranie własnego wykonania ● Dane, których nie można nagrać • Brzmienie „split” • Na początku nagrania ścieżki nagrane zostają następujące parametry. Zmiany dokonane w trakcie trwania utworu nie zostaną nagrane: Reverb type, Chorus type, Time signature, Style number, Style volume, Tempo (jeśli nagrywana jest ścieżka stylu) Song Clear — Kasowanie utworów użytkownika Ta funkcja kasuje cały utwór użytkownika (wszystkie ścieżki). 1 2 W oknie MAIN wybierz utwór użytkownika (031–035), który chcesz skasować.
Nagranie własnego wykonania Track Clear — Kasowanie wybranej ścieżki w utworze użytkownika Funkcja ta pozwala wykasować określoną ścieżkę w utworze użytkownika. 1 2 W oknie MAIN wybierz utwór użytkownika (031–035), który chcesz skasować. Naciśnij i przytrzymaj dłużej niż przez sekundę przycisk SONG MEMORY ([1]–[5], [A]), odpowiadający ścieżce, którą chcesz skasować. Na wyświetlaczu pojawi się komunikat potwierdzający. Przytrzymaj dłużej niż sekundę. 3 Naciśnij przycisk [+].
Kopia zapasowa i inicjowanie Kopia zapasowa Następujące ustawienia są zapamiętywane i zachowywane nawet wtedy, gdy zasilanie zostanie wyłączone. Jeśli chcesz zainicjować ustawienia użyj funkcji inicjowania opisanej poniżej.
Obsługa podstawowa Obsługa podstawowa Ogólna obsługa DGX-620/520, YPG-625/525 oparta jest na prostych operacjach. 1 Naciśnij przycisk, aby wybrać funkcję podstawową. 2 Użyj pokrętła, aby wybrać parametr lub wartość. 3 Uruchom funkcję. 3 Uruchom funkcję. 1 Wybierz funkcję podstawową. 2 Wybierz parametr lub wartość. Wyświetlacz (str. 64, 65) ● Regulacja głośności Ustaw głośność dźwięku słyszanego w głośnikach instrumentu lub w słuchawkach podłączonych do gniazdka PHONES.
Obsługa podstawowa 2 Użyj pokrętła, aby wybrać parametr lub wartość. Gdy wybierzesz funkcję podstawową, parametr odpowiadający tej funkcji zostanie wyświetlony na wyświetlaczu. Aby wybrać żądany parametr, możesz użyć pokrętła lub przycisków numerycznych [0]–[9]. Aktualnie wybrany parametr zostanie podświetlony na wyświetlaczu. W tym przykładzie naciśnięty został przycisk [VOICE].
Obsługa podstawowa Okna na wyświetlaczu ● Nazwy okien Wszystkie operacje wykonuje się, obserwując wyświetlacz. Dla różnych trybów i funkcji przewidziane są różne typy okna na wyświetlaczu. Nazwa aktualnego okna pojawia się u góry ekranu. ● Okno MAIN (Główne) Tytuł Aby powrócić do okna MAIN Większość operacji wykonuje się w oknie MAIN. Możesz powrócić do okna MAIN z dowolnego innego okna, naciskając przycisk [EXIT] przy prawym dolnym rogu wyświetlacza. r f ● Okno FUNCTION (str.
Obsługa podstawowa Parametry okna MAIN Okno MAIN pokazuje wszystkie aktualne ustawienia podstawowe: utworu, stylu, brzmienia. A także szereg wskaźników, które wskazują, czy dana funkcja jest włączona/wyłączona. * Ustaw regulator LCD CONTRAST na panelu tylnim, aby uzyskać optymalną wyrazistość wyświetlacza. Powtarzanie A-B Tempo Pojawi się, gdy włączone jest odtwarzanie zapętlone. Transpozycja Numer taktu Ikony włączenia/wyłączenia funkcji Dual Wyświetlana, gdy włączone jest brzmienie Dual.
Obsługa zaawansowana Obs ł ana ow u zaawans ga Gra z różnymi efektami Dodawanie harmonii Funkcja ta dodaje głosy harmonii do brzmienia głównego. 1 Naciśnij przycisk [HARMONY ON/OFF], aby włączyć funkcję harmonii. Aby wyłączyć harmonię, naciśnij ponownie przycisk [HARMONY ON/OFF]. Przytrzymaj dłużej niż sekundę.
Gra z różnymi efektami Dodawanie pogłosu Pogłos pozwala na grę z głęboką przestrzenią hali koncertowej. Gdy wybierzesz styl lub utwór, do wykorzystywanego brzmienia zostanie automatycznie dobrany optymalny rodzaj pogłosu. Jeśli chcesz wybrać inny rodzaj pogłosu, zastosuj się do wskazówek opisanych poniżej. W Tabeli rodzajów efektów na str. 133 znajdziesz informacje o dostępnych rodzajach pogłosu.
Gra z różnymi efektami Dodawanie efektu Chorus Efekt Chorus „pogrubia” brzmienie, tworząc wrażenie wielu takich samych dźwięków granych unisono. Gdy wybierzesz styl lub utwór, dla wykorzystywanego brzmienia zostanie automatycznie dobrany optymalny rodzaj Chorus. Jeśli chcesz wybrać inny rodzaj efektu Chorus, zastosuj się do wskazówek opisanych poniżej. 1 Naciśnij przycisk [FUNCTION], aby f 2 Użyj przycisków CATEGORY[ 3 Użyj pokrętła, aby wybrać rodzaj efektu Chorus.
Gra z różnymi efektami Funkcja Sustain na panelu Ta funkcja wydłuża czas wybrzmiewania dźwięków instrumentu. Użyj jej, gdy chcesz dodać efekt Sustain do wszystkich brzmień jednocześnie niezależnie od działania przełącznika nożnego. Funkcja Sustain nie wpływa na brzmienia Split. 1 Naciśnij przycisk [FUNCTION], aby otworzyć okno FUNCTION. 3 Możesz teraz użyć przycisków [+] i [-], aby włączyć lub wyłączyć efekt Sustain.
zaawans Obs ł Funkcje przydatne podczas gry Tap Start Możesz uruchomić utwór/styl, naciskając przycisk [TEMP/TAP] w żądanym tempie — 4 razy dla metrum czteromiarowego, a 3 razy dla metrum trójmiarowego. Możesz zmienić tempo w trakcie odtwarzania utworu, naciskając dwukrotnie przycisk. Dynamika klawiatury Możesz ustawić czułość klawiatury na siłę uderzenia, postępując w poniższy sposób. 1 Naciśnij przycisk [FUNCTION]. 3 Użyj pokrętła, aby wybrać ustawienie czułości między 1 a 3.
Funkcje przydatne podczas gry Funkcja One Touch Setting Niekiedy wybranie najlepszego brzmienia do gry z danym utworem czy stylem może być kłopotliwe. Funkcja One Touch Setting automatycznie wybiera najbardziej odpowiednie brzmienie, gdy wybierany jest styl lub utwór. Po prostu wybierz brzmienie nr „000”, aby uaktywnić tę funkcję. 1 Wybierz brzmienie numer „000” (kroki 1–2 na str. 15). 4 Użyj pokrętła, aby zmieniać utwory, a następnie graj na klawiaturze i słuchaj brzmienia.
Funkcje przydatne podczas gry Wybieranie ustawienia EQ dla uzyskania najlepszego brzmienia Dostępnych jest pięć różnych ustawień korektora brzmienia (EQ), aby umożliwić uzyskanie najlepszego brzmienia w zależności od sposobu odsłuchu — na wewnętrznych głośnikach instrumentu, słuchawkach lub zewnętrznym systemie nagłośnieniowym. 1 Naciśnij przycisk [FUNCTION]. f 2 Naciskaj przyciski CATEGORY[ r Aktualnie wybrany parametr zostanie pokazany na wyświetlaczu.
Funkcje przydatne podczas gry Kontrolery stroju 1 Naciśnij przycisk [FUNCTION]. 1 Naciśnij przycisk [FUNCTION]. ] i [ ], aby wybrać parametr Transpose. 2 Użyj przycisków CATEGORY[ f f 2 Użyj przycisków CATEGORY[ r ◆ Małe zmiany wysokości stroju (Strojenie) Ogólny strój instrumentu można przesunąć w górę lub w dół o 100 setnych co 1 setną (100 setnych = 1 półton).
zaawans Obs ł ga ana ow u Funkcje stylu (akompaniament automatyczny) Podstawowe działanie funkcji stylu (akompaniamentu automatycznego) opisane jest na str. 23 dodatku Krótki przewodnik. Poniżej znajdziesz m.in. informacje o innych sposobach gry stylami, o regulacji głośności stylu i możliwościach gry akordami przy użyciu stylów.
Funkcje stylu (akompaniament automatyczny) 1 Naciśnij przycisk [STYLE], a następnie wybierz styl. 4 Naciśnij przycisk [MAIN/AUTO FILL]. 2 Naciśnij przycisk [ACMP ON/OFF], aby włączyć akompaniament automatyczny. Wyświetlona zostanie nazwa wybranej sekcji — MAIN A lub MAIN B 5 Naciśnij przycisk [INTRO/ENDING/rit.]. Pojawia się, gdy akompaniament automatyczny jest włączony Możesz teraz odtworzyć intro.
Funkcje stylu (akompaniament automatyczny) 7 Naciśnij przycisk [MAIN/AUTO FILL]. Gdy sekcja Fill-in zostanie zakończona, nastąpi płynne przejście do wybranej sekcji A/B. 8 Naciśnij przycisk [INTRO/ENDING/rit.]. Styl zostanie uruchomiony, gdy zagrasz na klawiszach. Spowoduje to uruchomienie odtwarzania wybranego schematu zakończenia. Po zagraniu całego zakończenia odtwarzanie akompaniamentu automatycznego zatrzyma się. Jeśli podczas odtwarzania zakończenia odpowiadający mu przycisk [INTRO/ENDING/rit.
Funkcje stylu (akompaniament automatyczny) Ustawianie punktu podziału Początkowo punkt podziału jest ustawiony na klawiszu nr 54 (klawisz F #2), ale można go zmienić na inny klawisz, jak opisano poniżej. 1 Naciśnij przycisk [FUNCTION]. 3 Użyj pokrętła, aby ustawić punkt podziału na dowolnym klawiszu od 000 (C-2) do 127 (G8). Punkt podziału (54 : F#2) • Gdy zmienia się punkt podziału, zmianie ulega także obszar akompaniamentu automatycznego. • Punkt podziału nie może być zmieniony w trakcie lekcji.
Funkcje stylu (akompaniament automatyczny) Granie stylu z akordami, ale bez rytmu (Stop Accompaniment) Gdy sekcja akompaniamentu jest włączona (pokazana jest ikona ACMP ON), a funkcja Synchro Start wyłączona, można grać akordy w lewej części klawiatury po zatrzymaniu akompaniamentu, a jego akordy wciąż będą słyszalne. To jest funkcja „Stop Accompaniment”, użyte może być dowolne palcowanie akordów rozpoznawane przez instrument (str. 28).
Funkcje stylu (akompaniament automatyczny) Podstawowe informacje o akordach Dwa lub więcej dźwięków zagranych razem tworzą „akord”. Najbardziej podstawowy typ akordu to trójdźwięk, składający się z trzech nut: prymy, tercji i kwinty danej gamy. Na przykład trójdźwięk C dur składa się z dźwięków: C (pryma), E (tercja na skali C dur) oraz G (kwinta w gamie C dur).
Funkcje stylu (akompaniament automatyczny) ■Rozpoznawane akordy standardowe ● ● ● ● ● ● ● ● ● ● ● ● ● ● ● ● ● ● ● ● ● ● ● ● ● ● ● ● ● Wszystkie akordy w tabeli to akordy z prymą C.
Funkcje stylu (akompaniament automatyczny) Plik stylu Instrument posiada 150 wewnętrznych stylów. Dodatkowo inne style, jak te na dołączonej płycie CD-ROM albo pobrane z internetu (pasują tylko style z rozszerzeniem „sty”), mogą być wczytane pod numer stylu 151 i używane w taki sam sposób, jak style wewnętrzne. Szczegóły na temat wczytywania pliku stylu można znaleźć w części „Wczytywanie plików użytkownika i plików stylu” na str. 95.
Funkcje stylu (akompaniament automatyczny) Wyszukiwanie akordów za pomocą Słownika akordów Funkcja Dictionary jest po prostu wbudowanym wykazem akordów, który pokazuje poszczególne nuty akordów. Sprawdza się doskonale, gdy znasz nazwę danego akordu i chcesz szybko nauczyć się, jak go zagrać. 1 Naciśnij i przytrzymaj przycisk LESSON [START] dłużej niż sekundę. 3 Naciśnij klawisz „M7” (durowy septymowy) w sekcji klawiatury oznaczonej napisem „CHORD TYPE”. (Dźwięk nie zabrzmi).
zaawans Ustawienia utworu Głośność utworu 1 Naciśnij przycisk [FUNCTION]. Parametr Song Volume 2 Użyj przycisków CATEGORY[ r Może być ustawiony między 000 a 127 f Obs ł ga ana ow u ] i [ ], aby wybrać parametr Song Volume. 3 Użyj pokrętła, aby wybrać głośność utworu między 000 a 127. • Głośność utworu może być ustawiona podczas wybierania utworu. Powtarzanie A–B Możesz wyznaczyć fragment utworu do odtwarzania w pętli — „A” jest punktem początku, a „B” punktem zakończenia.
Ustawienia utworu Wyciszanie poszczególnych partii utworu Każda ścieżka utworu gra inną partię — melodię, perkusję, akompaniament itd. Możesz wyciszać poszczególne ścieżki utworu i grać samodzielnie na klawiaturze wyciszoną partię lub po prostu wyciszyć wszystkie ścieżki oprócz tej, której chcesz posłuchać. Użyj przycisków SONG MEMORY [1]–[5] i [A], aby wyciszyć lub włączyć odpowiadające im ścieżki. Gdy ścieżka zostanie wyciszona, zniknie ramka przy numerze śladu na wyświetlaczu. Na str.
Obs ł ga zaawans ana ow u Zapamiętywanie ulubionych ustawień panelu Instrument posiada funkcję Registration Memory (pamięć registracyjna), która umożliwia zapis ulubionych ustawień, aby móc łatwo je przywołać zawsze, gdy są potrzebne. Można zapisać do 16 kompletnych konfiguracji (8 banków po 2 konfiguracje każdy). 8 banków Pamięć 1 Do 16 ustawień (osiem banków po dwa w każdym).
Zapamiętywanie ulubionych ustawień panelu Przywołanie pamięci registracyjnej 1 Naciśnij przycisk [MEMORY/BANK]. Gdy zwolnisz przycisk, na wyświetlaczu pojawi się numer banku. ● Ustawienia, które można zapisać w pamięci registracyjnej • Ustawienia stylu* Numer stylu, włącz./wyłącz. akompaniamentu automatycznego, punkt podziału, ustawienia stylu (MAIN A/B), głośność stylu, tempo, palcowanie akordów Numer banku 2 Użyj pokrętła lub przycisków numerycznych [1]–[8], aby wybrać numer, który chcesz wywołać.
zaawans Funkcje Funkcje umożliwiają dostęp do wielu szczegółowych parametrów instrumentu dotyczących strojenia, ustawiania punktu podziału czy ustawień brzmień i efektów. Zobacz listę funkcji na następnej stronie. W sumie jest 46 parametrów funkcji. Gdy odnajdziesz funkcję, którą chcesz wywołać, po prostu wybierz na wyświetlaczu nazwę tej funkcji (pokazaną na liście po prawej stronie nazwy funkcji) i ustaw ją odpowiednio. Wybieranie i ustawianie funkcji 1 Znajdź na liście rozpoczynającej się na str.
Funkcje ● Tabela ustawień funkcji Kategoria VOLUME Parametr funkcji Zakres/ Ustawienia Style Volume (Głośność stylu) 000–127 Określa głośność stylu. Song Volume (Głośność utworu) 000–127 Określa głośność utworu. Transpose (Transpozycja) -12–+12 Określa strój instrumentu w jednostkach co pół tonu. Tuning (Strojenie) -100–+100 Ustawia strój dźwięku instrumentu w jednostkach co jedną setną. Pitch Bend Range (Zakres Pitch Bend) 01–12 Ustawia zakres Pitch Bend w jednostkach półtonu.
Funkcje Kategoria Parametr funkcji Zakres/ Ustawienia Opis Harmony Type (Rodzaj harmonii) 01–26 Określa rodzaj harmonii (zobacz listę na str. 133). Harmony Volume (Głośność harmonii) 000–127 Określa głośność efektu harmonii. PAT P.A.T. Type (Rodzaj P.A.T.) CHORD, CHORD/FREE, MELODY, CHORD/MELODY Określa rodzaj funkcji technologii Performance Assistant (zobacz listę na str. 35). PC PC Mode (Tryb PC) PC1/PC2/OFF Optymalizuje ustawienia MIDI, gdy instrument jest podłączony do komputera (str.
zaawans Obs ł ga ana ow u Używanie pamięci flash USB Pamięć flash USB jest nośnikiem pamięci używanym do przechowywania danych. Jeśli do złącza USB TO DEVICE włożona jest karta pamięci flash USB, utwory użytkownika oraz ustawienia registracyjne mogą być zapisane na nośniku pamięci lub wczytane z niego. Pamięć flash USB może być także wykorzystana do przesyłania do instrumentu danych utworów pobranych z internetu, a następnie użyta z funkcjami technologii Performance Assistant (str. 35) i Lekcji (str.
Używanie pamięci flash USB Podłączanie pamięci flash USB 1 Podczas podłączenia pamięci flash USB do złącza USB TO DEVICE upewnij się, że wkładasz ją odpowiednio. 2 Sprawdź, czy w oknie MAIN pokazana jest ikona zarządzania plikami. Ikona zarządzania plikami Możesz przejść do okna FILE CONTROL, z którego możesz uzyskać dostęp do pamięci flash USB, naciskając w tym oknie przycisk [MENU].
Używanie pamięci flash USB Formatowanie pamięci flash USB Przed użyciem nowa pamięć flash USB musi zostać sformatowana. 5 Naciśnij ponownie przycisk [EXECUTE] • Jeśli formatujesz pamięć flash USB zawierającą już dane, zostaną one skasowane. Uważaj, aby nie wykasować ważnych danych podczas wykonywania operacji formatowania. 1 Sprawdź, czy po podłączeniu pamięci flash USB do złącza USB TO DEVICE w oknie MAIN widać ikonę. informująca, że operacja została zakończona.
Używanie pamięci flash USB Zapisywanie danych W jednym pliku „User File” zapisują się trzy rodzaje danych: utwór użytkownika, plik stylu i dane pamięci registracyjnej. Gdy zapisujesz utwór użytkownika, automatycznie zapisywane są pliki stylu i pamięci registracyjnej. 1 Upewnij się, że właściwie sformatowana pamięć flash USB została prawidłowo włożona do złącza USB TO DEVICE, a w oknie MAIN wyświetla się ikona. r f 2 Naciśnij przycisk FILE CONTROL [MENU].
Używanie pamięci flash USB Konwertowanie utworu użytkownika na format SMF i zapisywanie Ta operacja konwertuje utwór użytkownika (numery utworów 031–035) na format SMF 0 i zapisuje plik w pamięci flash USB. ● Co to jest SMF (Standard MIDI File)? ● Nadpisywanie istniejącego pliku Format SMF (Standardowy Plik MIDI) jest jednym z najpopularniejszych i szeroko stosowanych formatów sekwencyjnych używanych do przechowywania danych sekwencyjnych. Istnieją dwie odmiany tego standardu: Format 0 i Format 1.
Używanie pamięci flash USB Wczytywanie plików użytkownika i plików stylu Pliki użytkownika, pliki stylu i style przechowywane w pamięci flash USB mogą być wczytane do instrumentu. Jeśli odpowiedni plik stylu został już przesłany z komputera do instrumentu przy użyciu aplikacji Musicsoft Downloader, rozpocznij od kroku 2. W części „Przesyłanie danych o wykonaniu do/z komputera” na str. 100 znajdziesz szczegóły dotyczące przesyłania plików utworu.
Używanie pamięci flash USB Kasowanie danych z pamięci flash USB Procedura ta kasuje z pamięci flash USB plik użytkownika i plik SMF. 1 Upewnij się, że właściwie sformatowana pamięć flash USB z plikami, które chcesz skasować, została prawidłowo włożona do złącza USB TO DEVICE, a w oknie MAIN wyświetla się ikona. r [MENU]. f Możesz nacisnąć jednocześnie przyciski [+] i [-], aby wybrać pierwszy utwór lub plik użytkownika w pamięci flash USB. 5 Naciśnij przycisk [EXECUTE].
Obs ł ga zaawans ana ow u Połączenia Złącza q q Złącze USB TO DEVICE To złącze umożliwia podłączenie urządzeń pamięciowych USB. Sprawdź w części „Podłączanie do urządzenia pamięciowego USB” na str. 97. w w Złącze USB TO HOST To złącze umożliwia bezpośrednie połączenie z komputerem osobistym. Więcej informacji znajdziesz w części „Podłączenie komputera osobistego” na str. 99.
Połączenia Tworzenie kopii zapasowej danych instrumentu na komputerze Dane zapisane w urządzeniu pamięciowym USB można skopiować na dysk twardy komputera, a następnie utworzyć ich kopię zapasową i organizować je w dowolny sposób. Wystarczy podłączyć urządzenie tak, jak pokazano poniżej.
Połączenia Podłączenie komputera osobistego Po podłączeniu instrumentu do komputera dostępne są poniższe funkcje. ● Pomiędzy instrumentem i komputerem mogą być przesyłane dane dotyczące wykonania (str. 100). ● Pomiędzy instrumentem i komputerem mogą być przesyłane pliki (str. 102). Procedura podłączania wygląda następująco: 1 Zainstaluj na komputerze sterownik MIDI USB. Sterownik USB MIDI znajduje się na dołączonej płycie CD-ROM. Instalacja sterownika MIDI USB opisana jest na stronie 108–109.
Połączenia Przesyłanie danych o wykonaniu do/z komputera Dzięki podłączeniu instrumentu do komputera dane na temat wykonania mogą zostać użyte na komputerze, a dane o wykonaniu z komputera mogą zostać odtworzone na instrumencie. ● Gdy instrument jest podłączony do komputera, przesyła/odbiera dane o wykonaniu.
Połączenia ■PC Mode ● ● ● ● ● ● ● ● ● ● ● ● ● ● ● ● ● ● ● Gdy chcesz przesłać dane pomiędzy komputerem a instrumentem, należy dokonać szeregu ustawień MIDI. Za pomocą parametru PC Mode można skonfigurować wiele z tych ustawień w ramach jednej operacji. Dostępne są trzy ustawienia: PC1, PC2 i OFF. Ustawienie to nie jest konieczne podczas przesyłania utworu lub kopii zapasowej pomiędzy komputerem i instrumentem. 1 Naciśnij i przytrzymaj przycisk [DEMO] dłużej niż sekundę, aby pojawił się parametr PC Mode.
Połączenia Funkcja Inital Send Funkcja umożliwia wysyłanie do komputera danych ustawień panelu. Zanim rozpoczniesz zapisywanie danych o wykonaniu w programie sekwencerowym na komputerze, warto wysłać i zapisać w komputerze ustawienia panelu. 1 Naciśnij przycisk [FUNCTION]. aby anulować. r f 2 Użyj przycisków CATEGORY [ 3 Naciśnij [+/YES], aby wysłać lub [-/NO], ] i [ ], aby wybrać parametr Initial Send.
Połączenia ■Stosowanie aplikacji Musicsoft Downloader do przesyłania utworów z dołączonej płyty CD-ROM do pamięci flash w instrumencie ● ● ● ● ● ● ● ● ● ● ● ● ● ● 6 Kopia wybranego utworu MIDI pojawi się na górze okna w „Wykazie plików przechowywanych tymczasowo” (List of files stored temporarily). U dołu okna wyświetlony będzie nośnik pamięci, aby określić miejsce docelowe przesłania pliku. Kliknij „Instrument”, a następnie „Flash memory”.
Połączenia 9 Aby odtworzyć utwór przechowywany w pamięci flash, naciśnij przycisk [SONG]. Użyj pokrętła, aby wybrać utwór, który chcesz zagrać, a następnie naciśnij przycisk [START/STOP], aby rozpocząć odtwarzanie. Pliki stylu (pliki z rozszerzeniem „.STY”) mogą być wysyłane do pamięci flash przy użyciu procedury opisanej powyżej. Pliki stylu przesłane do pamięci flash mogą być wczytane pod numer stylu 151, a następnie odtworzone (str. 81, 103). • Nie odłączaj kabla USB podczas przesyłania danych.
zaawans Obs ł ga ana ow u Instalacja dołączonej płyty CD-ROM UWAGI SPECJALNE • • • • • • • Ten dysk CD jest zabezpieczony przed kopiowaniem. Firma Yamaha nie przedstawia żadnych oświadczeń ani nie daje żadnych gwarancji dotyczących problemów powstałych przy próbie kopiowania dysku CD lub oprogramowania i nie bierze odpowiedzialności za efekt próby skopiowania tych danych. Wyłącznym właścicielem praw autorskich do oprogramowania i niniejszej instrukcji jest firma Yamaha Corporation.
Instalacja dołączonej płyty CD-ROM Zawartość płyty CD-ROM q e r Nazwa folderu Aplikacja/Nazwa danych w Zawartość Musicsoft Downloader Aplikacja może być użyta do pobierania utworów MIDI z internetu i przesyłania ich z komputera do pamięci instrumentu. DMN_FlashDemo Flash Demo Digital Music Notebook to aplikacja edukacyjna pozwalająca cieszyć się muzyką w trakcie nauki gry. Wersja demonstracyjna oprogramowania, prezentująca wszystkie funkcje Digital Music Notebook.
Instalacja dołączonej płyty CD-ROM Wymagania systemowe Zastosowanie/Dane OS: Musicsoft Downloader Windows 98SE/Me/2000/ XP Home Edition/ XP Professional USB Driver for Windows 98/Me Windows 98/Me USB Driver for Windows 2000/XP Windows 2000/XP Home Edition/XP Professional Digital Music Notebook Digital Music Notebook (wymagania dotyczące odtwarzania dołączonego wideo) Windows® XP Professional Edition, SP1a lub nowszy Windows® XP Home Edition, SP1a lub nowszy Windows 2000 Professional, SP4 lub nows
Instalacja dołączonej płyty CD-ROM Instalacja sterownika w Windows 98/Me Instalacja sterownika w Windows 2000 1 Włącz komputer. 2 Włóż dołączoną płytę CD-ROM do napędu 1 Uruchom komputer i użyj konta 3 CD-ROM. Automatycznie pojawi się ekran startowy. Najpierw upewnij się, że przycisk POWER w instrumencie ustawiony jest na OFF, a następnie podłącz instrument do komputera przy użyciu kabla USB. Gdy instrument zostanie włączony, na komputerze automatycznie pojawi się komunikat „Dodaj nowy sprzęt”.
Instalacja dołączonej płyty CD-ROM Instalacja sterownika w Windows XP komputer i użyj konta 1 Uruchom „Administrator”, aby zalogować się do 2 3 4 5 6 7 systemu Windows. Wybierz [Start] ➔ [Panel sterowania]. Jeśli panel sterowania pojawia się przez „Wybierz kategorię”, kliknij „Przełącz do widoku klasycznego” w prawym lewym rogu ekranu. Wyświetlone zostaną wszystkie panele sterujące i ikony.
Instalacja dołączonej płyty CD-ROM ■Rozwiązywanie problemów Sterownik nie może być zainstalowany. • Czy kabel USB jest prawidłowo podłączony? Sprawdź połączenie kabla USB. Odłącz kabel USB i podłącz go ponownie. • Czy funkcja USB jest uaktywniona na komputerze? Gdy pierwszy raz podłączasz instrument do komputera, jeśli nie pojawi się okno „Kreator znajdowania nowego sprzętu”, funkcja USB w komputerze może być wyłączona. Wykonaj poniższe kroki.
Instalacja dołączonej płyty CD-ROM • Aby wykasować te pliki, używając aplikacji Explorer, wybierz „Opcje folderów” z menu Widok i wybierz „Pokaż wszystkie pliki (i foldery).” • \WINDOWS\INF\OTHER\1039.INF • \WINDOWS\SYSTEM\Xgusb.drv • \WINDOWS\SYSTEM\Ymidusb.sys 4 5 6 Odłącz kabel USB. Zrestartuj komputer. Przeinstaluj sterownik.
Dodatek Rozwiązywanie problemów ■ Problemy dotyczące instrumentu Problem Możliwa przyczyna i rozwiązanie Gdy włącza się lub wyłącza instrument, słychać przez chwilę trzaski. Jest to normalne i wskazuje, że instrument został podłączony do zasilania. Podczas korzystania z telefonu komórkowego pojawiają się zakłócenia. Korzystanie z telefonu komórkowego w pobliżu instrumentu może powodować zakłócenia. Aby tego uniknąć, wyłącz telefon komórkowy lub używaj go w większej odległości od instrumentu.
Rozwiązywanie problemów Problem Możliwa przyczyna i rozwiązanie Po naciśnięciu przycisku [SONG], [EASY SONG ARRANGER], [STYLE] lub [VOICE] nie pokazuje się właściwe okno. Czy pokazuje się inne okno? Spróbuj nacisnąć przycisk [EXIT], aby powrócić do okna MAIN, a następnie naciśnij jeden z wymienionych przycisków. Podczas gry na klawiaturze, słychać niewłaściwe nuty. Być może włączona jest funkcja technologii Performance Assistant. Naciśnij przycisk [PEFORMANCE ASSISTANT], aby ją wyłączyć.
Komunikaty Komunikat na wyświetlaczu LCD Komentarz Access error! Wskazuje błąd odczytu lub zapisu w przypadku nośnika lub pamięci flash. All Memory Clearing... Wyświetlany podczas wykasowywania wszystkich danych z pamięci flash. Nigdy nie wyłączaj zasilania podczas przesyłania danych. Are you sure? Potwierdza, czy operacja kasowania utworu (Song Clear) lub kasowania ścieżki (Track Clear) ma być wykonana. Backup Clearing... Wyświetlony podczas wykasowywania kopii zapasowej danych w pamięci flash.
Komunikaty Komunikat na wyświetlaczu LCD Komentarz Overwrite ? Potwierdza, czy nadpisywanie ma być wykonane. Please Wait... Wyświetlany podczas wykonywania zadań wymagających czasu, jak wyświetlanie nut czy tekstu. Rename File Wyświetlany podczas zmiany nazwy pliku w aplikacji Musicsoft Downloader. Save OK ? Potwierdza, czy zapisywanie ma być wykonane. Saved data is not found. Wyświetlany, gdy dane do zapisu nie istnieją. Saving... Wyświetlany podczas zapisywania danych w pamięci.
Montaż statywu instrumentu Przed montażem lub korzystaniem ze statywu przeczytaj uważnie poniższe ostrzeżenia. Ostrzeżenia mają zapewnić bezpieczne używanie statywu i zapobiegać wypadkom i obrażeniom. Dzięki zastosowaniu się do tych ostrzeżeń instrument będzie służył długo i bezpiecznie. • Należy uważać, aby nie pogubić części i upewnić się, że wszystkie elementy są montowane z zachowaniem ich odpowiedniego ustawienia względem innych elementów. Montaż należy przeprowadzać w kolejności podanej poniżej.
Montaż statywu instrumentu x Przymocuj płytę tylną. 2 e śruby z kulistą główką 6 x 30 mm Przymocuj płytę tylną, używając śrub z kulistą główką 6 x 30 mm e. Użytkownicy DGX-620/YPG-625: należy sprawdzić ustawienie płyt bocznych przód–tył. Upewnij się, że niepomalowana powierzchnia skierowana jest w dół. • Uważaj, by nie upuścić płyty tylnej lub nie dotknąć ostrych metalowych elementów. 3 c Użytkownicy DGX-620/YPG-625: należy y śruby z płaską główką 4 x 45 mm zastosować się do poniższych instrukcji.
Zapis nutowy To demo pokazuje, jak łatwo funkcja Easy Song Arranger może być wykorzystana do zmieniania stylów w trakcie utworu. Song No.
Zapis nutowy DGX-620/520, YPG-625/525 Podręcznik użytkownika 119
Zapis nutowy Ten zapis nutowy zakłada, że wysokość dźwięków zostanie skorygowana za pomocą funkcji Performance Assistant. Jeśli zagrasz partię „Play These Notes”, używając funkcji Performance Assistant, partia zostanie skorygowana i zagrana tak, by pasowała do podkładu. Song No. 10 q =61 (Function Demo for performance assistant technology) Ave Maria P.A.T. Type =CHORD Your Turn. Repeatedly Play the Same Key.
Zapis nutowy DGX-620/520, YPG-625/525 Podręcznik użytkownika 121
Zapis nutowy Ten zapis nutowy zakłada, że wysokość dźwięków zostanie skorygowana za pomocą funkcji Performance Assistant. Jeśli zagrasz partię „Play These Notes”, używając funkcji Performance Assistant, partia zostanie skorygowana i zagrana tak, by pasowała do podkładu. Song No. 11 q =108 (Function Demo for performance assistant technology) Nocturne op.9-2 P.A.T.
Zapis nutowy DGX-620/520, YPG-625/525 Podręcznik użytkownika 123
Tabela brzmień ■ Maksymalna polifonia instrumentu ● ● ● ● ● ● ● ● Instrument dysponuje maksymalnie 32-dźwiękową polifonią. Oznacza to, że można zagrać jednocześnie maksymalnie 32 dźwięki niezależnie od używanych funkcji. Akompaniament automatyczny wykorzystuje pewną liczbę dostępnych dźwięków, więc gdy jest używany, łączna liczba dźwięków dostępnych do gry na klawiaturze jest odpowiednio zredukowana. To samo dotyczy funkcji brzmienia Split i funkcji utworu.
Tabela brzmień Brzmienie nr 101 102 103 104 105 106 107 108 109 110 111 112 113 114 115 116 117 118 119 120 121 122 123 124 125 126 127 128 129 130 131 132 133 134 135 136 137 138 139 Komunikat Bank Select Wartość komunikatu Program Nazwa brzmienia MSB LSB Change (0–127) (0–127) (1–128) 000 113 076 Sweet! Pan Flute 000 112 074 Flute 000 112 073 Piccolo 000 112 076 Pan Flute 000 112 075 Recorder 000 112 080 Ocarina SYNTH LEAD 000 112 081 Square Lead 000 112 082 Sawtooth Lead 000 115 082 Analogon 000 119
Tabela brzmień Brzmienie nr 230 231 232 233 234 235 236 237 238 239 240 Komunikat Bank Select Wartość komunikatu Program MSB LSB Change (0–127) (0–127) (1–128) 000 045 029 000 000 030 000 043 030 000 000 031 000 040 031 000 041 031 000 000 032 000 065 032 000 066 032 XG BASS 000 000 033 000 040 033 241 000 045 242 243 244 245 246 247 248 249 250 251 252 253 254 255 256 257 258 259 260 261 262 263 264 *265 266 000 000 000 000 000 000 000 000 000 000 000 000 000 000 000 000 000 000 000 000 000 000 00
Tabela brzmień Brzmienie nr 368 369 370 371 372 373 374 375 376 377 378 379 380 381 382 383 384 385 386 387 388 389 390 391 392 393 394 395 396 397 398 399 400 401 402 403 404 405 406 407 408 409 410 411 412 413 414 415 416 417 418 419 420 421 422 423 424 425 426 427 428 429 430 431 432 433 434 Komunikat Bank Select Wartość komunikatu Program Nazwa brzmienia MSB LSB Change (0–127) (0–127) (1–128) XG SYNTH PAD 000 000 089 New Age Pad 000 064 089 Fantasy 000 000 090 Warm Pad 000 000 091 Poly Synth Pad 000
Tabela zestawów perkusyjnych •„ ” wskazuje, że brzmienie perkusyjne jest takie samo, jak w zestawie „Standard Kit 1”. • Każde brzmienie perkusyjne wykorzystuje jeden dźwięk polifonii. • Nuta # i Nuta MIDI są w rzeczywistości o jedną oktawę niższe niż Nuta # i Nuta. Na przykład w zestawie „128: Standard Kit 1”, „Seq Click H” (Nuta# 36/Nuta C1) odpowiada (Nucie# 24/Nucie C0). • Key Off (zwolnienie klawisza): Klawisze oznaczone „O” przestają wybrzmiewać natychmiast po ich zwolnieniu.
Tabela zestawów perkusyjnych Voice No.
Tabela Stylów Styl nr 001 002 003 004 005 006 007 008 009 010 011 012 013 014 015 016 017 018 019 020 021 022 023 024 025 026 027 028 029 030 031 032 033 034 035 036 037 038 039 040 041 042 043 044 045 046 047 048 049 050 051 052 130 Nazwa stylu 8BEAT 8BeatModern Cool8Beat 60’sGuitarPop 8BeatAdria 60’s8Beat BubblegumPop BritPopSwing 8Beat OffBeat 60’sRock HardRock RockShuffle 8BeatRock 16BEAT 16Beat PopShuffle1 PopShuffle2 GuitarPop 16BeatUptempo KoolShuffle JazzRock HipHopLight BALLAD PianoBallad LoveSon
Lista muzycznej bazy danych MDB nr 001 002 003 004 005 006 007 008 009 010 011 012 013 014 015 016 017 018 019 020 021 022 023 024 025 026 027 028 029 030 031 032 033 034 035 036 037 038 039 040 041 042 043 044 045 046 047 048 049 050 051 052 053 054 055 056 057 058 059 060 061 062 063 064 065 066 Nazwa utworu POP AlvFever CoinLane Croco Rk DayPdise DwnTown EasySday GoMyWay HowDeep! HurryLuv I breath I’lBTher I’m Torn Imagine ISurvive JustCall JustWay LeadPack LoveFeel LoveMeT LveMeDo Mi Shell My Baby Niki
Utwory zawarte na dołączonej płycie CD-ROM Nazwa pliku 001Nutcr.mid 002Orphe.mid 003Slavo.mid 004Prima.mid 005Medit.mid 006Guill.mid 007Fruhl.mid 008Ungar.mid 009Fruhl.mid 010Dolly.mid 011Cande.mid 012Arabe.mid 013Pasto.mid 014Petit.mid 015Innoc.mid 016Progr.mid 017Taren.mid 018Cheva.mid 019Etude.mid 020Marci.mid 021Turki.mid 022Valse.mid 023Menue.mid 024Momen.mid 025Enter.mid 026Prelu.mid 027Violl.mid 028Angel.mid 029Saraf.mid 030Ameri.mid 031Brown.mid 032Lomon.mid 033Bonni.mid 034Londo.mid 035Banjo.
Tabela rodzajów efektów ● Rodzaje harmonii Nr Rodzaj harmonii 01 Duet 02 Trio 03 Block 04 Country 05 Octave 06 Trill 1/4 note 07 Trill 1/6 note 08 Trill 1/8 note 09 Trill 1/12 note 10 Trill 1/16 note 11 Trill 1/24 note 12 Trill 1/32 note 13 Tremolo 1/4 note 14 Tremolo 1/6 note 15 Tremolo 1/8 note 16 Tremolo 1/12 note 17 Tremolo 1/16 note 18 Tremolo 1/24 note 19 Tremolo 1/32 note 20 Echo 1/4 note 21 Echo 1/6 note 22 Echo 1/8 note 23 Echo 1/12 note 24 Echo 1/16
Schemat implementacji MIDI 134 DGX-620/520, YPG-625/525 Podręcznik użytkownika
*1 Refer to #2 on page 136.
Format danych MIDI UWAGA: 1 Domyślnie (ustawienie fabryczne) instrument działa jak 16-kanałowy, wielogłosowy generator brzmień i dane przychodzące nie wpływają na brzmienia ani ustawienia panelu. Jednak podane niżej komunikaty MIDI wpływają na brzmienia panelowe, automatyczny akompaniament i utwory. • MIDI Master Tuning (podstawowy strój instrumentu). • Specjalne komunikaty systemowe do zmiany rodzaju pogłosu i efektu Chorus.
Dane techniczne Klawiatura • DGX-620/YPG-625: 88 standardowych klawiszy typu Graded Hammer (A-1–C7) z dynamiką klawiatury. • DGX-520/YPG-525: 88 klawiszy typu „box” (A-1-C7) z dynamiką klawiatury. Wyświetlacz • Wyświetlacz LCD (podświetlany) 320 x 240 pikseli Konfiguracja • STANDBY/ON • MASTER VOLUME: MIN–MAX • LCD CONTRAST Kontrolery na panelu • SONG, VOICE, STYLE, EASY SONG ARRANGER, P.A.T.
Indeks Elementy płyty czołowej i złącza 138 r f +/– .................................................. 13, 63 ...................................................... 64 0–9 .................................................. 13, 63 A-B REPEAT ................................. 12, 83 ACMP ON/OFF ............................. 12, 24 CATEGORY[ ] i [ ] ................. 13, 63 Chord Fingering ............................. 12, 81 DC IN 12V ..................................... 10, 13 DEMO .....................
Indeks O Ocena .................................................... 49 Okno ..................................................... 65 Okno Function ...................................... 64 Okno MAIN ......................................... 64 One Touch Setting ................................ 71 P Pamięć flash ......................................... 32 Pamięć registracyjna ............................ 85 PC Mode ............................................. 101 Pitch Bend Range ........................
DGX-620/520, YPG-625/525 Podręcznik użytkownika
For details of products, please contact your nearest Yamaha representative or the authorized distributor listed below. Aby uzyskać szczegółowe informacje na temat produktów, należy skontaktować się z najbliższym przedstawicielem firmy Yamaha lub z autoryzowanym dystrybutorem wymienionym poniżej. NORTH AMERICA CANADA Yamaha Canada Music Ltd.