
User Manual
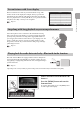
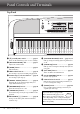
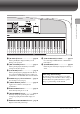
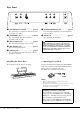

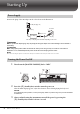

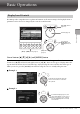
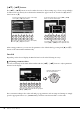
Table Of Contents
- PRECAUTIONS
- NOTICE
- Information
- About the Manuals
- Included Accessories
- Contents
- Welcome to the new DGX!
- Panel Controls and Terminals
- Starting Up
- Basic Operations
- Piano Room – Enjoying the Piano Performance –
- Voices – Playing the keyboard with various sounds –
- Playing Preset Voices
- Calling up the Appropriate Settings for Piano Performance (Piano Reset)
- Playing Realistic Resonance-enhanced Piano Sounds (VRM Voices)
- Playing Super Articulation Voices
- Setting the Touch Response of the Keyboard
- Using the Metronome
- Changing the Pitch of the Keyboard
- Applying Voice Effects
- Styles – Playing Rhythm and Accompaniment –
- Songs – Playing, Practicing and Recording Songs –
- USB Audio Player/Recorder – Playback and Recording Audio Files –
- Microphone – Connecting a Microphone and Singing Along with Your Performance –
- Registration Memory/Playlist – Saving and Recalling Custom Panel Setups –
- Mixer – Editing the Volume and Tonal Balance –
- Connections – Using Your Instrument with Other Devices –
- Connecting USB Devices ([USB TO DEVICE] terminal)
- Connecting to a Computer ([USB TO HOST] terminal)
- Connecting to a Smart Device ([AUX IN] jack/Bluetooth/[USB TO HOST] terminal/Wireless LAN)
- Listening to Audio Playback by an External Device through the Instrument’s Speaker ([AUX IN] jack/Bluetooth/[USB TO HOST] terminal)
- Connecting Headphones or an External Speaker ([PHONES/OUTPUT] jack)
- Connecting a Microphone ([MIC INPUT] jack)
- Connecting a Foot Pedal ([AUX PEDAL] jack)
- Connecting a Pedal Unit ([PEDAL UNIT] jack)
- Menu – Making Global Settings and Using Advanced Features –
- Troubleshooting
- Specifications
- Index

DGX-670 Owner’s Manual
20
[1UD] – [8UD] buttons
The [1UD] – [8UD] buttons are used to make selections or adjust settings (up or down correspondingly)
for functions shown directly above them. In this manual, the upper buttons are described as [
U] and the
lower buttons as [
D].
When setting parameters, you can reset the parameter to the default value by pressing both [
U] and [D]
buttons of the same number simultaneously.
Data dial
Depending on the selected display, the Data dial can be used in the following two ways.
Adjusting parameter values
You can conveniently use the Data dial in tandem with the [1UD] – [8UD] buttons to adjust parameters
indicated in the display.
This convenient technique also works well with pop-up parameters such as Tempo and Transpose. Simply
press the appropriate button (ex., [TEMPO/TAP]), and then rotate the Data dial to set the value.
For menus that appear in this section of the display,
use the [1U] – [8U] (upper) buttons.
For menus that appear in this section of the display,
use the [1D] – [8D] (lower) buttons.
For list menus that appear, use the [1UD] – [8UD]
buttons to select the desired item.
For parameters that appear in slider (or knob) form,
use the [1UD] – [8UD] buttons to adjust the value.
Select the desired parameter with the appropriate
[1UD] – [8UD] buttons.
Rotate the Data dial to adjust
the selected parameter.