
User Manual
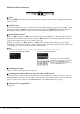
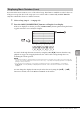
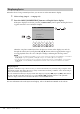

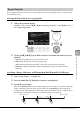
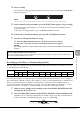
Table Of Contents
- PRECAUTIONS
- NOTICE
- Information
- About the Manuals
- Included Accessories
- Contents
- Welcome to the new DGX!
- Panel Controls and Terminals
- Starting Up
- Basic Operations
- Piano Room – Enjoying the Piano Performance –
- Voices – Playing the keyboard with various sounds –
- Playing Preset Voices
- Calling up the Appropriate Settings for Piano Performance (Piano Reset)
- Playing Realistic Resonance-enhanced Piano Sounds (VRM Voices)
- Playing Super Articulation Voices
- Setting the Touch Response of the Keyboard
- Using the Metronome
- Changing the Pitch of the Keyboard
- Applying Voice Effects
- Styles – Playing Rhythm and Accompaniment –
- Songs – Playing, Practicing and Recording Songs –
- USB Audio Player/Recorder – Playback and Recording Audio Files –
- Microphone – Connecting a Microphone and Singing Along with Your Performance –
- Registration Memory/Playlist – Saving and Recalling Custom Panel Setups –
- Mixer – Editing the Volume and Tonal Balance –
- Connections – Using Your Instrument with Other Devices –
- Connecting USB Devices ([USB TO DEVICE] terminal)
- Connecting to a Computer ([USB TO HOST] terminal)
- Connecting to a Smart Device ([AUX IN] jack/Bluetooth/[USB TO HOST] terminal/Wireless LAN)
- Listening to Audio Playback by an External Device through the Instrument’s Speaker ([AUX IN] jack/Bluetooth/[USB TO HOST] terminal)
- Connecting Headphones or an External Speaker ([PHONES/OUTPUT] jack)
- Connecting a Microphone ([MIC INPUT] jack)
- Connecting a Foot Pedal ([AUX PEDAL] jack)
- Connecting a Pedal Unit ([PEDAL UNIT] jack)
- Menu – Making Global Settings and Using Advanced Features –
- Troubleshooting
- Specifications
- Index

DGX-670 Owner’s Manual
69
Songs – Playing, Practicing and Recording Songs –
4
4 Start recording.
You can start recording by playing the keyboard, starting a Style or pressing the SONG [R/K]
(Play/Pause) button.
NOTE
You can use the metronome (page 44) while recording; however, the metronome sound will not be recorded.
5 After you finish your performance, press the [REC] button again to stop recording.
A message may appear prompting you to save the recorded data. Press the [EXIT] button to
close the message.
To hear the recorded performance, press the [R/K] (Play/Pause) button.
6 To hear the recorded performance, press the [R/K] (Play/Pause) button.
7 Save the recorded performance as a Song.
7-1
Press the SONG [SELECT] button to call up the Song Selection display.
7-2 Save the recorded data as a file by following the instructions on page 26.
NOTICE
The recorded Song will be lost if you change to another Song or you turn the power off without executing the Save
operation.
Recording Specified Parts or Channels Independently
A Song consists of 16 channels, and, in general, the keyboard parts and Style parts are assigned (recorded)
to each channel as described below.
You can create a Song by recording each part (or channel) independently, allowing you create a complete
piece which may be difficult to play live. For example, you can record the right-hand part to channel 1 and
then record the left-hand part to channel 2 while listening to the already recorded right-hand part. To
record a performance with Style playback, for example, record the Style playback to channels 9 – 16, and
then record melodies to channels 1 − 3 while listening to the already recorded Style playback.
1 Make necessary settings such as turning on the desired PART ON/OFF button and
selecting the desired Voice, etc.
2 Press the SONG [REC] button and the [R/K] (Play/Pause) button simultaneously.
A blank Song for recording is automatically set. A blank Song for recording is automatically set,
and the Song name on the Main display (page 23) is set to “New Song.”
Re-recording a Specific Section of the Song
You can re-record a specific section of an already-recorded Song by using the Song Creator function. For details,
refer to the Reference Manual on the website.
Part Keyboard Style
Main Layer Left
Rhythm 1 Rhythm 2
Bass Chord 1 Chord 2 Pad Phrase 1 Phrase 2
Channel 1 2 3 9 10 11 12 13 14 15 16