
User Manual
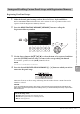
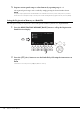
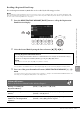
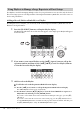
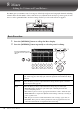

Table Of Contents
- PRECAUTIONS
- NOTICE
- Information
- About the Manuals
- Included Accessories
- Contents
- Welcome to the new DGX!
- Panel Controls and Terminals
- Starting Up
- Basic Operations
- Piano Room – Enjoying the Piano Performance –
- Voices – Playing the keyboard with various sounds –
- Playing Preset Voices
- Calling up the Appropriate Settings for Piano Performance (Piano Reset)
- Playing Realistic Resonance-enhanced Piano Sounds (VRM Voices)
- Playing Super Articulation Voices
- Setting the Touch Response of the Keyboard
- Using the Metronome
- Changing the Pitch of the Keyboard
- Applying Voice Effects
- Styles – Playing Rhythm and Accompaniment –
- Songs – Playing, Practicing and Recording Songs –
- USB Audio Player/Recorder – Playback and Recording Audio Files –
- Microphone – Connecting a Microphone and Singing Along with Your Performance –
- Registration Memory/Playlist – Saving and Recalling Custom Panel Setups –
- Mixer – Editing the Volume and Tonal Balance –
- Connections – Using Your Instrument with Other Devices –
- Connecting USB Devices ([USB TO DEVICE] terminal)
- Connecting to a Computer ([USB TO HOST] terminal)
- Connecting to a Smart Device ([AUX IN] jack/Bluetooth/[USB TO HOST] terminal/Wireless LAN)
- Listening to Audio Playback by an External Device through the Instrument’s Speaker ([AUX IN] jack/Bluetooth/[USB TO HOST] terminal)
- Connecting Headphones or an External Speaker ([PHONES/OUTPUT] jack)
- Connecting a Microphone ([MIC INPUT] jack)
- Connecting a Foot Pedal ([AUX PEDAL] jack)
- Connecting a Pedal Unit ([PEDAL UNIT] jack)
- Menu – Making Global Settings and Using Advanced Features –
- Troubleshooting
- Specifications
- Index

DGX-670 Owner’s Manual
81
Registration Memory/Playlist – Saving and Recalling Custom Panel Setups –
7
Registering Your Panel Setups
1 Make the desired panel settings, such as those for Voices, Styles and Effects.
Refer to Parameter Chart in the Data List on the website for a list of parameters that can be
registered with the Registration Memory function.
2 Press the REGISTRATION MEMORY [MEMORY] button to call up the
Registration Memory window.
3 Use the Cursor buttons [U][D][L][R] to select the item to be registered, and then
press the [ENTER] button to enter (or remove) the corresponding checkmark.
To cancel the operation, use the [8UD] (Cancel) buttons.
NOTE
You can also use the Data dial to select the items.
4 Press the desired REGISTRATION MEMORY [1] – [4] button to which you wish to
memorize the panel setup.
Memorized buttons are lit in orange, indicating that the number button contains data and its
number is selected.
NOTICE
If you select the button whose lamp is lit in orange or green here, the panel setup previously memorized to the
button will be erased and replaced by the new settings. Hence, you should memorize panel setups only to buttons
that are turned off.
Saving and Recalling Custom Panel Setups with Registration Memory
About the lamp status
• Orange: Data registered and currently selected
• Green: Data registered but not currently selected
• Off: No data registered
3