
User Manual
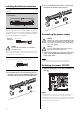
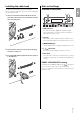
Table Of Contents
- PRECAUTIONS
- Introduction
- Features
- Contents
- Package contents (please verify)
- Manuals included
- Troubleshooting
- ProVisionaire Design Software
- Yamaha Steinberg USB Driver
- Updating the firmware
- Precautions for rack mounting
- Installing Euroblock connectors
- Connecting the power supply
- Switching the power ON/OFF
- Installing the cable hook
- Main unit settings
- Restoring (reinitializing) factory default settings
- General specifications
- Dimensions/Abmessungen/Dimensions/Dimensiones/Dimensões/ Dimensioni/Размеры/尺寸/尺寸/치수/寸法図

7
Package contents (please verify)
Manuals included
• DME7 Setup Guide (this manual)
Describes the setup procedure from connecting the power
supply to setting up the system.
• DME7 Reference Manual (HTML)
Explains everything necessary for configuring settings
and operating the system.
• ProVisionaire Design User Guide (HTML)
Describes how to operate the ProVisionaire Design
software used to control the product from a computer.
Troubleshooting
See the FAQs (frequently asked questions) posted on the
Yamaha Pro Audio website.
https://www.yamahaproaudio.com/
ProVisionaire Design Software
This Windows application software integrates settings for
devices such as signal processors, power amplifiers, and
audio interfaces.
Download ProVisionaire Design from the following website.
https://www.yamahaproaudio.com/
For more details, refer to the ProVisionaire Design user
guide (HTML).
Yamaha Steinberg USB Driver
The driver software for connecting DME7 to a computer via
USB.
Up to 8 in / out audio signals can be exchanged with DAW
software and other devices.
Download the driver software from the following website.
https://www.yamahaproaudio.com/
Updating the firmware
The product specifications enable the firmware in the main
unit to be updated for the purpose of improving operability,
adding functionality, and fixing bugs.
If a firmware update is available, that information is posted
on the following website.
https://www.yamahaproaudio.com/
Please refer to the "ProVisionaire Design User Guide
(HTML)" for the update procedure and the settings of the
main unit.
Precautions for rack mounting
The guaranteed operating temperature range for the
product is 0 to 40 °C. If mounting only DME7 units, multiple
units can be mounted and operated on a standard EIA rack
without leaving space between the units. If the product is
mounted on a standard EIA rack together with other
devices, heat generated from those devices can prevent
achieving adequate performance due to elevated
temperatures within the rack. To prevent heat from building
up inside the product, be sure to mount products in a
manner that satisfies the following conditions.
• If mounted together with a power amplifier or other
devices that tend to generate heat, leave at least one unit
of space between the product and other devices. Also, to
ensure adequate ventilation, install a vented panel at
those spaces or leave it open to the atmosphere.
• The product is designed to intake air via the front and
discharge it from the back, so do not install it together with
other devices that intake air via the back and exhaust it
from the front.
• Leave the back side open and the rack positioned at least
10 cm away from the wall and ceiling. If the back side of
the rack cannot be left open, use a commercially available
fan kit or other forced air ventilation system. If a fan kit is
installed, note that enclosing the back side of the rack can
improve heat dissipation in some cases. For more
information, refer to the rack and fan kit instruction manual.
Setup guide (this manual) × 1
Euroblock connectors (16-pin, 3.50 mm pitch) × 2
Power cords × 2
Cable hook × 1
In some cases, an update is required to provide compatibility with
other devices, depending on the version of devices within the Dante
network. For more information, check the firmware compatibility
chart provided on the Yamaha website indicated above.
NOTE