
manual


E-5
English
INSTALLATION
INSTALLATION
How to install
4:3 Screen
16:9 Screen
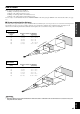
There are four ways this unit can be installed:
installing on a tabletop in front of the screen,
mounting on the ceiling in front of the screen,
installing on a tabletop behind a semi-translucent screen,
mounting on the ceiling behind a semi-translucent screen.
It is necessary to set the installation method for “INSTALLATION” in the menu group 4 <SETUP> on the menu described later. (See page
17.)
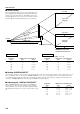
■ Screen and projection distance
The ideal position (projection distance [L]) to install this unit is determined by the screen aspect ratio (4:3 or 16:9) and the size (length of the
diagonal line across the screen). It is possible to adjust the projection distance within the range from Wide to Tele. by using the zoom
function. Use the following information as illustrated in the figure below to determine the best position for installation.
Screen size
(inch)
60
80
100
120
150
200
(m)
2.4—2.9
3.2—3.9
4.0—4.9
4.8—5.8
6.1—7.3
8.1—9.8
Zoom function
Tele.
Wide
Tele.
Wide
Tele.
Wide
Smaller
Screen size
Larger
Projection distance
Screen size
(inch)
60
80
100
120
150
200
(m)
2.6—3.2
3.5—4.2
4.4—5.3
5.3—6.4
6.6—8.0
8.8—10.6
Zoom function
Tele.
Wide
Tele.
Wide
Tele.
Wide
Projection distance
Smaller
Screen size
Larger
Projection distance [L] Wide/Tele.
(feet, inch)
7’ 10”— 9’ 6”
10’ 6”— 12’ 10”
13’ 1”— 16’
15’ 9”— 19’
20’— 23’ 11”
26’ 7”— 32’ 2”
(feet, inch)
8’ 6”— 10’ 6”
11’ 6”— 13’ 9”
14’ 5”— 17’ 5”
17’ 5”— 21’
21’ 8”— 26’ 3”
28’ 10”— 34’ 9”
Projection distance [L] Wide/Tele.
Important
• Projection distance is the horizontal distance from the lens surface of this unit to the screen. The lens is recessed for 4 cm (1-1/2
inch) from this unit’s exterior.