U DVD Recorder Enregistreur de DVD DRX-1 OWNER’S MANUAL MODE D’EMPLOI
CAUTION RISK OF ELECTRIC SHOCK DO NOT OPEN CAUTION:TO REDUCE THE RISK OF ELECTRIC SHOCK, DO NOT REMOVE COVER (OR BACK). NO USER-SERVICEABLE PARTSINSIDE. REFER SERVICING TO QUALIFIED SERVICE PERSONNEL. This “bolt of lightning” indicates uninsulated material within your unit may cause an electrical shock. For the safety of everyone in your household, please do not remove product covering.
1. IMPORTANT NOTICE: DO NOT MODIFY THIS UNIT! This product, when installed as indicated in the instructions contained in this manual, meets FCC requirements. Modifications not expressly approved by Yamaha may void your authority, granted by the FCC, to use the product. 2. IMPORTANT: When connecting this product to accessories and/or another product use only high quality shielded cables. Cable/s supplied with this product MUST be used. Follow all installation instructions.
CAUTION Read this before operating your unit. 1 To assure the finest performance, please read this manual carefully. Keep it in a safe place for future reference. 2 The recommended operating temperature range for the Recorder is from 60˚F-95˚F (Fahrenheit). Exceeding these ranges may cause unstable recording results. Do not expose this unit to sudden temperature changes from cold to hot, nor locate this unit in an environment with high humidity (i.e.
Introduction__________________________________2 DVD Recorder ____________________________________________ 2 Cleaning discs _____________________________________________ 2 Remote control____________________________________________ 2 VCR Plus+ and PlusCode are registered trademarks of Gemstar Development Corporation.The VCR Plus+ system is manufactured under license from Gemstar Development Corporation. Pats.
Introduction DVD Recorder DVD (Digital Versatile Disc) is the new storage medium that combines the convenience of the Compact Disc with the latest advanced digital video technology. DVD Video uses state-of-the-art MPEG2 data compression technology to register an entire movie on a single 5-inch disc. DVD’s variable bitrate compression, running at up to 9.8 Mbits/second, captures even the most complex pictures in their original quality.
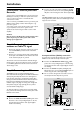
Connections - back of your DVD Recorder - Please refer to your TV,VCR, Stereo and any other User Manual(s) as necessary to make the optimal connections. - Do not connect the power cords until all other connections are made. - Do not connect your DVD Recorder to your TV via your VCR. The video quality could be distorted by the copy protection system. - For better sound, connect the Recorder’s audio outputs to your amplifier, receiver, stereo system or A/V equipment.
S-Video (Y/C) connection If your TV is not equipped with COMPONENT VIDEO inputs, connect the DVD Recorder with the S-Video (Y/C) jacks. ● Connect the S-Video (Y/C) OUT jack to the corresponding IN jacks on the TV, using the S-Video cable supplied (3) as shown in the drawing. ● Connect the AUDIO Left (white) and Right (red) OUT jacks to the corresponding IN jacks on the TV using the audio cable supplied (4). 4 3 EXT 3 EXT 3 COMPONENT VIDEO Apparatus Claims of U. S. Patent Nos.
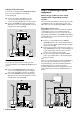
Connecting to a receiver equipped with two channel digital stereo (PCM) English If you cannot connect your DVD Recorder to an A/V receiver with a Multi-channel decoder, choose one of the following alternatives. Step 4: Connecting to other equipment (optional) To connect other devices to the Recorder, use the available IN jacks on the back of the Recorder. ● Connect one of the Recorder’s DIGITAL AUDIO OUT jacks to the corresponding IN jack on your receiver.
Step 5: Connections - Front of your DVD Recorder (optional) Notes You will need only one video connection and one audio connection: only the i-link DV connection carries both video and audio.You may not use all the jacks on the DVD Recorder. Video camera connection ● If you have a DV or Digital 8 video camera, connect the i-link DV input jack on the Recorder (1) to the corresponding output jack on the video camera using the i-link cable of your video camera.
After switching on the DVD Recorder for the very first time, the ‘Initial setup screen’ will appear. In initial setup, you may have to set your preferences for some of the Recorder features. If the initial setup screen does not appear, your DVD Recorder has been installed already.You may still change the preferences via the ‘installation menu.’ Subtitle language The subtitles of DVD-Video discs will be in the language you choose if it is available on the current disc.
Automatic TV Channel Search Make sure the antenna is connected to the DVD Recorder. See ‘Connecting to the antenna.’ Your DVD Recorder will search for all TV channels that are available in your area. It stores channels in the order in which they are found. ● Press ENTER/OK to confirm. ➤ Automatic search and installation starts. This can take several minutes. Installation Auto Ch.
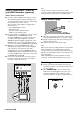
English Functional overview Front of recorder STANDBY/ON - switches the Recorder On or to standby mode (off) STANDBY indicator - lights red when the Recorder is in standby mode; Recorder is not operable - lights green when the Recorder is operable Infrared remote control receiver DISPLAY - displays the current status of the Recorder REC - recording of the selected channel or source 2 (play) - starts disc play 9 (stop) - stops disc playback or recording / (open/close) - opens/closes the disc tray DIGITAL
Back of Recorder Power jack - connection to the power outlet TV - RF connection to TV (does not carry the video output signal of the Recorder) ANTENNA - RF connection to antenna/cable TV signal VIDEO (CVBS) - 2 x OUT: for connection to a TV, receiver or amplifier with CVBS video inputs - IN: for connecting a video source with CVBS outputs S-VIDEO (Y/C) - OUT: for connection to an amplifier, TV or receiver with S-Video inputs - IN: for connecting a video source with S-Video outputs COMPONENT VIDEO (YPBPR) OU
English Display DVD - DVD Video disc inserted DVD+RW - DVD+Rewritable disc inserted DVD+R - DVD+Recordable disc inserted CHANNEL - Current channel number RECORD - Recording in progress TITLE TIMER - Current DVD title number - A Timer is programmed or active TRACK TRACK TIME - Current VCD/CD track number - Track time in minutes and seconds VCD TOTAL TIME - Video CD inserted - Total playback time in hours, minutes and seconds CD - Audio CD inserted TIME REMAIN SVCD - Total remaining recor
Remote control POWER ( ) - switches the Recorder On or to standby mode (off) MONITOR - switches between disc mode and monitor mode A/CH (Alternate Channel) - switches to previous TV channel 0-9 - numerical buttons to enter information or select channels SELECT - switches between different values in a menu CLEAR - delete last entry/clear a timer TIMER - displays the timer menu SKIP - select a previous chapter, track or title SKIP - skip to next chapter, track or title PLAY - begin disc playback SEARCH/SLOW -
Important notes for operation Disc types You can switch on the DVD Recorder with the STANDBY/ON button on the front of the Recorder or POWER (B/I) button on the remote control to interrupt a function. Keep your DVD Recorder connected to the power outlet at all times to ensure programmed recordings can be made. You will recognize the different types of discs that can be used in your DVD Recorder by the logo. Depending on the disc type you can either use it for recording and playback or playback only.
CD Digital Audio You can play digital audio CDs in conventional style through a stereo system, using the buttons on the remote control and/or front panel of the DVD Recorder. On-screen display information System menu bar Super Audio CD Of hybrid SACD discs, the CD layer can play. (Super) Video CD Depending on the material on the disc (a movie, video clips, a drama series, etc.), these discs may have one or more tracks. Tracks may have one or more indexes as indicated on the disc case.
User preference menu icons Picture settings English Temporary feedback icons Sound settings Language settings Feature settings These symbols may appear in the top left corner of the TV screen when you access a feature. Scan first 10 seconds of each Chapter/Track Remote control settings Record settings Installation Repeat entire Disc Repeat current Title -- --- off on off -- --- off on off Repeat current Track Repeat current Chapter Point A for Repeat A-B playback is set.
Status box Warning box The status box displays the current status of the Recorder and information about the current disc, including disc type, total playing time, and elapsed playing time. Set status Box to ‘On,’ if you want to see following icons when you access a feature. A warning box will be displayed near the bottom on the screen when appropriate.
English Timer info box The timer info box appears on the TV screen with the Index Picture Screen, it displays the current status of the timer recordings. When a timer is set, it shows a timer indication and the start time or date of the first recording. Timer event due today am Timer event due on another day When an OTR is in progress, the end time appears. 10:15 pm End time of the OTR When no timer recording is scheduled, the current time appears.
● On the right side of the Index Picture Screen, you can see the disc bar. This gives an overview of all titles on the disc, as well as any empty spaces. On the disc bar, an arrow – the disc pointer – indicates your current position on the disc. From this point you may resume playback or recording. ● If you move through the list of titles with w/v (down/ up cursor) or / , the disc pointer will move. ● Press to put the disc pointer at the beginning of the disc.
Setting user preferences You can set your user preferences for some of the Recorder features. (See ‘Operation - User preference menu operation’) The following items can be adapted: Picture settings TV Shape With TV Shape you can adjust the image from your DVD Recorder to fit your TV screen. You can choose: - 16:9 if you have a wide screen (16:9) TV.
Analog output Select Stereo, Surround or 3D Sound. Factory setting is Stereo. Surround : Select this setting when using equipment with a Dolby Surround Pro Logic decoder. In this setting the 5.1 audio channels (Dolby Digital, MPEG-2) are downmixed to a Dolby Surround-compatible 2-channel output.
Notes: When the Recorder is in low power standby mode: - the display will be off, - the standby indicator on the recorder will still light up in standby mode. -- off --- on In practice, the DVD recorder may record a few minutes more than indicated. You can only play a disc in the mode in which it was recorded. 1 In the Record settings menu, select ‘Record mode.’ Record settings EP+ On Sport Record mode Auto chapters Filter mode off Features Access control Enter code...
Installation Update/Re-install TV channel After initial installation is complete, it is possible to perform the installation procedure again. If, for example, your cable company adds TV channels, you may wish to update the channel screen. Note: All previously stored channels will be erased and replaced. 1 In the installation menu, select ‘Auto Ch. Programming’ with w/v (down/up cursor), then press ENTER/OK or u (right cursor). ➤ Automatic search and installation starts.
Time/Date Manually If the time in the DVD Recorder display is not correct, the clock must be set manually. Time/date Manual Time AM/PM Year Month Date 03: 46 PM 2001 06 16 Daylight Saving On 4 Press SYSTEM MENU to exit the Cable/Antenna menu. ➤ If you have selected ‘Cable’ or ‘Anten.,’ the Auto Channel Search starts. Only after a new channel search, the new setting will take effect.
Recording Before you start recording Recordings on a DVD+RW disc are called ‘titles.’ Every title consists of one or more chapters. A disc can hold up to 48 titles (including empty titles). When this maximum is reached, the on-screen message ‘Too many titles’ appears if you want to make a new recording.You have to erase a title first. See ‘Managing Disc Content - Erasing a Title.
1 2 3 4 Press / to open the disc tray. Insert a recordable DVD+RW or DVD+R disc. Press / to close the disc tray. Select the position from which you want to record using the / . 5 Press MONITOR to see TV channels through the DVD Recorder. 6 Use CHANNEL 3 and CHANNEL 4 (on the Recorder) or CH+ and CH- (on the remote control) to select the channel you wish to record.
Recording with automatic switch-off (OTR One-Touch Recording) This is due to the initial 20 seconds of spin time required for the Disc to ready itself for operation. Also, it is normal for networks to begin the broadcast of programs about one minute prior to the announced time. This is done to possibly catch the viewer’s attention as they channel scan or surf through available channel selections. Timer programming with the VCR Plus+® system 1 Insert a recordable DVD+RW or DVD+R disc.
Timer programming without the VCR Plus+ system Timer VCR Plus + system 1 Press TIMER on the remote control. 2 Select Timer programming with w/v (down/up cursor). 3 Press u (right cursor). 4 Enter a specific month and date with w/v (down/up cursor) or with the digit 0-9 buttons. 5 If desired, select recording at daily or weekly intervals in the field ‘Date’ with SELECT. Select ‘Mo-Fr’ for recording to be made from Mondays to Fridays inclusive.
16 If you make a mistake, go back with t (left cursor) and re-enter the information. 17 Confirm with ENTER/OK. ➤ When all information is correct, the data is stored in a timer block. 18 To end, press TIMER. 19 Make sure you inserted a disc without write protection. If you inserted a write protected disc, recording will not occur. 20 Turn the Recorder to standby mode by pressing POWER (B/I). Checking or altering a Timer Recording 1 Press TIMER on the remote control.
English Clearing a timer block 1 2 3 4 Press TIMER on the remote control. Select ‘Timer list’ with w/v (down/up cursor). Press u (right cursor). Select the Timer Recording you want to clear with w/ v (down/up cursor). The selected Timer Recording will be highlighted in blue. 5 Press CLEAR. ➤ The Recording you selected will appear alone on the screen. 6 Confirm with ENTER/OK. ➤ Timer Cleared will appear at the bottom of the screen briefly. Then the Timer List will reappear.
Playback Playing a DVD+RW/+R disc 1 Insert a DVD+RW or a DVD+R disc. ➤ If the inserted disc is erase-protected, playback starts automatically. Otherwise, the Index Picture Screen appears. 2 Press w/v (down/up cursor) to select the Title you want to play. ➤ If you do not select a Title, playback starts from the point where it stopped the last time the disc was played or recorded. ➤ If the disc is a new blank disc, the display will show ‘EMPTY DISC.’ 3 Press . 4 To stop playback at any time, press .
DVD VIDEO TITLE 1 CHAPTER 1 CHAPTER 2 TITLE 2 CHAPTER 3 CHAPTER 1 CHAPTER 2 VIDEO CD Note: Unless stated otherwise, all operations described are based on remote control operation. A number of operations can also be carried out via the system menu bar on the screen. TRACK 1 INDEX 1 INDEX 2 TRACK 2 INDEX 3 INDEX 1 INDEX 2 Moving to another title/track When a disc has more than one title or track, you can move to another title in any one of the following ways.
Slow Motion 1 Press SYSTEM MENU to access the system menu bar. 2 Press t/u (left/right cursor) to select H (Slow motion) in the system menu bar. 3 Use w (down cursor) to enter the slow motion menu. ➤ Playback will pause. - 1 - 1 /2 - 1 / 4 - 1 / 8 You can also select Slow Motion speeds by using and on the remote control. 1 Press during playback. 2 Press repeatedly to make the disc play at 1/2, 1/4 or 1/8 the regular speed. 3 Press to resume normal playback.
English Repeat Scan DVD Discs - Repeat chapter/title/disc ● To repeat the currently playing chapter, press REPEAT. Play the first 10 seconds of each chapter/index on the disc. 1 Press SCAN. The first 10 seconds of each chapter will play, beginning with the current chapter. 2 To continue play at your chosen chapter/index, press SCAN again or press . ➤ appears on the TV screen. ● To repeat the currently playing title, press REPEAT a second time. Time search ➤ appears on the TV screen.
Special DVD+RW/+R features Zoom Recording date and time If a recording was made from a digital video camera using the i.LINK DV input, the original recording date and time are automatically stored as DVD subtitles. ● Press SUBTITLE to display the recording date and time. ➤ The recording date and time are displayed in the right bottom corner of the screen. 31/ 08/ 2001 The Zoom function allows you to enlarge the video image and pan through the enlarged image. 1 Press ZOOM.
English 1 Press TITLE/CHAP followed by TOP MENU. ➤ The disc menu is displayed. 2 To remove the disc menu, press TOP MENU again. Subtitles Camera Angle If the disc contains sequences recorded from different camera angles, the angle icon appears, showing the number of available angles, and the current angle. You can change the camera angle if you wish. 1 Press the SUBTITLE to select Z (Subtitle) in the system menu bar.
Playing an Audio CD Moving to another track 1 Insert the disc. ➤ After loading the disc, playback starts automatically. ➤ If the TV is on, the Audio CD screen appears. ➤ During play, the current track number and its elapsed playing time will show on the TV screen and on the Recorder display. Audio Disk Mode play 1 2: 45 track time 14 ● Press during play to step forward to the next track. ● Press during play to return to the beginning of the current track.
English Access control Child Lock (DVD and VCD) When activating Child Lock, only discs that are authorized can be played without entering a code. The Recorder memory maintains a list of 50 authorized (‘Child safe’) disc titles. A disc will be placed in the list when you select ‘Play always.’ Each time a ‘Child safe’ disc is played, it will be placed on top of the list. When the list is full and a new disc is added, the last disc in the list will be removed.
Authorizing discs when Child Lock is activated 1 Insert the disc. ➤ The ‘Access Control box’ will appear.You will be asked to enter your code for ‘Play once’ or ‘Play always.’ locked Parental Level (DVD-Video only) Movies on pre-recorded DVD discs may contain scenes not suitable for children. Therefore, some discs may contain ‘Parental Control’ rating information that applies to the complete disc or to certain scenes on the disc.
Country Changing the 4-digit code 1 Press SYSTEM MENU. 2 Press t (left cursor) to select in the system menu bar. 3 Press w (down cursor) repeatedly to select , then press u (right cursor). 4 ‘Access control’ will be selected in the features menu . Press u (right cursor). 5 Enter the old 4-digit code using the 0-9 buttons. 6 Move to ‘Change code’ using w (down cursor). 1 See the disc case for details on whether it has Parental Level settings for specific countries.
Managing disc content (DVD+RW/+R only) ➤ The message ‘This will completely erase this title,’ ‘Press OK to confirm’ is shown. 5 Press ENTER/OK a second time. ➤ ‘Erasing title’ is shown until the action is completed. ➤ After the title has been erased, the Index Picture Screen will show an empty space instead of the Title. If there was an empty space in front of or behind this title, then these are combined into one empty space. Empty spaces of less than one minute will not be shown.
Protection You can change disc settings for a DVD+RW/+R from the Disc Information Screen. 1 When in the Index Picture Screen, press or press and hold for about two seconds. ➤ This selects the first title on the DVD+RW. 2 Press v (up cursor). ➤ You enter the Disc Information Screen. 3 In the Disc Information Screen, press u (right cursor). ➤ You will enter the ‘Settings’ menu. Settings for Summer holiday Disc name Summer holiday Protection Unprotected Perform steps 1, 2, 3 and 4 as explained above.
Make edits DVD-compatible If titles have been edited (See ‘Editing’), the edits will play on your DVD Recorder. However a DVD player may show the original versions instead of the edits.You can prepare your discs so that a DVD player will also play the edited version. Perform steps 1, 2, 3 and 4 as explained above. 5 If the Disc Information Screen shows the option ‘Make edits DVD-compatible,’ press u (right cursor) to select this option. If the menu does not show this option, your disc is already compatible.
Deleting chapter markers To insert a chapter marker on the current position of the title that is playing: Perform steps 1 and 2 to call up the Edit menu. 3 Select ‘Insert chapter marker.’ 4 Press ENTER/OK on the remote control to insert a marker. The maximum number of chapter markers per title is 99. When the maximum number is reached, the on-screen message ‘Too many chapters’ appears.You will have to delete some before inserting new chapter markers.
1 2 Edit menu play Insert chapter marker Current chapter Visible Delete chapter marker Delete all\markers in this title New index picture Divide title Press OK 6 Press ENTER/OK. ‘This will divide this title into two separate titles. Press OK to confirm’ will appear. ➤ ‘Dividing title’ is shown until the action is completed. 7 Press ENTER/OK again. The Index Picture Screen will show two titles instead of one. Both will have the same name.
If it appears that the DVD Recorder is faulty, first consult this checklist. It may be that something has been overlooked. Under no circumstances attempt to repair the system yourself; this will invalidate the warranty. Look for the specific symptom(s). Then perform only the actions listed to remedy the specific symptom(s). Symptom Remedy The Recorder does not respond to the remote control Aim the remote control directly at the sensor on the front of the Recorder.
Symptom Remedy The disc can not be erased because the Index Picture Screen does not appear Open the tray while leaving the disc in. Press and hold CLEAR for about five seconds until the tray closes. The disc is technically not yet erased but you can start a new recording like on a blank disc. The Index Picture Screen does not appear but the titles on the disc still a play period Take out the disc. Clean the disc. Insert the disc.
If the Recorder is still faulty you can start the Diagnosis Program in the Recorder. You can operate the Diagnosis Program by following these instructions step by step. Instructions DVD Recorder system notes DVD+RW and DVD+R discs recorded on your DVD recorder can be played on most DVD players and DVDROM drives, with the following issues: - The time search function will not be available. - The screen will display twice as many titles as there are on the disc.
Glossary This section explains most important terms, abbreviations, and acronyms used in this document. Term 48 Explanation AC-3 Audio Coding 3, also known as Dolby Digital. Multi-channel digital audio compression system from Dolby Labs. A/V Audio/Video Chapter A part of a title. Disc Bar A graphical representation of the contents of a (DVD+RW) disc. Disc Pointer An arrow indicating the current playback/recording position on the DVD+RW disc, appears on the ‘disc bar.
English Appendix Using your DVD Recorder remote control with your TV Your DVD Recorder remote control has limited control of TVs of different brands. The following buttons will operate TVs: - VOL + - VOL - MUTE increase TV volume decrease TV volume mute TV sound Other buttons normally operate the DVD Recorder but will operate the TV if you press and hold TV SHIFT.
Remote control codes for television Abex. . . . . . . . . . . . . . . . . . . . . . . . . . . . . . 1066 Admiral . . . . . . . . . . . . . . . . . 1013, 1028, 1075 Aiko . . . . . . . . . . . . . . . . . . . . . . . . . . . . . . 1012 Akai . . . . . . . . . . . . . . . . . . . . . . . . . . . . . . 1005 Alaron . . . . . . . . . . . . . . . . . . . . . . . . . . . . 1022 American Action . . . . . . . . . . . . . . . . . . . . 1023 Anam . . . . . . . . . . . . . . . . . . . . . . . . 1023, 1079 AOC . . . . . .
Specifications Disc type DVD+RW DVD+R DVD-RW (Video format) DVD-R DVD-Video SVCD Video CD Audio CD CD-R CD-RW Playback • • • • • • • • • • FRONT CONNECTIONS Recording • • — — — — — — — — RECORDABLE DISC FORMATS Medium Diameter Capacity (single side) Recording time TV Standard Scan Frequency Number of lines Playback Recording Internal tuner DVD+RW: Phase-Change ReWritable DVD+R: dye-based 12 cm 4.7 Gbyte HQ 60’ 9.72 Mbit/s SP+ 150’ 4.06 Mbit/s EP 240’ 2.54 Mbit/s EP+ 360’ 1.
YAMAHA ELECTRONICS CORPORATION, USA 6660 ORANGETHORPE AVE., BUENA PARK, CALIF. 90620, U.S.A. YAMAHA CANADA MUSIC LTD. 135 MILNER AVE., SCARBOROUGH, ONTARIO M1S 3R1, CANADA YAMAHA ELECTRONIK EUROPA G.m.b.H. SIEMENSSTR. 22-34, 25462 RELLINGEN BEI HAMBURG, F.R. OF GERMANY YAMAHA ELECTRONIQUE FRANCE S.A. RUE AMBROISE CROIZAT BP70 CROISSY-BEAUBOURG 77312 MARNE-LA-VALLEE CEDEX02, FRANCE YAMAHA ELECTRONICS (UK) LTD. YAMAHA HOUSE, 200 RICKMANSWORTH ROAD WATFORD, HERTS WD1 7JS, ENGLAND YAMAHA SCANDINAVIA A.B.