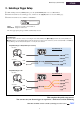
Drum Trigger Module Setup Manual for DT50S/DT50K This manual describes how to correctly connect drum triggers (DT50S/DT50K) to your drum trigger module and set parameters on your module to use the triggers. Refer to the Owner’s Manual that came with your DT50S/DT50K for details on how to use drum triggers and mount them on acoustic drums. Select your drum trigger module.
DTX502 Checking the Firmware Version Depending on the version of the firmware, you may need to update it. Before you connect the module to your DT50S/DT50K triggers, be sure to check the version of your module’s firmware. 1. While holding down the [SHIFT] button, turn on the drum trigger module. 2. Confirm the version displayed on-screen. Selecting a Setup Method After you confirm the version, select the appropriate setup method. If Version 1.30 or later If Version less than 1.
Quick Setup (recommended) DTX502 Quick Setup (recommended) This section describes the basic setup for connecting your DT50S/DT50K triggers to your module, and how to automatically set parameters by using Trigger Setup. With this method, you do not need to select voices individually. You can play snare, tom, or kick drum sounds simply by selecting a Preset kit. 1.
DTX502 Quick Setup (recommended) 2. Selecting a Trigger Setup 1. While holding down the [SHIFT] button, press the [SAVE/ENTER] button to access Menu Mode. 2. Turn the Data Dial to select the Trigger area, and then use the [<]/[>] buttons to select the TRG1 page. 3. Turn the Data Dial to select “DT50” or “DT50Mesh”. DT50: Setup for a normal acoustic drum set. DT50Mesh: Setup for mesh heads. The most appropriate pad types will be automatically selected.
Advanced Setup DTX502 Advanced Setup This section describes how to set individual pad types and voices for drum triggers without using Trigger Setup. Use this method for more advanced configurations such as mounting a DT50S on a tom in order to produce two sounds, one for a head shot and one for a rim shot. A high degree of customization is possible, but you will need to adjust the parameters yourself. 1.
Advanced Setup DTX502 4. Turn the Data Dial to set the pad type (w). Refer to the table below for settings. Input jack on drum trigger module Acoustic drum on which the trigger is mounted DT50S DT50K [qSNARE] [wTOM1/!0], [eTOM2/!1], [rTOM3/!2], or [uKICK/i] Snare DT50S(S) SN DT50S SN Tom DT50S(S) tomH DT50S tomH Floor tom DT50S(S) tomL DT50S tomL Bass drum (*) DT50K DT50K (S): Only the head trigger of the DT50S will produce a sound.
Advanced Setup DTX502 2-4. Saving Voices Save your voice settings on the drum trigger module as a User kit to ensure they are not lost. 1. Press the [SAVE/ENTER] button. Destination for saving 2. Turn the Data Dial to select the User kit number (51 to 100) in which you wish to save your settings. 3. If necessary, name your new drum kit. Press the [<]/[>] buttons to move the cursor to the character you wish to change, and then turn the Data Dial to change it. 4. Press the [SAVE/ENTER] button.
DTX502 TIPS! This section provides tips on how to make your drum triggers even easier to use. Adjusting the Noise Filter Follow the steps below to make adjustments in situations where, for whatever reason, noise enters the trigger signal when a pad is struck or other instability in trigger signals leads to sounds not being generated correctly. 1. While holding down the [SHIFT] button, press the [SAVE/ENTER] button to access Menu Mode. 2.
Update before Using (recommended) DTX502 Update before Using (recommended) There are two ways to update the firmware—a Windows application or an iOS app. If you are using Windows, search for “DTX502 Updater” on the web site below, download the DTX502 Updater application, and follow the steps on the firmware updater page to update the firmware. Yamaha Downloads: http://download.yamaha.
Use without Updating DTX502 Use without Updating You can use drum triggers with DTX502 drum trigger modules of Version less than 1.30, but in such a case, you will need to set parameters individually. We recommend updating the module, as it will make setup easier. Follow the steps below to use your drum triggers without updating the DTX502. 1. Connecting to the Drum Trigger Module Connect your drum triggers to the jacks on your DTX502 by using the stereo audio cables that came with the triggers.
Use without Updating DTX502 2-2. Setting Other Trigger Parameters Based on the recommended settings below, adjust the parameters in accordance with your drum setup. Refer to “Menu Mode—Trigger-related settings” in the DTX502 Owner’s Manual for details on other trigger input parameters such as Gain and Minimum Level.
DTX700 Checking the Firmware Version Depending on the version of the firmware, you may need to update it. Before you connect the module to your DT50S/DT50K triggers, be sure to check the version of your module’s firmware. 1. While holding down the drum trigger module’s [REC] button, turn on the power. 2. Confirm the version displayed on-screen. Look for the number after “Firm Ver:”. If the version is 1.
Setup Procedures DTX700 Setup Procedures 1. Connecting to the Drum Trigger Module Connect your drum triggers to the jacks for the DTX700 voices you wish to play by using the stereo audio cables that came with the triggers. Refer to the Owner’s Manual that came with your DT50S/DT50K for details on how to use the drum triggers and mount them on acoustic drums. NOTE • The DTX700 has only one dual mono input jack (L: trigger, R: trigger)—[oKICK/!0].
Setup Procedures DTX700 2-2. Storing Pad Types Store your pad type settings on the drum trigger module to ensure they are not lost. 1. Press the [STORE] button. You can press the [EXIT] button to return to the previous page without storing. 2. Press the [ENTER] button to store the settings. Notice Never attempt to turn off the drum trigger module while the message “Please keep power on” is shown.
DTX700 TIPS! This section provides tips on how to make your drum triggers even easier to use. Adjusting Head and Rim Balance Follow the steps below to adjust the balance between the head and rim of the snare or other drum on which a DT50S is mounted. This setting will only work when you have selected “DT50S Snare”, “DT50S HiTom”, or “DT50SLoTom” for the Pad Type parameter. 1. Press the [MENU] button to access the Menu area. 2. Use the dial to navigate to the TRIGGER/PAD/PAD TYPE page. 3.
DTX700 TIPS! Connecting Multiple DT50S/DT50K Triggers This section describes how to connect five DT50S/DT50K triggers—for example, four DT50S triggers and one DT50K trigger to the five [oKICK/!0], [wTOM1], [eTOM2], [rTOM3], and [!1] jacks. Adding triggers is a great way to expand your performance options by playing voices, waves, and songs; assigning functions to the triggers; and so on.
DTX900M/DTX900/DTXTREME III DTX900 Unless otherwise noted, “DTX900” in this manual refers to the DTX900M, DTX900, and DTXTREME III drum trigger modules. Please interpret it as referring to your module. Checking the Firmware Version Depending on the version of the firmware, you may need to update it. Before you connect the module to your DT50S/DT50K triggers, be sure to check the version of your module’s firmware. 1.
Setup Procedures DTX900 Setup Procedures 1. Connecting to the Drum Trigger Module Connect your drum triggers to the jacks for the DTX900 voices you wish to play by using the stereo audio cables that came with the triggers. Refer to the Owner’s Manual that came with your DT50S/DT50K for details on how to use the drum triggers and mount them on acoustic drums. NOTE • The DTX900 has only one dual mono input jack (L: trigger, R: trigger)—[!0KICK/!1].
Setup Procedures DTX900 2-2. Storing Pad Types Store your pad type settings on the drum trigger module as a User Trigger Setup to ensure they are not lost. 1. Press the [TRIGGER] button to access Trigger mode. 2. Press the [ENTER/STORE] button. Destination Trigger Setup number for storing 3. Turn the data dial to select the Trigger Setup number in which you wish to store your settings. 4. Press the [ENTER/STORE] button. You will be asked to confirm that you wish to proceed.
Setup Procedures DTX900 2-4. Storing Drum Voices Store your drum voice settings on the module as a User kit to ensure they are not lost. 1. Press the [DRUM KIT] button to access Drum Kit mode. 2. Press the [ENTER/STORE] button. Destination Drum Kit bank for storing Destination Drum Kit number for storing 3. Turn the data dial to select the Drum Kit bank and Drum Kit number in which you wish to store your settings. 4. Press the [ENTER/STORE] button.
DTX900 TIPS! This section provides tips on how to make your drum triggers even easier to use. Configuring Startup Settings You can configure settings so that stored pad type and voice settings will be automatically selected when you turn on the drum trigger module. 1. Press the [UTILITY] button to access Utility mode. 2. Press the [F1] GENERAL button, and then the [SF4] STARTUP button to call up the display for making the drum trigger module’s startup settings. e q w 3.
TIPS! DTX900 Adjusting the Noise Filter Follow the steps below to make adjustments in situations where, for whatever reason, noise enters the trigger signal when a pad is struck or other instability in trigger signals leads to sounds not being generated correctly. 1. Press the [TRIGGER] button to access Trigger mode. 2. Press the [F3] button to call up the Trigger Sensitivity Settings display. q w 3.
DTX900 TIPS! Connecting Multiple DT50S/DT50K Triggers This section describes how to connect five DT50S/DT50K triggers—for example, four DT50S triggers and one DT50K trigger to the five [!0KICK/!1], [!2], [!3], [!4], and [!5] jacks. Adding triggers is a great way to expand your performance options by playing voices, waves, and songs; assigning functions to the triggers; and so on.
DTX-MULTI 12 Checking the Firmware Version Depending on the version of the firmware, you may need to update it. Before you connect the electronic percussion pad to your DT50S/DT50K triggers, be sure to check the version of your instrument’s firmware. 1. While holding down the [SHIFT] button, turn on the instrument. 2. Confirm the version displayed on-screen. If the version is 1.
DTX-MULTI 12 Setup Procedures Setup Procedures 1. Connecting to the Instrument Connect your drum triggers to the jacks for the DTX-MULTI 12 voices you wish to play by using the stereo audio cables that came with the triggers. Refer to the Owner’s Manual that came with your DT50S/DT50K for details on how to use the drum triggers and mount them on acoustic drums. NOTE • The following jacks on the DTX-MULTI 12 each comprise a pair of mono inputs (L: trigger, R: trigger): [!4/!5] and [!6/!7].
Setup Procedures DTX-MULTI 12 2-2. Storing Pad Types Save your pad type settings on the instrument as a User trigger setup to ensure they are not lost. 1. While holding down the [SHIFT] button, press the [UTILITY] button to access the Trigger setting area. 2. Press the [STORE] button. 3. By using the [–/DEC] and [+/INC] buttons, indicate where you wish to store your settings. Destination for storing 4. Press the [ENTER] button. You will be asked to confirm that you wish to proceed.
Setup Procedures DTX-MULTI 12 2-4. Storing Voices Store your voice settings on the instrument as a User kit to ensure they are not lost. NOTE Voice data is stored as part of kit data. For details, refer to “Internal Design—Makeup of Internal Memory” in the DTX-MULTI 12 Owner’s Manual. 1. Press the [VOICE] button to access the Voice setting area. 2. Press the [STORE] button. The following will be displayed on-screen. Use the [–/DEC] and [+/INC] buttons to indicate where you wish to store your settings.
DTX-MULTI 12 TIPS! This section provides tips on how to make your drum triggers even easier to use. Configuring Startup Settings You can configure settings so that stored pad type and voice settings will be automatically selected when you turn on the instrument. 1. Press the [UTILITY] button to access the Utility setting area. 2. Use the [ ]/[ ] buttons and the [ENTER] button to navigate to the GENERAL page (UTIL1), and from there to the Startup Kit page (UTIL1-3). 3.
TIPS! DTX-MULTI 12 Adjusting the Noise Filter Follow the steps below to make adjustments in situations where, for whatever reason, noise enters the trigger signal when a pad is struck or other instability in trigger signals leads to sounds not being generated correctly. 1. While holding down the [SHIFT] button, press the [UTILITY] button to access the Trigger setting area. 2.
DTX-MULTI 12 TIPS! Connecting Multiple DT50S/DT50K Triggers The instrument has three input jacks that allow triggers to be connected—[!3], [!4/!5], and [!6/!7]. However, you can connect up to five DT50S/DT50K triggers (e.g., four DT50S triggers and one DT50K trigger) by using commercially available Y-cables. This section describes how to connect five DT50S/DT50K triggers (four DT50S triggers and one DT50K trigger) as an example.