
User Manual


Advanced Setup
5
DTX502
This section describes how to set individual pad types and voices for drum triggers without using
Trigger Setup.
Use this method for more advanced configurations such as mounting a DT50S on a tom in order to
produce two sounds, one for a head shot and one for a rim shot.
A high degree of customization is possible, but you will need to adjust the parameters yourself.
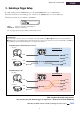
1. Connecting to the Drum Trigger Module
Connect your drum triggers to the jacks on your DTX502 by using the stereo audio cables that came with the triggers. Refer to
the Owner’s Manual that came with your DT50S/DT50K for details on how to use the drum triggers and mount them on acous-
tic drums.
2. Setting Parameters on the Drum Trigger Module
This section describes how to set parameters to play voices by using signals from DT50S/DT50K triggers connected to your
drum trigger module.
2-1. Selecting the Pad Type
Set the pad type for the DT50S/DT50K connected to the trigger input jack. Make sure to select the appropriate pad type for the
drum trigger in order to take full advantage of its functions.
1. While holding down the [SHIFT] button, press the [SAVE/ENTER] button to access Menu Mode.
2. Turn the Data Dial to select the Trigger area, and then press the [<]/[>] buttons to select the TRG3 page.
3. Strike the head of the connected drum to select the trigger input (q). Alternatively, you can change the selection by holding
down the [SHIFT] button and pressing the [<]/[>] buttons.
NOTE
The following jacks on the DTX502 each comprise a pair of mono inputs (L: trigger, R: trigger): [wTOM1/!0], [eTOM2/!1], [rTOM3/!2], and
[uKICK/i]. (Refer to the diagram below).
If you wish to produce two sounds with a DT50S (which is designed for snares and toms), one for a head shot and one for a rim shot, connect the
trigger to one of the jacks indicated above.
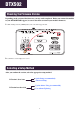
Advanced Setup
q
w