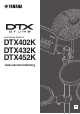
ELECTRONIC DRUM KIT DTX402K DTX432K DTX452K Gebruikershandleiding NL
Informatie over ophalen en weggooien van oude apparatuur Dit symbool op de apparaten, verpakking en/of meegeleverde documenten betekent dat gebruikte elektrische en elektronische apparaten niet met het gewone huishoudelijke afval mogen worden gemengd. Voor juist behandelen, hergebruik of recyclen van oude apparatuur brengt u deze naar de desbetreffende ophaalpunten in overeenstemming met de nationale wetgeving.
Inhoudsopgave VOORZICHTIG ............................................. 4 Welkom......................................................... 7 Over de handleidingen................................ 7 Afgedrukte handleiding ..................................... 7 Digitale handleiding (pdf) .................................. 7 Set-up De eerste stappen ....................................... 8 Verpakkingsinhoud ..................................... 9 Montagehandleiding .................................
VOORZICHTIG LEES DIT ZORGVULDIG DOOR VOORDAT U VERDERGAAT Bewaar deze gebruikershandleiding op een veilige en handige plaats voor eventuele toekomstige raadpleging. Voor netadapter WAARSCHUWING VOORZICHTIG • Deze netadapter is uitsluitend bedoeld voor gebruik met elektronische instrumenten van Yamaha. Gebruik de netadapter niet voor andere doeleinden. • Alleen voor binnenshuis gebruik. Niet gebruiken in vochtige omgevingen. • Zorg er bij het opstellen voor dat het stopcontact makkelijk toegankelijk is.
VOORZICHTIG Volg altijd de hierna vermelde algemene voorzorgsmaatregelen op om lichamelijk letsel bij uzelf en anderen of beschadiging van het instrument en andere eigendommen te voorkomen. Deze maatregelen houden in, maar zijn niet beperkt tot: Locatie Spanningsvoorziening/netadapter • Sluit het instrument niet via een verdeelstekker aan op het stopcontact. Dit kan leiden tot een verminderde geluidskwaliteit of oververhitting in het stopcontact.
LET OP Informatie Houd u aan onderstaande waarschuwingen om storingen/ schade aan het apparaat en schade aan de data of andere eigendommen te voorkomen. Auteursrechten Behandeling en onderhoud • Gebruik het instrument niet in de nabijheid van een tv, radio, stereoapparatuur, mobiele telefoon of andere elektrische apparaten. Het instrument, de tv of de radio kunnen bijgeluid genereren.
Welkom Dank u voor de aanschaf van dit Yamaha-product. Lees deze gebruikershandleiding zorgvuldig door om optimaal gebruik te maken van uw DTX402-serie elektronische drumkit. En bewaar deze handleiding op een veilige plaats wanneer u deze hebt doorgelezen, zodat u deze later zo nodig kunt raadplegen. Over de handleidingen Voor het gebruik van de DTX402K, DTX432K, and DTX452K zijn de volgende handleidingen beschikbaar. Deze handleidingen zijn bedoeld voor gebruikers van de DTX402K, DTX432K, and DTX452K.
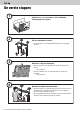
Set-up De eerste stappen Set-up 1 2 Open de doos en controleer of alle onderdelen aanwezig zijn en kloppen. Zet de onderdelen in elkaar. • Het montageproces wordt gedetailleerd beschreven op pagina 9 t/m 20. 3 Maak de nodige aansluitingen. • Sluit de pads aan op de drummodule met de meegeleverde kabels. Zie pagina 20. • Sluit de netadapter aan op de drummodule en schakel de module in. Zie pagina 21. 4 Bespeel uw elektronische drumkit.
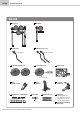
Set-up Verpakkingsinhoud Controleer na het openen van de verpakking van uw elektronische drumkit of de volgende onderdelen allemaal aanwezig zijn. DTX402K Rek (groot) Rek (klein) Hi-hathouder Bekkenhouders (×2) Geen stopper Stopper Bekken/hi-hatpads (×2) Crash-bekkenpad Drummodule Sensor (bobbels) HH40 hi-hatcontroller Drumsleutel KU100 kickunit Kabelbandjes (×2) Negenkanaals verdeelkabel Netadapter * Wordt mogelijk niet meegeleverd in uw regio. Neem hiervoor contact op met uw Yamaha-dealer.
Set-up Verpakkingsinhoud DTX432K Rek (groot) Rek (klein) Hi-hathouder Bekkenhouders (×2) Geen stopper Stopper Bekken/hi-hatpads (×2) Crash-bekkenpad Drummodule Sensor (bobbels) HH65 Hi-hatcontroller Negenkanaals verdeelkabel KP65 Kickpad Drumsleutel FP6110A Voetpedaal Kabelbandjes (×2) Netadapter * Wordt mogelijk niet meegeleverd in uw regio. Neem hiervoor contact op met uw Yamaha-dealer.
Verpakkingsinhoud Set-up DTX452K Rek (groot) Rek (klein) Hi-hathouder TP70S Snarepad Bekkenhouders (×2) Geen stopper Stopper Bekken/hi-hatpads (×2) S-vleugelbout Crash-bekkenpad Drummodule Sensor (bobbels) HH65 Hi-hatcontroller Negenkanaals verdeelkabel KP65 Kickpad Drumsleutel FP6110A Voetpedaal Kabelbandjes (×2) Netadapter * Wordt mogelijk niet meegeleverd in uw regio. Neem hiervoor contact op met uw Yamaha-dealer.
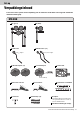
Set-up Montagehandleiding Volledig gemonteerde drumkit (DTX452K weergegeven) Stap 10 Stap 9 Stap 8 Stap 5 Stap 9 Stap 7 Stap 6 Stap 4 Stap 2 Stap 3 Stap 1 Stap 12 Stap 11 Stap 12 VOORZICHTIG • Monteer uw elektronische drumkit op een vlak, hard oppervlak. • Zorg dat u geen onderdelen door elkaar haalt of ze in de verkeerde richting monteert. Voer bovendien de montagestappen een voor een uit in de beschreven volgorde.
Montagehandleiding Stap 1 Set-up Het grote rek rechtop zetten Rek (groot) Toms 1. 2. 3. Zet het grote rek rechtop met de achterkant van de tompads naar u toe gericht, zoals weergegeven in de afbeelding. Draai de sleutelbout los met de drumsleutel. Trek de kortere poot naar u toe. Stap 2 Het kleine rek rechtop zetten Rek (klein) Bovenaanzicht 70° 1. Zet het kleine rek rechtop zoals weergegeven in de afbeelding en ondersteun deze met de hand.
Set-up Montagehandleiding Stap 3 Het rek monteren Rek (groot) Rek (klein) Bovenaanzicht Verbinding 1. 2. 110° 110° Draai de sleutelbout op het rek (groot) en draai de verbinding rond voordat u het kleine rek schuift (in de volgende stap). Schuif het kleine rek volledig in de verbinding van Stap 1. In de volgende stap wordt de snarepad voor de DTX452Kaan het kleine rek bevestigd. 3. Zet de linker en rechter poot uit elkaar zoals in het bovenaanzicht is weergegeven.
Montagehandleiding Stap 5 Set-up De pads op hun plaats draaien Voor DTX402K en DTX432K Stap 5 geldt voor elk van de vier pads. Voor DTX452K Stap 5 geldt voor elk van de drie tompads. Raadpleeg Stap 4 . Snarepad 1. 2. Draai de sleutelbout op elk van de pads los. Draai de pads in posities waarin ze gemakkelijk te bespelen zijn. (Raadpleeg zo nodig de afbeelding van de op de juiste manier gemonteerde kit op pagina 12.
Set-up Montagehandleiding Stap 7 De hi-hatpad bevestigen De positie van de hi-hatstopper aanpassen Stopper Speelpositie 1. 2. Draai de sleutelbout los van de stopper die zich boven aan de hi-hathouder bevindt. 3. Draai de sleutelbout vast om de stopper vast te zetten. Pas de positie van de stopper aan totdat deze vanaf uw speelpositie recht naar achteren wijst (zoals weergegeven in de afbeelding). De hi-hatpad monteren 1. 2.
Montagehandleiding Stap 9 Set-up De bekkenhouders bevestigen Speelpositie 1. 2. Draai de vier sleutelbouten aan de uiteinden van de tom een halve slag. Plaats de bekkenhouders in de uiteinden van de bovenste helft. Pas vervolgens de hoek van de bekkenhouders aan totdat ze dezelfde positie hebben als in de afbeelding. OPMERKING De twee bekkenhouders zijn identiek. • Als de bekkenhouders op de juiste manier zijn geplaatst, steken de punten iets uit de onderkant van het tomonderdeel.
Set-up Montagehandleiding Stap 11 1. 2. Voor DTX432K en DTX452K De kickpad monteren Verwijder de vier vleugelbouten, veerringen en platte ringen van de kickpad en plaats elke set gedemonteerd dichtbij. Monteer de voet aan de kickpad zoals hieronder wordt aangegeven en monteer vervolgens vanaf de zijkant van de voet de vleugelbouten, veerringen en platte ringen die u in stap 1 hebt verwijderd om de voet op zijn plaats vast te zetten. Kickpad Vleugelbout Voet Veerring Platte ring Kickpad Kickpad 3.
Montagehandleiding Stap 12 Set-up De hi-hatcontroller en kickdrum op hun plaats brengen Plaats de hi-hatcontroller en de kickdrumonderdelen of kickunit zoals weergegeven in de afbeelding. BELANGRIJK De hi-hatcontroller en de kickunit van de DTX402K zien er vrijwel hetzelfde uit. U kunt ze uit elkaar houden met de sticker op de voet.
Set-up Montagehandleiding Step 14 De pads op de drummodule aansluiten TOM2 TOM1 CR Triggeringangsaansluitingen op de drummodule RIDE HH SNR TOM3 TOM1 TOM2 TOM3 RIDE CR HH SNR RIDE HH HHC KICK SNR KICK DTX402K 1. KICK HHC HHC CR TOM1 TOM2 TOM3 KICK HHC Negenkanaals verdeelkabel Steek de ministekkers* aan de ene kant van de negenkanaals verdeelkabel in de juiste triggeringangsaansluitingen (SNARE tot KICK/PAD) van de drummodule. (*: Het setje met de kleinste stekkers.
Set-up Configureren voor geluid Het netsnoer aansluiten 1. 2. 3. Controleer of de drummodule is uitgeschakeld (geen van de knoppen lichten op). Steek de DC-stekker van de netadapter in de aansluiting [ ] aan de onderkant van de module. Haak het snoer van de netadapter rond de kabelklem om te voorkomen dat het per ongeluk wordt losgetrokken. Een hoofdtelefoon of luidsprekers aansluiten Uw drummodule heeft geen ingebouwde luidsprekers.
Set-up Configureren voor geluid De drummodule inschakelen 1. 2. Als u de drummodule hebt aangesloten op andere audioapparaten, zoals luidsprekers met eigen voeding, controleert u of het volume van alle andere apparaten helemaal omlaag is gedraaid. Druk op de knop [ ] (Standby/On). De drummodule wordt ingeschakeld en de knoppen lichten op. LET OP • In bepaalde bedieningsmodi schakelt de automatische uitschakelfunctie de drummodule niet uit als de ingestelde tijd is verstreken.
Set-up Paneelregelaars en functies Besturingspaneel Drummodule v c x b n z m , z Modusschakelaar • Druk op deze schakelaar om tussen de afspeelmodus en trainingsmodus te schakelen. (pagina's 26, 31) • Houd deze schakelaar ingedrukt om Menu Mode te selecteren. (pagina 41) x Knop [DRUM ON/OFF] (pagina 28) Gebruik deze knop om drumpartijen te dempen en de demping op te heffen voor een oefendrumpatroon. c Knop [ ] • Gebruik deze knop om songs te starten en te stoppen.
Set-up Paneelregelaars en functies Onderpaneel . ⁄0 ⁄1 . Aansluiting [USB TO HOST] (pagina 58) Hierop kunt u een computer of slim apparaat, zoals een iPhone of iPad, aansluiten zodat u digitale signalen kunt verzenden en ontvangen (audio en MIDI). Voor het aansluiten van een iPhone of iPad zijn extra onderdelen nodig. Raadpleeg hiervoor de 'iPhone/iPad Connection Manual' (Handleiding voor het aansluiten van een iPhone/iPad) (pdf).
Basistechnieken Speeltechnieken Basistechnieken Snarepad Hi-hatcimbaal Als u een TP70S snarepad met de DTX452K gebruikt, kunt u afhankelijk van waar u tikt drie verschillende geluiden (head, open rim en gesloten rim) produceren, zoals wanneer u een akoestische snare bespeelt. Gesloten rimshots (rand 2) Open/gesloten • U kunt een open hi-hatgeluid produceren door op de hi-hatpad te tikken terwijl het pedaal van de hi-hatcontroller niet is ingedrukt.
Basistechnieken Bespelen met een geselecteerde muziekcategorie De drummodule wordt geleverd met tien verschillende muziekcategorieën. Als u een muziekcategorie selecteert, worden de overeenkomstige kit (een volledige set toewijzingen van drumgeluiden voor alle pads) en song automatisch geselecteerd. Een muziekcategorie selecteren 1. 2. Druk de modusschakelaar in om het lampje PLAY in te schakelen (afspeelmodus). Selecteer een muziekcategorie door op de overeenkomstige nummerknop [1] t/m [10] te drukken.
Bespelen met een geselecteerde muziekcategorie Meespelen met een song 1. 2. Druk de modusschakelaar in om het lampje PLAY in te schakelen. Selecteer een muziekcategorie door op de overeenkomstige nummerknop [1] t/m [10] te drukken. De geselecteerde nummerknop licht op en de overeenkomstige song wordt automatisch geselecteerd. 1 Het songvolume aanpassen Houd de knop [ ] ingedrukt en druk op de knop VOLUME[+] of VOLUME[–].
Basistechnieken Bespelen met een geselecteerde muziekcategorie Het volume van gedempte drumpartijen aanpassen Een MIDI-song importeren Als u op de knop [DRUM ON/OFF] drukt terwijl u een song afspeelt, worden de drumpartijen uit de song gedempt: het volume ervan wordt verminderd tot nul. Als u echter wilt dat de drumpartijen in een situatie als deze nog enigszins hoorbaar zijn, kunt u het gedempte volume aanpassen op de manier die hieronder wordt beschreven. 1.
Basistechnieken De metronoom gebruiken Op uw elektronische drumkit meespelen met de ingebouwde metronoom is een goede manier om uw ritme te perfectioneren. De metronoom starten en stoppen Het tempo controleren Wanneer dat nodig is, kunt u het huidige tempo van de drummodule controleren via het knipperpatroon van de lampjes van de nummerknoppen en de Voice Guidance. Hoe hoger de waarde, hoe sneller het tempo wordt. • Druk op de knop [ ] om de metronoom aan te zetten.
Basistechnieken De metronoom gebruiken Het tempo aanpassen 2. De volgende drie methoden zijn beschikbaar als u het tempo wilt wijzigen. Nadat u alle benodigde cijfers hebt ingevoerd, haalt u uw vinger van de knop [ ]. De drummodule spreekt het nieuwe tempo uit (in het Engels). OPMERKING • Nummerknop [10] wordt gebruikt om de waarde nul in te voeren. U kunt de knop niet gebruiken om het nummer tien in te voeren.
Basistechnieken Oefenen in de trainingsmodus Er zijn tien verschillende typen trainingen beschikbaar waarmee u het bespelen van drums op een aangename manier onder de knie kunt krijgen. Basistraining Geavanceerde training Aan uw ritme werken: — Ga na de basistraining verder voor volledige beheersing — Rhythm Gate (2 typen) . . . . . . . . . . pagina 32 Measure Break . . . . . . . . . . . . . . . . pagina 36 Change Up . . . . . . . . . . . . . . . . . . .
Basistechnieken Oefenen in de trainingsmodus 1. RHYTHM GATE 2. RHYTHM GATE Aan uw ritme werken: ••••••••••••••••••••••••••••••••••••••••••••••••••••••••••••••••••••••••• 1. RHYTHM GATE, 2. RHYTHM GATE Rhythm Gate is een oefening voor het verbeteren van uw timing door mee te spelen met een song of de metronoom. Als u met een perfecte timing tikt, knipperen de nummerknoppen [5] en [6] tegelijk. Als u te vroeg of te laat tikt, wordt er geen geluid geproduceerd.
Oefenen in de trainingsmodus Basistechnieken 3. DYNAMIC GATE Spelen met dynamiek: ••••••••••••••••••••••••••••••••••••••••••••••••••••••••••••••••••••••••• 3. DYNAMIC GATE Dynamic Gate is een oefening voor het bespelen van pads met de juiste dynamiek. Het doel is drie niveaus te beheersen: zwak, normaal en sterk. Wanneer u met de verkeerde dynamiek tikt, wordt er geen geluid geproduceerd. Aan het einde van de oefening wordt geëvalueerd hoe nauwkeurig u met de juiste dynamiek hebt getikt.
Basistechnieken Oefenen in de trainingsmodus 4. SONG PART GATE Met een song meespelen: ••••••••••••••••••••••••••••••••••••••••••••••••••••••••••••••••••••••••• 4. SONG PART GATE Song Part Gate is een geavanceerde oefening voor het meespelen van werkelijke drumpatronen met een partij van een song. U kunt bijvoorbeeld alleen de fill-in partij in de song oefenen of alleen de handpartijen van het basisdrumpatroon van de song.
Oefenen in de trainingsmodus Basistechnieken 5. SONG SCORE GATE Met een song meespelen: ••••••••••••••••••••••••••••••••••••••••••••••••••••••••••••••••••••••••• 5. SONG SCORE GATE Song Score Gate is de laatste oefening voor het meespelen van werkelijke drumpatronen met een partij van een song.
Basistechnieken Oefenen in de trainingsmodus 6. MEASURE BREAK Aan uw ritme werken: ••••••••••••••••••••••••••••••••••••••••••••••••••••••••••••••••••••••••• 6. MEASURE BREAK Measure Break is een oefening voor het vasthouden van een stabiel tempo zonder metronoom. Geëvalueerd wordt hoe nauwkeurig u de eerste tel van de maat na de break tikt. Als u Measure Break eenmaal beheerst, kunt u zelfs na breaks of fill-ins een stabiel tempo houden.
Oefenen in de trainingsmodus Basistechnieken 7. CHANGE UP Aan uw ritme werken: ••••••••••••••••••••••••••••••••••••••••••••••••••••••••••••••••••••••••• 7. CHANGE UP Change Up is een oefening voor het spelen van zeven verschillende ritmes die om de twee maten veranderen. Geëvalueerd wordt hoe goed u bij de ritmes de juiste timing behoudt. Doe uw best om een stabiel tempo te houden, zelfs wanneer de ritmes veranderen. 3 3 6 Ritme Procedure 1.
Basistechnieken Oefenen in de trainingsmodus 8. PART MUTE Oefenen per partij: ••••••••••••••••••••••••••••••••••••••••••••••••••••••••••••••••••••••••• 8. PART MUTE Part Mute is een oefening waarbij u een of meer van de drumpartijen (bijvoorbeeld snare en kick) en de instrumentpartijen (niet-drumpartijen) van een song kunt dempen. U selecteert de drum-/instrumentpartijen die moeten worden gedempt door op de overeenkomstige nummerknoppen te drukken.
Oefenen in de trainingsmodus Basistechnieken 9. FAST BLAST Zo snel spelen als u kunt: ••••••••••••••••••••••••••••••••••••••••••••••••••••••••••••••••••••••••• 9. FAST BLAST Fast Blast is een oefening waarbij u binnen een tijdslimiet (60 seconden) zo snel mogelijk op de pads moet tikken. De half verlichte nummerknoppen geven de resterende tijd aan. De oefening eindigt wanneer de verlichting van alle nummerknoppen is uitgeschakeld.
Basistechnieken Oefenen in de trainingsmodus 10. RECORDER Uw spel opnemen: ••••••••••••••••••••••••••••••••••••••••••••••••••••••••••••••••••••••••• 10. RECORDER Met Recorder kunt u uw performance gemakkelijk opnemen. U kunt deze opnamen niet alleen gebruiken om via terugluisteren te controleren of u vooruit gaat, maar ook om zelf met de opname mee te spelen. Bedenk wel dat bij deze training geen score wordt bijgehouden. Procedure 1. Druk de modusschakelaar in om het lampje TRAINING in te schakelen.
Geavanceerde technieken Parameters instellen met Menu Mode Geavanceerde technieken Menu Mode wordt gebruikt voor het instellen van parameters en functies van de drummodule, die zijn onderverdeeld in de volgende zeven groepen. z Metronoominstellingen 1-1. Patroon .........................................................pagina 42 1-2. Tellen............................................................pagina 42 1-3. Geluid...........................................................pagina 42 1-4.
Geavanceerde Parameters instellen met Menu Mode 1-2. Tellen z Metronoominstellingen Stappen: Houd de modusschakelaar [1] [2] ingedrukt. 1-1. Patroon Stappen: Houd de modusschakelaar [1] [1] ingedrukt. Instelling Instelling U kunt de metronoom tussen een lengte van 1 en 9 tellen instellen. U kunt een van de acht patronen voor de metronoom van de drummodule instellen. 1. 2. 3. 4. Houd de modusschakelaar ingedrukt om Menu Mode te activeren.
Parameters instellen met Menu Mode 4. Selecteer een nieuw metronoomgeluid door op de overeenkomstige nummerknop [1] t/m [7] te drukken. Nummerknop Instelling [1] Metronome click 1 [2] Metronome click 2 [3] [4] Cowbell Drumsticks x Kitinstellingen 2-1. Padgeluid Stappen: Houd de modusschakelaar [2] [1] ingedrukt. Instelling [5] Claves [6] Spoken count 1 [7] Spoken count 2 (met maatnummer) 1-4.
Geavanceerde Parameters instellen met Menu Mode 4. 2-3. Pad stemmen Stappen: Houd de modusschakelaar [2] [3] ingedrukt. Stel de parameter in met nummerknop [1] of [2]. De volgende instellingen zijn beschikbaar. Nummerknop Instelling Instelling [1] Off [2] On OPMERKING • Zo lang de functie Double Bass Drum is ingeschakeld, kunt u de hi-hatcontroller die op de triggeringangsaansluiting [HI-HAT CONTROL] is aangesloten, niet gebruiken om het openen en sluiten van de hi-hat te simuleren.
Parameters instellen met Menu Mode Geavanceerde 3-2. Nootnummer c MIDI-instellingen Stappen: Houd de modusschakelaar [3] [2] ingedrukt. 3-1. Local Control (lokale besturing) Stappen: Houd de modusschakelaar [3] [1] ingedrukt. Instelling Instelling U kunt het MIDI-nootnummer instellen dat wordt uitgevoerd als een van de pads wordt bespeeld.
Geavanceerde Parameters instellen met Menu Mode 4. v Hi-hatinstellingen Voer een nieuwe splash-gevoeligheid in met de knoppen TEMPO[+]/[–]. Instelling 4-1. Koppelingspositie 0 t/m 127 Stappen: Houd de modusschakelaar [4] [1] ingedrukt. OPMERKING Stel deze parameter in op [0] als u foot splashes wilt uitschakelen. Instelling 4-3. Foot-closepositie Stappen: Houd de modusschakelaar [4] [3] ingedrukt. U kunt het effect van het wijzigen van de koppelingspositie van de hi-hat simuleren.
Parameters instellen met Menu Mode 4-4. Foot-closesnelheid 4-5. Kicksnelheid Stappen: Houd de modusschakelaar [4] [4] ingedrukt. Stappen: Houd de modusschakelaar [4] [5] ingedrukt. Instelling U kunt de snelheid (of kracht) aanpassen van footclosegeluiden die met de hi-hatcontroller worden geproduceerd. Deze parameter heeft alleen effect als u een HH40 hi-hatcontroller gebruikt. 1. 2. 3. 4.
Geavanceerde Parameters instellen met Menu Mode b Triggerinstellingen aanslag 11 12 13 5-1. Padsnelheidscurve 14 15 Stappen: Houd de modusschakelaar [5] [1] ingedrukt. Instelling U kunt een snelheidscurve voor afzonderlijke pads selecteren. Een snelheidscurve bepaalt hoe de snelheid (of kracht) van een geluid wordt beïnvloed bij hoe hard u op de pad tikt. 1. 2. 3. 4. 5. aanslag Triggeringangsniveau 16 17 18 19 20 Houd de modusschakelaar ingedrukt om Menu Mode te activeren.
Geavanceerde Parameters instellen met Menu Mode 5-2. Overspraak 5-3. Snarepadtype Stappen: Houd de modusschakelaar [5] [2] ingedrukt. Stappen: Houd de modusschakelaar [5] [3] ingedrukt. Instelling De term 'overspraak' verwijst naar de uitvoer van valse triggersignalen van een andere pad die de pad die is ingedrukt als het resultaat van een trilling of interferentie tussen pads. U kunt de parameter Crosstalk voor afzonderlijke pads aanpassen om dit fenomeen te voorkomen. 1. 2. 3. 4. 5.
Geavanceerde Parameters instellen met Menu Mode 5-4. Pedaaltype 5-5. Versterking Stappen: Houd de modusschakelaar [5] [4] ingedrukt. Stappen: Houd de modusschakelaar [5] [5] ingedrukt. Instelling Gebruik de volgende parameter om de pedaaltypen (hi-hatcontroller en kick) op te geven die zijn aangesloten op uw drummodule. 1. 2. 3. 4. Houd de modusschakelaar ingedrukt om Menu Mode te activeren.
Parameters instellen met Menu Mode Geavanceerde 6-2. Moeilijkheidsniveau n Trainingsinstellingen Stappen: Houd de modusschakelaar [6] [2] ingedrukt. 6-1. Timer Stappen: Houd de modusschakelaar [6] [1] ingedrukt. Instelling Instelling U kunt het moeilijkheidsniveau van de training voor de volgende oefeningen instellen. U kunt de oefentijd voor de volgende oefeningen in de trainingsmodus instellen. • • • • • Rhythm Gate Dynamic Gate Song Part Gate Measure Break Change Up 1. 2.
Geavanceerde 4. Parameters instellen met Menu Mode Selecteer de instelling voor elke drumpad met de nummerknoppen [1] t/m [5]. Als ze zo zijn ingesteld dat ze een geluid produceren, produceert de pad een geluid zodra erop wordt geslagen. Als ze zo zijn ingesteld dat ze geen geluid produceren, produceren alleen de pads die precies op tijd worden gespeeld een geluid. Nummerknop 6-5. Lage limiet Dynamic Gate Stappen: Houd de modusschakelaar [6] [5] ingedrukt.
Geavanceerde Parameters instellen met Menu Mode 6-7. Fast Blast-timer Stappen: Houd de modusschakelaar [6] [7] ingedrukt. Instelling m Overige instellingen 7-1. Voice Guidance-volume Stappen: Houd de modusschakelaar [7] [1] ingedrukt. Instelling U kunt de oefentimer voor Fast Blast instellen (pagina 39). De timer begint met aftellen bij het begin van een oefening en als de ingestelde tijd is bereikt, wordt de oefening automatisch beëindigd. 1. 1.
Geavanceerde Parameters instellen met Menu Mode 7-3. USB-audio-uitgangsinstellingen Stappen: Houd de modusschakelaar [7] [3] ingedrukt. 7-5. Tijd van de automatische uitschakelfunctie Stappen: Houd de modusschakelaar [7] [5] ingedrukt. Instelling Instelling U kunt instellen of de USB-audio-invoer naar de USB out wordt verzonden of niet.
Parameters instellen met Menu Mode 4. 7-6. Stereo/mono Stappen: Houd de modusschakelaar [7] [6] ingedrukt. 5. Instelling 6. U kunt de aansluiting [PHONES/OUTPUT] instellen zodat mono- of stereogeluid wordt uitgevoerd. Wij raden u aan de instelling Mono te gebruiken als u een standaard-monoaudiokabel aansluit op deze aansluiting om uw drummodule te gebruiken met externe luidsprekers, een mengpaneel of vergelijkbare apparatuur. 1. 2. 3. 4.
Geavanceerde Parameters instellen met Menu Mode 7-9. Terugzetten naar laatste keer inschakelen Stappen: Houd de modusschakelaar [7] [9] [1] [1] ingedrukt. U kunt alle instellingen van drumkits, songs en Menu Mode terugzetten naar de instellingen die ze hadden bij de laatste keer dat u de drummodule hebt ingeschakeld. LET OP • Als u instellingen op de hieronder beschreven manier terugzet, gaan wijzigingen verloren die u erin hebt aangebracht nadat u de drummodule voor het laatst hebt ingeschakeld.
Geavanceerde technieken Afzonderlijk verkrijgbare accessoires integreren Zoals hieronder wordt beschreven, kunt u verschillende accessoires* toevoegen aan uw elektronische drumkit voor een nog betere drumervaring. (*: apart verkrijgbaar) Deze optionele externe pads waren up-to-date ten tijde van het afdrukken van deze handleiding. Informatie met betrekking tot eventuele modellen die later zijn uitgebracht, is beschikbaar op de volgende website. https://www.yamaha.
Geavanceerde technieken Aansluiten op een computer Door de drummodule met een USB-kabel aan een computer of een smart-apparaat zoals een iPhone/ iPad aan te sluiten, kunt u audio- of MIDI-data verzenden of ontvangen. In dit gedeelte wordt uitgelegd hoe u de drummodule en de computer op elkaar aansluit. OPMERKING Een USB-kabel wordt niet meegeleverd.
Referentie Problemen oplossen Referentie Sommige problemen zijn mogelijk opgelost door de standaardinstellingen (fabrieksinstellingen) terug te zetten. Als de volgende instructies niet werken, raden we u aan de fabrieksinstellingen terug te zetten (zie pagina 22). Er wordt geen geluid geproduceerd wanneer een pad wordt aangeslagen of het volume lager is dan verwacht. Controleer de aansluitingen als volgt.
Referentie Problemen oplossen Geluiden of volumes klinken niet zoals verwacht. Als hi-hat splashgeluiden niet zoals verwacht worden geproduceerd, kunt u het volgende proberen. • Pas de parameter Splash Sensitivity aan vanuit Menu Mode (zie pagina 46). Als het moeilijk is om gesloten hi-hatgeluiden te produceren met een HH65 hi-hatcontroller, kunt u het volgende proberen. • Pas de parameter Foot Close Position aan vanuit Menu Mode (zie pagina 46).
Problemen oplossen Referentie Andere algemene vragen Hoe zorg ik dat de instellingen van de drummodule worden opgeslagen? • De instellingen van de drummodule worden automatisch opgeslagen als u de drummodule uitschakelt met de knop [ ] (Standby/On) (zie pagina 22). Hoe zet ik alle parameters van de drummodule terug op hun standaardinstellingen? • U kunt standaardinstellingen terugzetten met de functie Factory Reset (zie pagina 22).
Referentie Datalijst Lijst met muziekcategorieën Number 1 2 3 Muziekcategorie POP1 POP2 ROCK1 4 ROCK2 5 METAL 6 7 8 9 10 FUNK HIPHOP EDM JAZZ LATIN Songbeschrijving 8-beat pop 16-beat pop 8-beat rock Rocknummer met een swingritme Een heavy-metalsong met twee basdrums. Up-tempo funk Moderne hip-hop Elektronische dance-muziek 4-beat jazz Salsa, een soort latin-muziek Kitbeschrijving Een veelzijdig kit die geschikt is voor pop. Een kit die gated reverb drumgeluiden simuleert.
Datalijst Hi-Hat 153 Briliant14 154 Dark 14 155 Vintage 14 156 Bright 14 157 Jazz 14 158 R&B 1 159 R&B 2 160 Electro 1 161 Electro 2 162 Electro 3 163 Electro 4 164 T8 165 T9 166 HipHop 1 167 HipHop 2 168 DNB Percussion 169 Cajion Mt 170 Cajion Slp 171 Cajion Lo 172 Cajion Ft 173 PndeiroTap 174 PndeiroOp 175 PndeiroShk 176 PndeiroSld 177 Claves 178 Conga H Sw 179 Conga L Sw 180 BongoH Sw 181 BongoL Sw 182 Cowbell1Sw 183 Cowbell 2 184 Cowbell 3 185 Shaker Op 186 Shaker Cl 187 Timbales H 188 Timbales L 189
Referentie Technische gegevens Drummodule Type AWM2 Maximale polyfonie 64 noten voices Drum en percussie: 287 Toetsenbord: 128 Drumkits 10 (welke alle kunnen worden bewerkt en overschreven) Songs 10 Reverb 9 typen Tempo 30 t/m 300 BPM (functies Tap Tempo en Voice Guidance) Tellen 1/4 t/m 9/4 Aansluitingen SNARE (ministereo-audio) TOM1 (minimono-audio) TOM2 (minimono-audio) TOM3 (minimono-audio) RIDE (minimono-audio) CRASH (ministereo-audio) HI-HAT (minimono-audio) HI-HAT CTL (ministereo-
Referentie Index Symbolen H R [ ], aansluiting .............. 24 [ ] (metronoom) ], knop ................. 23 [ ], knop.................................... 23 [ ] (Standby/On), knop .................. 23 [AUX IN], aansluiting ....................... 24 [DRUM ON/OFF], knop ................... 23 [HI-HAT CTL], aansluiting ............... 24 [KICK/PAD], aansluiting .................. 24 [PHONES/OUTPUT], aansluiting ....24 [TEMPO], knoppen.......................... 23 [USB TO HOST], aansluiting .....
DTX402K DTX432K DTX452K Gebruikershandleiding
Neem voor details over producten alstublieft contact op met uw dichtstbijzijnde Yamaha-vertegenwoordiging of de geautoriseerde distributeur uit het onderstaande overzicht. ITALY NORTH AMERICA Yamaha Canada Music Ltd. 135 Milner Avenue, Toronto, Ontario M1S 3R1, Canada Tel: +1-416-298-1311 U.S.A. Yamaha Corporation of America 6600 Orangethorpe Avenue, Buena Park, CA 90620, U.S.A. Tel: +1-714-522-9011 CENTRAL & SOUTH AMERICA MEXICO Yamaha de México, S.A. de C.V. Av. Insurgentes Sur 1647 Piso 9, Col.
Yamaha web site https://www.yamaha.com/ Yamaha Downloads https://download.yamaha.