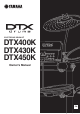
ELECTRONIC DRUM KIT DTX400K DTX430K DTX450K Owner’s Manual EN DTX400K/DTX430K/DTX450K Owner’s Manual 1
Contents PRECAUTIONS ............................................ 4 Practicing in Training Mode ...................... 29 Welcome....................................................... 6 Basic Training Mode Procedure....................... 29 1. Groove Check .............................................. 30 Product Manuals ......................................... 6 2. Rhythm Gate ............................................... 31 3. Measure Break ............................................ 32 4.
SPECIAL MESSAGE SECTION This product utilizes batteries or an external power supply (adapter). DO NOT connect this product to any power supply or adapter other than one described in the manual, on the name plate, or specifically recommended by Yamaha. This product should be used only with the components supplied or; a cart, rack, or stand that is recommended by Yamaha. If a cart, etc., is used, please observe all safety markings and instructions that accompany the accessory product.
PRECAUTIONS PLEASE READ CAREFULLY BEFORE PROCEEDING Please keep this manual in a safe and handy place for future reference. WARNING Always follow the basic precautions listed below to avoid the possibility of serious injury or even death from electrical shock, short-circuiting, damages, fire or other hazards. These precautions include, but are not limited to, the following: Power supply/AC power adaptor Water warning • Do not place the power cord near heat sources such as heaters or radiators.
• When setting up the product, make sure that the AC outlet you are using is easily accessible. If some trouble or malfunction occurs, immediately turn off the power switch and disconnect the plug from the outlet. Even when the power switch is turned off, electricity is still flowing to the product at the minimum level. When you are not using the product for a long time, make sure to unplug the power cord from the wall AC outlet. • Use only the stand/rack specified for the instrument.
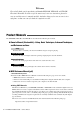
Welcome First of all, thank you for purchasing a Yamaha DTX400K, DTX430K, or DTX450K Electronic Drum Kit. In order to get the most out of your new instrument, please be sure to read this owner’s manual carefully. And after doing so, be sure to store it in a safe place so that you can refer back to it again as needed. Product Manuals The DTX400K, DTX430K, and DTX450K are described in the following two manuals.
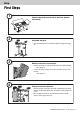
Setup First Steps Setup 1 2 Open the box and confirm that all parts are present and correct. Assemble the parts. • The assembly process is described in detail on pages 8 through 18. 3 Make the necessary connections. • Connect the pads to the drum module using the cables provided. See page 18. • Connect the power adaptor to the drum module and turn on the module. See page 19. 4 Play your electronic drum kit.
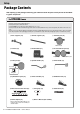
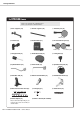
Setup Package Contents After opening up the package containing your electronic drum kit, please verify that all of the following parts are present. For DTX400K Owners • Parts !6, !7, and !8 are contained in Box 1. • Parts !0 and !1 are contained in Box 2. • The DTX400K does not have any parts numbered u, o, or !3. • Parts !4 and !5 are almost identical in appearance but are actually different. They can be told apart by the sticker on the base section.
Package Contents For DTX430K Owners • Parts !6, !7, and !8 are contained in Box 1. • Parts !0 and !1 are contained in Box 2. • The DTX430K does not have any parts numbered u or o.
Package Contents For DTX450K Owners • Parts o, !6, !7, and !8 are contained in Box 1. • Parts u, !0, and !1 are contained in Box 2.
Setup Assembly Guide Fully assembled drum kit (DTX450K shown) CAUTION Step 6 Step 11 Step 5 Step 9 Step 10 • Choose a flat, hard surface on which to assemble your electronic drum kit. • Take care to avoid mixing up parts or assembling them in the wrong direction. In addition, the assembly steps should be completed one at a time in the order described. • The assistance of at least one other person will be required when assembling the electronic drum kit.
Assembly Guide Step 3 Step 4 Attaching the third tom part Attaching the left arm r Joint e Rear of third tom pad Left vertical support Right vertical support The joint shown in the figure is not part of the DTX400K. IMPORTANT 1. The third tom part (e) and the snare part (i) from the DTX400K are almost identical in appearance, and special care should be taken to avoid mixing them up during the assembly process. To tell them apart, look for the wing bolt, which is only found on part i.
Assembly Guide Step 6 Attaching the first/second tom part 1. Rear of first tom pad Rear of second tom pad Take the first/second tom part (y) from the package, and using the tuning key, securely tighten the s key bolts. NOTE This part has two s key bolts, one each on the left and right. y 2. Loosen the key bolts. NOTE This part has two key bolts, one each on the left and right. 3.
Assembly Guide The details of Step 7 are different for the DTX400K, DTX430K, and DTX450K. For DTX430K Owners Step 7 1. For DTX450K Owners Step 7 Attaching the snare pad 1. Loosen the wing bolt on the joint on the left arm, which was attached in Step 4 . Attaching the snare pad Loosen the wing bolt on the joint on the left arm, which was attached in Step 4 . Left arm Left arm Wing bolt Wing bolt 90° Joint 90° Joint 2.
Assembly Guide The details of Step 8 are different for the DTX400K, DTX430K, and DTX450K. For DTX400K and DTX430K Owners Step 8 For DTX450K Owners Step 8 Attaching the hi-hat holder Attaching the hi-hat holder !1 Left arm Snare pad !1 Joint Joint 1. Loosen the two key bolts on the joint on the snarepad part, which was attached in Step 7 . 2. Take the hi-hat holder (!1) from the package and slide it into the joint from the front as shown in the figure.
Assembly Guide Step 10 Step 11 Attaching the hi-hat Adjusting the position of the hihat stopper pin Assembling the cymbal pads Wing nut Felt pad Pin 30° 30° !2 Pin Felt pad Front Cymbal holder Stopper In this step, the two remaining cymbal/hi-hat pads (!2) are assembled. Accordingly, 1. to 4. must be performed twice. Hi-hat holder NOTE The two cymbal pads (!2) are identical. Front This figure shows the hi-hat holder correctly inserted in the DTX450K.
Assembly Guide Step 13 is only required for the DTX430K and DTX450K. Owners of the DTX400K should skip to Step 14 . Step 13 Assembling the kick pad 5. 1. Take the kick pad (!3) from the package, remove the four wing bolts, spring washers, and flat washers from the kick pad holder, and arrange each set nearby in the disassembled condition. 2. Assemble the base to the holder as shown below, and then from the base side, assemble the wing bolts, spring washers, and flat washers removed in 1.
Assembly Guide Step 15 Fine-tuning the positions of the pads and the drum module Sit on your stool and adjust the positions of the pads and the drum module to your liking. • To adjust the height of the snare pad, loosen the key bolt. • To adjust the height of the third tom pad, loosen the key bolt. • To adjust the height of the drum module, loosen the s key bolt. • To tilt the drum module forwards or backwards, loosen the key bolt.
Setup Setting Up for Sound Connecting the Power Connecting Headphones or Speakers 1. Ensure that your drum module is turned off (i.e., none of the buttons are lit). 2. Insert the power adaptor’s DC plug into the [ ] connector on the left side of the module. 3. Hook the power adaptor’s cord around the cord clip to prevent it from being accidentally pulled out. Your drum module does not have built-in speakers.
Setting Up for Sound Turning On the Drum Module 1. If you have connected your drum module to other audio devices such as powered speakers, ensure that the volume on all other devices is turned down fully. 2. Press the [ ] (Standby/On) button. The drum module will turn on and its buttons will light up. NOTICE • In certain modes of operation, the Auto Power-Off function will not turn off the drum module when the set time has elapsed.
Setup Component Names & Functions z x n c v b m , . ⁄0 Control Panel z Number buttons b[ ] button • These buttons are used to select drum kits, songs, and training types. (pages 23, 25, 29) • Using this button, you can start and stop songs. (page 25) • You can use them to enter a tempo directly. (page 28) • In Training Mode, it is also used to start and stop training sessions. (page 29) • In Menu Mode, they are used to select settings.
Component Names & Functions Left side ⁄1 ⁄2 ⁄3 ⁄4 ⁄5 Right side Control panel ⁄6 Left Side This terminal is used to connect the drum module to a computer via a USB cable. ⁄2 [AUX IN] jack (page 19) The Auxiliary Input stereo mini-jack is used to input audio from an external source. For example, you can use this jack to connect a portable music player, a CD player, or another similar device and play along with your favorite tunes.
Basic Techniques Selecting & Playing a Kit Basic Techniques For the purpose of this manual, the term “kit” refers to a full set of drum-sound assignments for all of the pads. The drum module comes with ten different drum and percussion kits already set up. Selecting a Kit 1. 2. Adjusting Kit Sensitivity Press the [KIT] button to activate Kit Mode. Select a kit by pressing the corresponding number button ([1] to [10/0]).
Basic Techniques Playing Techniques Snare Pad Hi-hat Cymbal If using a TP70S Snare Pad, you will be able to produce three distinct sounds (i.e., head, open rim, and closed rim) depending on where you strike it, much the same as if you were playing an acoustic snare. Closed rim shots (Rim 2) Open/close • You can produce an open hi-hat sound by striking the hi-hat pad with the hi-hat controller’s pedal not depressed.
Basic Techniques Performing with a Song The drum module comes complete with ten practice songs. Covering a wide range of genres, they provide a convenient, enjoyable way to practice drumming. Selecting a Song 1. 2. 3. Adjusting the Song Volume Press the [SONG] button. Press the [ ] button to start the current song. If you wish press one of the number buttons ([1] to [10/ 0]) to select a different one. Using the following procedure, you can set the volume of the current song to your preferred level.
Performing with a Song Adjusting the Volume of Muted Drum Parts If you press the [DRUM MUTE] button while playing a song, the drum parts from the song will be muted—that is, their volume will be reduced to zero. If, however, you would like the drum parts to be slightly audible in this type of situation, you can adjust the muted volume as described below. 1. 2. Press the [ As described below, you can have a song playback between two points set in units of one measure.
Basic Techniques Using the Metronome Playing your electronic drum kit along with the built-in metronome is a great way to perfect your rhythm. Starting and Stopping the Metronome Confirming Tempo via Number Buttons Whenever necessary, you can confirm the drum module’s current tempo from the flashing pattern of the number button lights. Press either the [TEMPO+] or [TEMPO–] button once. • Press the [ • Press the [ ] button to turn on the metronome. ] button once again to turn it off.
Using the Metronome Adjusting the Tempo 2. The following three methods are available when you want to change the tempo. After entering all necessary digits, remove your finger from the [ ] button. The drum module will speak the new tempo to you (in English). NOTE • Number button [10/0] is used to enter the value zero. You cannot use it to enter the number ten.
Basic Techniques Practicing in Training Mode The drum module’s Training Mode provides many different ways in which to practice playing the drums. With ten different types of training available, you can finely hone your sense of rhythm, master drum patterns from a range of different musical genres, or if you are a beginner, learn easy patterns in an enjoyable way. 4. Training Mode Work on your rhythm 1. Groove Check ............................................Page 30 2. Rhythm Gate........................
Practicing in Training Mode Groove Check As an aid to improving your timing, Groove Check uses the number button lights to show how early or late you are drumming. Two different training styles are available—the first uses the metronome; the second lets you play along with a song. At the end of training, the drum module will display your score using number buttons [1] to [10/0] and will also speak it to you. 2 1 1. Press the [TRAINING] button to activate Training Mode. 2. Press number button [1].
Practicing in Training Mode Rhythm Gate Rhythm Gate training allows you to confirm by ear whether or not your timing is accurate. If you do not strike a pad in time, it will not produce any sound. Two different training styles are available—the first uses the metronome; the second lets you play along with a song. At the end of training, the drum module will display your score using number buttons [1] to [10/0] and will also speak it to you. 2 5 1 1.
Practicing in Training Mode Measure Break With Measure Break training, the metronome will be muted for certain measures in a sequence. For example, by setting the measures during which you play fills to be muted in this way, you can check for any deviation in your timing when the metronome returns. This will help you to play at a constant tempo throughout your performances. Please note that this type of training is not scored. 2 4 1 1. Press the [TRAINING] button to activate Training Mode. 2.
Practicing in Training Mode Tempo Up/Down Use Tempo Up/Down training to see how fast you can go and still maintain accurate timing. As you play along with a metronome, the drum module will automatically increase the tempo if your timing is good and decrease it if not. Please note that this type of training is not scored. If you would like to check or adjust the current tempo before you start training, see Using the Metronome (page 27). 2 1 1. Press the [TRAINING] button to activate Training Mode. 2.
Practicing in Training Mode Change Up In Change Up training, your aim is to maintain good timing as you play along with up to seven different practice rhythms that change every two measures. The rhythms are assigned to number buttons [1] to [7], allowing you to freely choose which ones you want to practice with. At the end of training, the drum module will display your score using number buttons [1] to [10/0] and will also speak it to you. 2 1 1. Press the [TRAINING] button to activate Training Mode.
Practicing in Training Mode Easy Session Easy Session training lets you play a drum pattern along with an accompanying song simply by striking any pad(s) in time. As such, it is not unlike a basic form of jamming with other band members. Please note that this type of training is not scored. 2 1 4 1. Press the [TRAINING] button to activate Training Mode. 2. Press number button [6]. The [ ] button will flash, indicating that the drum module is on standby to start training. 3. 4.
Practicing in Training Mode Groove Tracker Groove Tracker makes it simple to play a number of different practice drum patterns, which will automatically reflect the speed and strength of your drumming. In addition, you can also freely add your own fills to the basic pattern. Please note that this type of training is not scored. 2 1 1. 3,6 • If you briefly stop drumming and then begin again, Press the [TRAINING] button to activate Training Mode. 2. Press number button [7].
Practicing in Training Mode Pad Gate In Pad Gate training, the pads will only produce a sound when your drumming precisely matches a practice drum pattern. At the end of training, the drum module will display your score using number buttons [1] to [10/0] and will also speak it to you. 2 1 1. Press the [TRAINING] button to activate Training Mode. 2. Press number button [8]. The [ ] button will flash, indicating that the drum module is on standby to start training. 3.
Practicing in Training Mode Part Mute Part Mute training lets you mute any or all of the drum parts (i.e., hi-hat, snare, kick, tom, and/or cymbal) and also the instrument parts from an accompanying song. Please note that this type of training is not scored. 5 1 1. 2. 3. 5 3,6 Press the [TRAINING] button to activate Training Mode. Press number button [9]. The [ ] button will flash, indicating that the drum module is on standby to start training. Press the [ ] button to start the current song.
Practicing in Training Mode Fast Blast In a Fast Blast training session, you just play the drums as wildly as you can over a set period of time. More a game than a form of practice, your aim is to get the highest possible score. At the end of training, the drum module will display your score using number buttons [1] to [10/0] and will also speak it to you. NOTE Fast Blast uses a different scoring system than the other types of training. 2 1 1. Press the [TRAINING] button to activate Training Mode. 2.
Advanced Techniques Setting Parameters using Menu Mode Advanced Techniques Menu Mode is used to set drum-module parameters and functions, which are arranged into the following seven groups. z Metronome Settings 1-1. Pattern ............................................................ Page 41 1-2. Beats .............................................................. Page 41 1-3. Sound............................................................. Page 41 1-4. Number Button Lighting Pattern ..................
Setting Parameters using Menu Mode 1-2. Beats z Metronome Settings Steps: MENU ([KIT] + [SONG]) [1] [2] Setting 1-1. Pattern Steps: MENU ([KIT] + [SONG]) [1] [1] Setting Setting Setting Using the following procedure, you can set the metronome to between 1 and 9 beats in length. Using the following procedure, you can set one of eight patterns for the drum module’s metronome. 1. While holding the [KIT] button, press the [SONG] button to activate Menu Mode. 1.
Setting Parameters using Menu Mode 1-4. Number Button Lighting Pattern Steps: MENU ([KIT] + [SONG]) [1] [4] Setting Setting You can have number buttons [1] to [10/0] light up when playing the metronome in Kit Mode or Song Mode. Use the following procedure to set the buttons’ lighting pattern. x Kit Settings 2-1. Pad Sound Steps: MENU ([KIT] + [SONG]) [2] [1] Setting Setting Using the following procedure, you can change the sounds assigned to the current kit’s pads.
Setting Parameters using Menu Mode 2-3. Pad Panning 2-5. Reverb Steps: MENU ([KIT] + [SONG]) [2] [3] Setting Steps: MENU ([KIT] + [SONG]) [2] [5] Setting Setting Using the following procedure, you can adjust the panning of the current kit’s pads. 1. While holding the [KIT] button, press the [SONG] button to activate Menu Mode. 2. Press number button [2] to select the Kit Settings parameter group. 3. Press number button [3] to select the Pad Panning parameter. 4. 5.
Setting Parameters using Menu Mode 3-2. Note Number c MIDI Settings Steps: MENU ([KIT] + [SONG]) [3] [2] Setting 3-1. Local Control Steps: MENU ([KIT] + [SONG]) [3] [1] Setting Setting The Local Control parameter determines whether or not the drum module’s internal tone generator will produce sounds in response to playing of the pads or of songs. Normally, this parameter is set to “On”, meaning that pads and songs will generate sounds.
Setting Parameters using Menu Mode 4-3. Foot Close Position v Hi-hat Settings Steps: MENU ([KIT] + [SONG]) [4] [3] Setting 4-1. Clutch Position Steps: MENU ([KIT] + [SONG]) [4] [1] Setting Setting Using the following procedure, you can simulate the effect of changing the hi-hat’s clutch position. The smaller the setting, the quicker an open hi-hat sound will decay.
Setting Parameters using Menu Mode 4-5. Kick Velocity Steps: MENU ([KIT] + [SONG]) [4] [5] Setting Setting Using the following procedure, you can adjust the velocity (or power) of kick sounds produced using the hi-hat controller. In order for the Kick Velocity parameter to have an effect, Double Bass Drum must be set to “On” for the current kit (page 43). This parameter only has an effect when you are using the hi-hat controller that comes with the DTX400K. 1.
Setting Parameters using Menu Mode 5-2. Crosstalk Velocity 11 12 13 Steps: MENU ([KIT] + [SONG]) [5] [2] Setting 14 15 Setting Velocity Trigger input level 16 17 18 19 20 Trigger input level The term “crosstalk” refers to the output of spurious trigger signals from a pad other than the one that was stuck as a result of vibration or interference between pads. Using the following procedure, you can adjust the Crosstalk parameter for individual pads to prevent this phenomenon from occurring.
Setting Parameters using Menu Mode 5-3. Snare Pad Type 5-4. Pedal Types Steps: MENU ([KIT] + [SONG]) [5] [3] Setting Steps: MENU ([KIT] + [SONG]) [5] [4] Setting Setting Using the following procedure, you can specify the type of snare pad connected to your drum module. Setting Use the following parameter to specify the types of pedals (i.e., hi-hat controller and kick) connected to your drum module. 1. While holding the [KIT] button, press the [SONG] button to activate Menu Mode. 1.
Setting Parameters using Menu Mode 5-5. Gain Steps: MENU ([KIT] + [SONG]) [5] [5] Setting Setting Using the following procedure, you can set the gain level for trigger signals output from individual pads. The higher the gain setting, the louder the sounds produced by light drumming. n Training Settings 6-1. Timer Steps: MENU ([KIT] + [SONG]) [6] [1] Setting Setting Using the following procedure, you can set the practice timer used in the drum module’s Training Mode.
Setting Parameters using Menu Mode 4. 6-2. Difficulty Level Steps: MENU ([KIT] + [SONG]) [6] [2] Setting Set the parameter using number button [1] or [2]. The available settings are as follows. Number button Setting [1] Off [2] On Setting Using the following procedure, you can set the level of training difficulty for Tempo Up/Down (page 33), Change Up (page 34), and Pad Gate (page 37). 1. While holding the [KIT] button, press the [SONG] button to activate Menu Mode. 2.
Setting Parameters using Menu Mode 6-5. Groove Tracker Control Pad(s) 6-6. Groove Tracker Advance Step Steps: MENU ([KIT] + [SONG]) [6] [5] Setting Steps: MENU ([KIT] + [SONG]) [6] [6] Setting Setting Setting Using the following procedure, you can select which pad(s) you would like to use to advance the practice drum pattern in Groove Tracker training (page 36).
Setting Parameters using Menu Mode 6-7. Pad Gate Group 6-8. Fast Blast Timer Steps: MENU ([KIT] + [SONG]) [6] [7] Setting Steps: MENU ([KIT] + [SONG]) [6] [8] Setting Setting Using the following procedure, you can set which groups of pads the drum module should consider when deciding whether or not you are playing the correct pattern in Pad Gate training (page 37). Using the following procedure, you can set the timer for Fast Blast training sessions (page 39).
Setting Parameters using Menu Mode 7-3. Auto Power-Off Time m Other Settings Steps: MENU ([KIT] + [SONG]) [7] [3] Setting 7-1. Kit Lock Steps: MENU ([KIT] + [SONG]) [7] [1] Setting Setting Normally, when you select a song, the drum module automatically chooses the most appropriate kit. You can, however, use the Kit Lock function to prevent this if you wish to keep the current kit when practicing with different songs. 1. 2.
Setting Parameters using Menu Mode 7-5. Initialize Kit 7-6. Initialize Song Steps: MENU ([KIT] + [SONG]) [7] [5] [1] [1] Using the following procedure, you can restore a kit’s default settings. NOTICE When you initialize a kit, all of the changes you have made to it will be lost. Before proceeding, therefore, you should ensure that the kit contains no irreplaceable settings. 1. 2. Press the [KIT] button. 3.
Setting Parameters using Menu Mode 7-7. Revert to Last Power On Steps: MENU ([KIT] + [SONG]) [7] [7] [1] [1] Using the following procedure, you can return all of the parameters from Kit Mode, Song Mode, and Menu Mode to the settings they had when you last turned on the drum module. NOTICE When you reset parameters as described below, any changes you have made to them since last turning on the drum module will be lost.
Advanced Techniques Integrating Separately Sold Accessories As described below, you can add various accessories* to your electronic drum kit for an even more enjoyable drumming experience. (*: Sold separately) For DTX400K Owners By upgrading the KU100 Kick Unit and/or the hi-hat controller included as part of the DTX400K, you can make your electronic drum kit feel much closer to the real thing. Replacing the KU100 Kick Unit with a KP65 Kick Pad 1. Assemble the KP65 Kick Pad.
Advanced Techniques Connecting to a Computer Making Connections While the drum module is highly powerful and versatile all by itself, you can connect it to a computer via USB for even greater convenience and flexibility. When connected in this way, MIDI data can be freely exchanged with the computer, allowing the drum module to be used as an input device for music production applications. In this section, you’ll learn how to make the necessary connections.
Reference Troubleshooting Reference In addition to the following, you can also find troubleshooting tips in the MIDI Reference Manual (PDF). See page 57 for details on downloading this manual. No sound is produced when a pad is struck, or the volume is lower than expected. Check connections as follows. • Ensure that the pads are properly connected to the drum module’s trigger input jacks.
Troubleshooting If you notice double triggering, crosstalk, or skipped sounds (as described below), proceed as follows. Double triggering—i.e., multiple sounds are produced in response to a single strike: • If the pad or drum trigger in question features a controller for adjusting output or sensitivity, turn it down. • Ensure that the Gain parameter from Menu Mode is not set too high. (See page 49) Crosstalk—i.e.
Reference Data List Kit List 1. Maple Custom Kit with a Maple Custom Absolute sound. PAD No. SNARE 22 MapleCustom TOM1 45 TOM2 46 TOM3 2. Oak Custom Kit with an Oak Custom sound. Name PAD No. Name SNARE 23 OakCustom Maple 1 H TOM1 51 Maple 1 M TOM2 52 47 Maple 1 L TOM3 RIDE 82 Warm Rd 20-1 CRASH 93 HI-HAT 113 KICK 1 PAD 89 PAD No.
Data List Voice List Kick Tom 1 2 3 4 5 6 7 8 9 10 11 12 13 14 15 16 17 18 19 20 21 45 46 47 48 49 50 51 52 53 54 55 56 57 58 59 60 61 62 63 64 65 66 67 68 69 70 71 72 73 74 75 76 77 78 79 80 MapleCustom OakCustom Oak 22 Birch 22 HardRock Vintage 24 Vintage 18 Jazz T8-1 T8-2 T8-3 T9-1 T9-2 T9 Hard Electric ElectricComp ElectricClick HipHop 1 HipHop 2 Break DnB Snare 22 23 24 25 26 27 28 29 30 31 32 33 34 35 36 37 38 39 40 41 42 43 44 MapleCustom OakCustom DeepOak HardRock Funk Vintage Jazz FieldSna
Data List Drum Score There are many different types of drum score commercially available, but we’ve chosen the following common format for the examples below. Hi-Hat Cymbal (H.H.) Ride Cymbal (RIDE) Hi-Hat (H.H.
Data List t Heavy Metal Control Pad : Kick 256 y 16beat Rock Advance Step : Control Pads : Snare + hi-hat 148 u Funk Rock Advance Step : Control Pad : Kick 107 i 8beat Funk Advance Step : Control Pads : Cymbal + hi-hat 1 116 o Slow Blues Advance Step : Control Pads : Cymbal + hi-hat 1 56 !0 4beat Jazz Advance Step : 3 Control Pad : Kick 132 Advance Step : DTX400K/DTX430K/DTX450K Owner’s Manual 63
Reference Specifications Drum module Tone generator Click-track Type AWM2 Maximum polyphony 32 notes Voices Drum and percussion: 169 Keyboard: 128 Drum kits 10 (all of which may be edited and overwritten) Songs 10 Reverb 9 types Tempo 30 to 300 BPM (Tap Tempo and Voice Guidance functions) Beats 1/4 to 9/4 Jacks and terminals SNARE (mini stereo audio) TOM1 (mini mono audio) TOM2 (mini mono audio) TOM3 (mini mono audio) RIDE (mini mono audio) CRASH (mini mono audio) HI-HAT (mini mono au
Reference Index Symbols [ ] connector................. 22 [ ] (metronome) button.................. 21 [ ] button ..................................21 [ ] (Standby/On) button ................. 21 [AUX IN] jack ...................................22 [DRUM MUTE] button .....................21 [HI-HAT CTL] jack ...........................22 [KICK/PAD] jack ..............................22 [KIT] button...................................... 21 [PHONES/OUTPUT] jack ................ 22 [SONG] button................
DTX400K/DTX430K/DTX450K Owner’s Manual
Information for Users on Collection and Disposal of Old Equipment This symbol on the products, packaging, and/or accompanying documents means that used electrical and electronic products should not be mixed with general household waste. For proper treatment, recovery and recycling of old products, please take them to applicable collection points, in accordance with your national legislation and the Directives 2002/96/EC.
For details of products, please contact your nearest Yamaha representative or the authorized distributor listed below. Pour plus de détails sur les produits, veuillez-vous adresser à Yamaha ou au distributeur le plus proche de vous figurant dans la liste suivante. NORTH AMERICA CANADA Yamaha Canada Music Ltd. 135 Milner Avenue, Toronto, Ontario M1S 3R1, Canada Tel: +1-416-298-1311 U.S.A. Yamaha Corporation of America 6600 Orangethorpe Avenue, Buena Park, CA 90620, U.S.A.