電子ドラム DTX400K DTX430K DTX450K 取扱説明書 JA
目次 安全上のご注意 .........................................................3 はじめに.....................................................................6 取扱説明書の読み方 .................................................6 トレーニングモードで練習する........................... 29 トレーニングモードの基本操作 ................................ 29 1. グルーブチェック.................................................. 30 2. リズムゲート.......................................................... 31 3. メジャーブレーク..................................................
安全上のご注意 ご使用の前に、必ずこの「安全上のご注意」をよくお読みください。 ここに示した注意事項は、製品を安全に正しくご使用いただき、お客様やほかの方々への危害や財産への 損害を未然に防止するためのものです。必ずお守りください。 お読みになったあとは、使用される方がいつでも見られる所に必ず保管してください。 記号表示について この製品や取扱説明書に表示されている記号には、次のような意味があります。 「ご注意ください」 という注意喚起を示します。 〜しないでくださいという 「禁止」を示します。 「必ず実行」 してくださいという強制を示します。 「警告」と「注意」について 以下、誤った取り扱いをすると生じることが想定される内容を、危害や損害の大きさと切迫の程度を明示するために、 「警告」と「注意」に区分して掲載しています。 警告 この表示の欄は、 「死亡する可能 性または重傷を負う可能性が想 定される」内容です。 注意 この表示の欄は、 「傷害を負う可 能性または物的損害が発生する 可能性が想定される」内容です。 警告 電源アダプター 禁止 組み立て 電源コードをストーブなどの熱器
火に注意 接続ケーブルの引き回しに注意する。 足を掛けて転倒するなど、けがの原因となります。 本体の上にろうそくなど火気のあるものを置かない。 ろうそくなどが倒れたりして、火災の原因になりま す。 必ず実行 禁止 水に注意 禁止 本体の上に花瓶や薬品など液体の入ったものを置か ない。また、浴室や雨天時の屋外など湿気の多いとこ ろで使用しない。 内部に水などの液体が入ると、感電や火災、または故 障の原因になります。入った場合は、すぐに電源ス イッチを切り、電源プラグをコンセントから抜いた上 で、お買い上げの販売店または巻末のヤマハ修理ご相 談センターに点検をご依頼ください。 異常に気づいたら 必ず実行 ぬれた手で電源プラグを抜き差ししない。 感電のおそれがあります。 下記のような異常が発生した場合、すぐに電源スイッ チを切り、電源プラグをコンセントから抜く。 ・電源コード/プラグがいたんだ場合 ・製品から異常なにおいや煙が出た場合 ・製品の内部に異物が入った場合 ・使用中に音が出なくなった場合 そのまま使用を続けると、感電や火災、または故障の おそれがあります。至急、お買い上げの販売店または
接続 禁止 必ず実行 すべての機器の電源を切った上で、ほかの機器と接続 する。また、電源を入れたり切ったりする前に、機器 のボリュームを最小にする。 感電、聴力障害または機器の損傷の原因になります。 禁止 必ず実行 演奏を始める前に機器のボリュームを最小にし、演奏 しながら徐々にボリュームを上げて、適切な音量にす る。 聴力障害または機器の損傷の原因になります。 パネルのすき間から金属や紙片などの異物を入れな い。 感電、ショート、火災、故障や動作不良の原因になる ことがあります。 本体の上にのったり重いものをのせたりしない。ま た、ボタンやスイッチ、入出力端子などに無理な力を 加えない。 本体が破損したり、お客様やほかの方々がけがをした りする原因になります。 大きな音量で長時間ヘッド フォンを使用しない。 聴覚障害の原因になります。 取り扱い 本体のすき間に手や指を入れない。 お客様がけがをするおそれがあります。 禁止 禁止 ●データが破損したり失われたりした場合の補償はいたしかねますので、ご了承ください。 ●不適切な使用や改造により故障した場合の保証はいたしかねます。 使用後は、必ず
はじめに このたびは、ヤマハDTX400K/DTX430K/DTX450Kをお買い上げいただき、 まことにありがとうございました。本体の優れた機能を十分にご活用いただく ために、この取扱説明書をよくお読みくださいますようにご案内申しあげます。 また、ご一読いただいたあとも、不明な点が生じた場合に備えて、保証書ととも に大切に保管いただきますようお願いいたします。 取扱説明書の読み方 ■ 本書(準備編 / 基本編 / 応用編 / 資料) 準備編 :本体の組み立て方や音を出すまでの準備方法について説明しています。 基本編 :本体の基本的な使い方について説明しています。 応用編 :本体をより詳細に使いこなす方法について説明しています。 資 :困ったときの解決方法をはじめ、各種資料を掲載しています。 料 ■ MIDIリファレンスマニュアル(PDF) ※本製品には付属していません。 MIDIリファレンスマニュアルでは以下の資料を掲載しています。詳しくは57ページをご覧くださ い。 • MIDIに関する資料 • コンピューターを使って音楽制作をするときに参照する資料 • コンピューターを使って本体にソ
準備編 最初にやっていただくこと 準備編 1 2 箱を開けて同梱品を確認する 組み立てる • 組み立てる手順は8ページ〜18ページを参照。 3 接続する • パッドと音源モジュールをケーブルでつなぐ。 →18ページを参照。 • 電源アダプターを音源モジュールにつないで、電源を入れる。 →19ページを参照。 4 演奏する • 基本的な使い方は、基本編(23ページ〜39ページ)を参照。 • さらに詳しい使い方は、応用編(40ページ〜55ページ)を 参照。 DTX400K/DTX430K/DTX450K 取扱説明書 7
準備編 同梱品について 梱包箱を開けたら、すべての部品がそろっていることを確認してください。 DTX400K をお買い求めのお客様 • !6、 !7、 !8 は BOX1と書かれた箱に入っています。 • !0、 !1 は BOX2と書かれた箱に入っています。 • DTX400Kには部品 u、 o、 !3 はありません。 • !4、 !5 は非常に似ていますが、別の部品です。本体側面に貼られたシールを見て区別してください。 • e、 i は非常に似ていますが、別の部品です。ウイングボルトがあるほうが i です。 また、梱包箱の発泡スチロールに e はT、 i はSと刻印されています。 q 脚パイプ(2本) w 縦パイプ(2本) e タム3(1個) タム3 r 左パイプ(1個) t 音源モジュール(1個) y タム1&2(1個) タム1 i スネアパッド(1個) タム2 !0 シンバルホルダー (2個) !1 ハイハットホルダー (1個) !4 ハイハットコントローラー !5 キックユニットKU100(1個) 背面 ウイングボルト !2 シンバル/ハイハットパッド (3枚)
同梱品について DTX430K をお買い求めのお客様 • !6、 !7、 !8 は BOX1と書かれた箱に入っています。 • !0、 !1 は BOX2と書かれた箱に入っています。 • DTX430Kには部品 u、 o はありません。 q 脚パイプ(2本) w 縦パイプ(2本) e タム3(1個) タム3 r 左パイプ(1個) t 音源モジュール(1個) y タム1&2(1個) タム1 タム2 i スネアパッド(1個) !0 シンバルホルダー (2個) !1 ハイハットホルダー (1個) !2 シンバル/ハイハットパッド !3 キックパッド !4 ハイハットコントローラー (3枚) !5 フットペダル KP65(1個) HH65(1個) !6 9chマルチケーブル(1組) !7 チューニングキー (1個) !9 電源アダプター (1個) @0 取扱説明書(本書) FP6110A(1個) !8 ケーブルバンド(3本) DTX400K/DTX430K/DTX450K 取扱説明書 9
同梱品について DTX450K をお買い求めのお客様 • o、 !6、 !7、 !8 は BOX1と書かれた箱に入っています。 • u、 !0、 !1 は BOX2と書かれた箱に入っています。 q 脚パイプ(2本) w 縦パイプ(2本) e タム3(1個) タム3 r 左パイプ(1個) t 音源モジュール(1個) y タム1&2(1個) タム1 タム2 u 六角ロッド(1個) i スネアパッドTP70S(1個) o ウイングボルトS(1個) !0 シンバルホルダー (2個) !1 ハイハットホルダー (1個) !2 シンバル/ハイハットパッド (3枚) !3 キックパッド KP65(1個) 10 !4 ハイハットコントローラー HH65(1個) !6 9chマルチケーブル(1組) !7 チューニングキー (1個) !9 電源アダプター (1個) @0 取扱説明書(本書) DTX400K/DTX430K/DTX450K 取扱説明書 !5 フットペダル FP6110A(1個) !8 ケーブルバンド(3本)
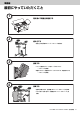
準備編 組み立てる 組み立てイメージ 注意 手順6 手順11 • 硬くて平らな場所で組み立ててく ださい。 • 部品をまちがえたり、向きをまち がえないように注意して、手順ど おりに組み立ててください。 手順5 手順9 手順10 • 組み立ては、必ず2人以上で行 なってください。 • ネジは各ユニット固定後、ゆるみ がないようきつく締め直してくだ さい。 手順8 手順3 • 解体するときは、組み立てと逆の 手順で行なってください。 手順4 手順7 手順2 手順1 手順1 脚パイプを設置する 手順2 縦パイプを取り付ける !7 w パイプ ジョイント 50cm q q 左 正面 1. 脚パイプ2本(q)とチューニングキー (!7) を用意し、 プジョイントの穴に、縦パイプ(w)を根元までさし かり締めます。 込みます。 脚パイプ2本は同じ部品です。 脚パイプ2本(q)の、おのおののキーボルト(図★)を NOTE 2. チューニングキーでゆるめます。 3.
組み立てる 手順3 タム3を取り付ける 手順4 左パイプを取り付ける r e パイプ ジョイント タム3裏面 左側の縦パイプ 右側の縦パイプ 図のパイプジョイントはDTX400Kには付属していません。 [重要] DTX400Kでは、タム3(e)とスネアパッド(i)が非常に 似ているので、間違えないように取り付けてください。 e と i の違いはウイングボルトのある/なしです。詳しくは8ペー ジの図をご覧ください。 1. タム3(e)を用意し、キーボルト(図▲)をチューニン 1. ングキーでしっかり締めます。 2. 3. キーボルト(図★)をゆるめます。 左側の縦パイプに、左パイプ(r)を縦パイプの半分 4. キーボルト(図★)を締めて左パイプ(r)を固定します。 右側の縦パイプに、タム3(e)を縦パイプの半分くら 注意 いの高さまでさし込みます。タム3をさし込む向き 縦パイプは転倒しやすいので、いったん安全な場所に寝 かせてください。 は、上図を参考にしてください。 NOTE 4.
組み立てる 手順6 タム1&2を取り付ける 1. タム1裏面 タム1&2(y)を用意し、キーボルト(図▲)をチュー ニングキーでしっかり締めます。 NOTE タム2裏面 2. y キーボルト(図★)をゆるめます。 NOTE 3. キーボルト(図▲)は左右2箇所あります。 キーボルト(図★)は左右2箇所あります。 タム1&2(y)の穴の上端と、縦パイプの上端が合う ようにタム1&2をさし込みます。さし込む向きは図 を参考にしてください。 NOTE 縦パイプ 4. タム1&2の上下や表裏の向きを間違えないように さし込んでください。 キーボルト(図★)を締めてタム1&2(y)を固定します。 NOTE タムパッドの向きは、手順12 で調節します。 手順7 は、DTX400K/DTX430K/DTX450Kで取り付け内容が異なります。 DTX400Kをお買い求めのお客様 手順7 1. スネアパッドを取り 付ける 4.
組み立てる 手順7 は、DTX400K/DTX430K/DTX450Kで取り付け内容が異なります。 DTX430Kをお買い求めのお客様 手順7 1. DTX450Kをお買い求めのお客様 手順7 スネアパッドを取り 付ける 1. 手順4 で取り付けた左パイプのパ スネアパッドを取り 付ける 手順4 で取り付けた左パイプのパ イプジョイントにあるウイングボル イプジョイントにあるウイングボル トをゆるめます。 トをゆるめます。 左パイプ 左パイプ ウイングボルト パイプジョイント 2. ウイングボルト 90° パイプジョイントを反時計方向に90度回転させ、 2. ジョイント部が床と平行になるように合わせます。 3. 4. 90° パイプジョイント ウイングボルトを締めて固定します。 パイプジョイントのキーボルト(図◆)をゆるめます。 パイプジョイントを反時計方向に90度回転させ、 ジョイント部が床と平行になるように合わせます。 3. 4. ウイングボルトを締めて固定します。 パイプジョイントのキーボルト(図◆)をゆるめます。 u 5.
組み立てる 手順8 は、DTX400K/DTX430K/DTX450Kで取り付け内容が異なります。 DTX400K/DTX430Kをお買い求めのお客様 手順8 DTX450Kをお買い求めのお客様 手順8 ハイハットホルダー を取り付ける ハイハットホルダー を取り付ける !1 左パイプ スネアパッド !1 パイプジョイント パイプジョイント 1. 手順7 で取り付けたスネアパッドのパイプジョイ 2.
組み立てる 手順10 ハイハットを取り付 ける 手順11 シンバルパッドを取 り付ける ハイハットの回り止め金具の向き を調節する ピン 30° 蝶ナット フェルト 30° !2 ピン フェルト ↑正面 シンバルホルダー 回り止め金具 手順11 で、残り2枚のシンバルパッド(!2) を取り付け ます。 1. 〜 4. の手順を2回繰り返してください。 ハイハットホルダー NOTE 正面 1. 図のハイハットホルダーをさし込む向きはDTX450Kの場 合です。DTX400K/DTX430Kはハイハットホルダーを手 前からさし込んでいます。 1. ハイハットホルダーの上端部にある回り止め金具の キーボルト(図★)を、チューニングキーを使ってゆ るめます。 2. 図のように、ピンが正面から見て左30度くらいにく るように向きを調節します。 3. シンバルパッド(!2)2枚は同じ部品です。 シンバルホルダーから、蝶ナットと上側のフェルト 1個を外します。(下側のフェルトはシンバルホル ダーから外しません) 2.
組み立てる 手順13 は、DTX430K/DTX450Kのみの作業です。DTX400Kは 手順14 へお進みください。 手順13 キックを組み立てる 1. 5. キックパッド(!3) を用意し、本体か フットペダルのT字ボルトを左に回してゆるめます。 ら蝶ボルト、ばねワッシャー、 ワッシャーをいったん外し、4組 それぞれ外したままの状態で近く に置きます。 2. 図のようにベース部を本体に組み付け、 1. で外した 蝶ボルト、ばねワッシャー、ワッシャーをベース部 T字ボルト 側から取り付けて固定します。 6. 蝶ボルト ばねワッシャー の凸部をはさみます。 ワッシャー !3 フットペダルの取り付け金具にキックパッド前面下 7. 8. T字ボルトを右に回して固定します。 ペダルを踏んでビーターヘッドがキックパッドの円 のほぼ中心に当たるかどうか確認します。必要があ ればビーターの長さや左右の位置を調節します。 本体 3. ベース部 本体 フットペダル(!5) を用意し、フレームの穴に下図の ように差し込みます。 4.
組み立てる 手順15 パッドと音源モジュールの位置を微調節する 椅子に座ってみて、パッドや音源モジュールをお好みの 位置に調節します。 • スネアパッドの高さは「図★」のキーボルトをゆるめ て調節します。 • タム3パッドの高さは「図◆」のキーボルトをゆるめ て調節します。 音源モジュール • 音源モジュールの高さは「図▲」のキーボルトをゆる めて調節します。 • 音源モジュールの前後の角度は「図●」のキーボルト をゆるめて調節します。 注意 • ゆるめたキーボルトは必ずしっかりと締めなおしてください。 • すべてのキーボルトにゆるみがないか、再度確認してくだ さい。 スネアパッド NOTE タム3 • スネアパッドの角度を再び調節したいときは、 手順7 を参考にしてください。 • タムパッドの角度を再び調節したいときは、 手順12 を参考にしてください。 手順16 パッドと音源モジュールを接続する TOM2 CR TOM1 【音源モジュールの右サイドパネル】 RIDE HH SNR TOM1 TOM2 TOM3 RIDE CR HH SNR RIDE HH H
準備編 音を出すまでの準備 電源を準備する ヘッドフォンやスピーカーをつなぐ 1. 本体の電源が切れている(ランプがすべて消えている) 本体にはスピーカーが内蔵されていません。音を出すた ことを確認してください。 めには、ヘッドフォンやモニタースピーカーを 電源アダプターのDCプラグを左サイドパネルの [PHONES/OUTPUT]端子(標準ステレオフォーン [ ジャック)に接続してください。音量はフロントパネル 2. 3. ]端子にさし込みます。 電源アダプターのコードをコードフックに巻きつけ の[VOLUME]ボタンで調節します。 NOTE て固定します。 [PHONES/OUTPUT]端子はステレオジャックです。 モノラルフォーン(φ6.
音を出すまでの準備 注 記 電源を入れる 1. アンプ内蔵スピーカーなどの外部オーディオ機器を 接続している場合は、外部オーディオ機器の音量が • 外部オーディオ機器を本体に接続した状態で、一定 時間本体を操作しない場合は、外部オーディオ機器 の音量をゼロにしておくことをお勧めします。本体 の電源が自動的に切れないようにするには、オート パワーオフを解除してください。 ゼロになっていることを確認します。 2.
準備編 各部の名称と機能 z x c n v b m , .
各部の名称と機能 ■左サイドパネル ⁄1 ⁄2 ⁄3 ⁄4 ⁄5 ■右サイドパネル フロントパネル ⁄6 左サイドパネル ⁄8 右サイドパネル ⁄1 [USB TO HOST]端子(57ページ) ⁄6 トリガー入力端子(18ページ) 本体とコンピューターのUSB端子とをUSBケーブル スネアパッド、タムパッド、シンバルパッドを接続す で接続するために使います。 る端子です。 ⁄2 [AUX IN](外部入力)端子(19ページ) 本体へ外部オーディオ機器からの音声を入力する端子 (ステレオミニジャック)です。携帯用音楽プレーヤー やCDプレーヤーを接続すれば、プレーヤーの音楽に 合わせて演奏できます。 ⁄3 [PHONES/OUTPUT]端子(19ページ) ヘッドフォンおよび、外部アンプやミキサーなどと接 続します。ステレオ標準ジャックです。 ⁄4 コードフック(19ページ) 電源アダプターのコードが抜けないように、このフッ クでプラグ付近のコードを引っ掛けて固定します。 ⁄5 [ ]端子(19ページ) 付属の電源アダプターを接続します。 22 ⁄7 DTX
基本編 キットを選んで演奏する 基本編 各パッドにさまざまな打楽器の音色が配置されたものをひとまとめにして「キット」と呼びます。 本体には10種類のドラムやパーカッションのキットが内蔵されています。 キットを選ぶ キットの感度を調節する 1. 2. [KIT]ボタンを押して、キットモードに入ります。 ドラムパッドを叩く強さに対する鳴る音の音量を10段 数字キー ([1]〜[10/0])を押して、お好みのキット 階で調節できます。お好みの感度に調節しましょう。 を選びます。 [KIT]ボタンを押しながら[VOLUME+]ボタンまたは 2 [VOLUME−]ボタンを押します。 パッド感度大 パッド感度小 押しながら 1 • [VOLUME+]ボタンを押すごとに、パッドの感度は 上がります。したがって、弱く叩いても大きな音が出 3.
基本編 奏法について スネアパッド ハイハットシンバル TP70Sをお使いの場合は、アコースティックのスネア オープン/クローズ ドラムと同じように3種類(ヘッド、オープンリム、ク ローズドリム)の叩き方ができます。 • ハイハットコントローラーのペダルを踏まない状態 でハイハットパッドを叩くと、ハイハットオープン クローズドリム ショット(リム2) の音が出ます。 • ハイハットコントローラーのペダルを踏んだ状態で ハイハットパッドを叩くと、ハイハットクローズの 音が出ます。 • HH65をお使いの場合は、ペダルの踏み具合に よってオープンからクローズまで音色が変化しま す。 オープンリムショット(リム1) ヘッドショット フットクローズ ヘッドショット ヘッドを叩きます。 ハイハットパッドを叩かずにハイハットコントローラ を踏み込むと、フットクローズの音が出ます。 ハイハットスプラッシュ ハイハットコントローラーのペダルを瞬間的に踏んで すぐ放すと、ハイハットスプラッシュの音が出ます。 オープンリムショット オープン側のリムを叩きます。 クローズドリム
基本編 ソングに合わせて演奏する 本体には10種類のソング(練習曲)が内蔵されています。さまざまな音楽ジャンルのソングに合わせなが ら、ドラムを楽しく練習しましょう。 ソングを選ぶ ソングの音量を調節する 1. [SONG]ボタンを押します。 2. [>/■]ボタンを押してソングを再生します。 3. ソングを聞きながら、数字キー ([1]〜[10/0])を押 ソングの音量を、お好みの状態に調節できます。 1. [>/■]ボタンを押して、ソングを再生させます。 して、お好みのソングを選びます。 3 2.
ソングに合わせて演奏する ミュートされたドラムパートの音量を調 節する ソングの一部をリピート再生する ソングの再生中に「A(リピートの始まり)」、 「B(リピー ソングの再生中に[DRUM MUTE]ボタンを押すと、お トの終わり)」を小節単位で設定することで、その間の演 手本のドラム音量はミュート(消音)されます。ミュート 奏をくり返し再生できます。 されたお手本のドラムの音量は調節ができるので、お手 A 本の演奏をかすかに鳴らしながら練習できます。 1. [>/■]ボタンを押して、ソングを再生させます。 2. [DRUM MUTE]ボタンを押して、ドラムパートを B この区間をくり返す ミュートします。 1. [>/■]ボタンを押して、ソングを再生させます。 1 2 2. A点にしたいポイントに来たら、[SONG]ボタンを 押しながら[>/■]ボタンを押します。 3. [DRUM MUTE]ボタンを押しながら[VOLUME+] ボタンまたは[VOLUME−]ボタンを押します。 お手本音量大 押しながら 3.
基本編 クリック(メトロノーム)を使う クリック(メトロノーム)を鳴らしながらパッドを叩くことにより、リズムを正確に叩けるように練習がで きます。 クリックを鳴らす/止める テンポの値を数字キーで確認する 本体に設定されているテンポの値を数字キーの点滅で確 認できます。 [TEMPO+]または[TEMPO−]ボタンのいずれかを1 回だけ押します。 • クリックを鳴らすには、[ ]ボタンを押します。 • クリックを止めるには、もう一度[ ]ボタンを押し ます。 クリックの音量を調節する [ 数字キーの数字が順に点滅し、テンポを表示します。 ]ボタンを押しながら[VOLUME+]ボタンまたは [VOLUME−]ボタンを押します。 クリック音量大 例: テンポ108のときは、数字キーが[1]→[0]→[8] の順に点滅します。 クリック音量小 押しながら テンポの値を音声ガイドで確認する • [VOLUME+]ボタンを押すごとに、クリックの音量 は上がります。 本体に設定されているテンポの値を音声ガイドで確認で きます。 • [VOLUME−]ボタンを押すごとに、クリックの音量 は
クリック(メトロノーム)を使う 2.
基本編 トレーニングモードで練習する トレーニングとは、さまざまな目的に応じてドラムを楽しく練習できる機能です。リズム感を鍛えるト レーニングや、初心者でも簡単にドラムパターンを楽しむトレーニング、さまざまな音楽ジャンルのドラ ムパターンを覚えるトレーニングなど、10種類のトレーニングがあります。 4. トレーニングモード トレーニングを終了したいときは、 3. で押したボタ ンをもう一度押します。 リズム感を鍛える 1. グルーブチェック .......................................... 30ページ 2. リズムゲート.................................................. 31ページ 3. メジャーブレーク .......................................... 32ページ 4. テンポアップ/ダウン.................................... 33ページ 5. チェンジアップ .........................................
トレーニングモードで練習する グルーブチェック 叩くタイミングのズレを数字キーの点灯で確認しながら、正確なタイミングでパッドを叩きます。 このトレーニングは、クリックに合わせながらトレーニングする方法と、ソングに合わせながらトレーニングする方法 があります。また、トレーニング後に採点結果が数字キー ([1]〜[10/0])の点灯表示と音声ガイドで確認できます。 2 1 1. 3 3 叩いたタイミングを確認する [TRAINING]ボタンを押して、トレーニングモード に入ります。 2. • 叩いたタイミングは数字キー ([1]〜[10/0])が 点滅して確認できます。 数字キーの[1]を押します。 [ ]ボタンと[>/■]ボタンが点滅して、スタンバ • [5]と[6]が同時に点滅しているときは、正確な イ状態になります。 3. [ タイミングで叩いています。 ]ボタンまたは[>/■]ボタンを押して、トレー • [6]→[7]→[8]→[9]→[10/0]と点滅する数字 ニングを開始します。 [ 4.
トレーニングモードで練習する リズムゲート パッドを叩くタイミングにズレがないかを音で確認しながら、正確なタイミングでパッドを叩きます。正確なタイミン グで叩かないと音が鳴りません。このトレーニングは、クリックに合わせながらトレーニングする方法と、ソングに合 わせながらトレーニングする方法があります。また、トレーニング後に採点結果が数字キー ([1]〜[10/0])の点灯表示 と音声ガイドで確認できます。 2 5 1 1. [TRAINING]ボタンを押して、トレーニングモード に入ります。 2. 数字キーの[2]を押します。 [ 3 3 5. つれ、より正確に叩かなければ発音しなくなります。 ]ボタンと[>/■]ボタンが点滅して、スタンバ [2]または[9]を押す イ状態になります。 3.
トレーニングモードで練習する メジャーブレーク 特定の小節だけクリック音をミュート(消音)してトレーニングします。たとえば、フィルインの小節だけクリックを鳴 らさないよう設定すると、フィルインで叩くタイミングがずれたかを把握できるので、演奏全体を通して一定のテンポ で叩けるようになります。なお、このトレーニングには採点機能はありません。 2 4 1 1. [TRAINING]ボタンを押して、トレーニングモード 3,6 4. に入ります。 2. 小節番号の数字キーを押して、クリックを鳴らす(点 灯)/鳴らさない(薄く点灯)を交互に切り替えます。 数字キーの[3]を押します。 [ 点滅=再生中の小節(1拍目) ]ボタンが点滅して、スタンバイ状態になりま す。 3. [ ]ボタンを押します。 クリックが4小節単位で再生されます。 点灯=クリックを 鳴らす小節 薄く点灯= クリックを鳴らさない小節 • 数字キーの数字は小節番号を表わします。 • 各小節の1拍目で数字キーが点滅します。 5. 6.
トレーニングモードで練習する テンポアップ/ダウン 正確なタイミングでどこまで早く叩き続けられるかをトレーニングします。クリックが鳴る正確なタイミングでパッド を叩くとテンポが自動的に上がっていき、正確でなかった場合は自動的に下がっていきます。なお、このトレーニング には採点機能はありません。 トレーニングを始める前に、クリックのテンポを確認/調節したいときは、クリック(メトロノーム)を使う(27ペー ジ)を参照してください。 2 1 1. [TRAINING]ボタンを押して、トレーニングモード に入ります。 2. 数字キーの[4]を押します。 [ ]ボタンが点滅して、スタンバイ状態になりま す。 3. [ ]ボタンを押します。 クリックの再生が始まります。 4. クリックの鳴る正確なタイミングでパッドを叩きま 3,5 5.
トレーニングモードで練習する チェンジアップ 7種類のリズムから、お好みの組み合わせを選び、2小節単位で正確に叩くトレーニングです。数字キーの[1]〜[7]に はリズムが割り当てられています。また、トレーニング後に採点結果が数字キー ([1]〜[10/0])の点灯表示と音声ガイ ドで確認できます。 2 1 1. 2. [TRAINING]ボタンを押して、トレーニングモード 4 3,6 5 5. ドを叩きます。 数字キーの[5]を押します。 • お手本のリズムの音量を調節するには、[SONG] [>/■]ボタンが点滅して、スタンバイ状態になり ボタンを押しながら[VOLUME+]ボタンまたは ます。 [VOLUME−]ボタンを押します。 3. [>/■]ボタンを押して、トレーニングを開始しま • お手本のリズムをミュート(消音)してクリック音 す。 だけでトレーニングするには[DRUM MUTE]ボタ • お手本のリズムとクリックが再生され、お手本のリ ンを押します。 • ミュートを解除するには[DRUM MUTE]ボタンを ズムが2小節ごとに変わります。 4.
トレーニングモードで練習する イージーセッション ソングの伴奏に合わせてどのパッドを叩いてもドラムパターンが簡単に演奏できるトレーニングです。バンドのメン バーとセッション(合奏)をしている感覚を楽しめます。なお、このトレーニングには採点機能はありません。 2 1 1. 4 4 3, 5 [TRAINING]ボタンを押して、トレーニングモード に入ります。 2. 数字キーの[6]を押します。 [>/■]ボタンが点滅して、スタンバイ状態になり ます。 3. [>/■]ボタンを押して、伴奏の再生を始めます。 4.
トレーニングモードで練習する グルーブトラッカー 簡単にお手本のドラムパターンを楽しむトレーニングです。パッドを叩く強さやタイミングに、お手本のドラムパターン が自動的に合わせてくれます。また、ドラムパターンの合間に自分でフィルインを入れて楽しむこともできます。なお、 このトレーニングには採点機能はありません。 2 1 1. 3,6 [TRAINING]ボタンを押して、トレーニングモード • 一定時間パッドを叩かないと、ドラムパターンは先 に入ります。 2. 頭の小節に戻ります。 数字キーの[7]を押します。 NOTE [>/■]ボタンが点滅して、スタンバイ状態になり ます。 3. [>/■]ボタンを押して、トレーニングを開始しま す。 お手本のドラムパターンが1回だけ流れます。また、 4 6.
トレーニングモードで練習する パッドゲート お手本のドラムパターンと同じフレーズを叩かないと発音しないトレーニングです。トレーニング後に採点結果が数字 キー ([1]〜[10/0])の点灯表示と音声ガイドで確認できます。 2 1 1. 3,6 [TRAINING]ボタンを押して、トレーニングモード に入ります。 2. 4,5 数字キーの[8]を押します。 [>/■]ボタンが点滅して、スタンバイ状態になり ます。 3. [>/■]ボタンを押して、トレーニングを開始しま お手本のドラムパターンで特定の楽器パートをミュー トする方法 お手本となるドラムパターンの特定の楽器パート(ス ネア、キック、タム、ハイハット、シンバルなど)だ けをミュート(消音)できます。たとえば、お手本のス ネアをミュートすればスネアに専念してトレーニング す。 ができます。 • お手本のドラムパターンが再生されます。 1. [DRUM MUTE]ボタンを押して、点灯させます。 • お手本のドラムパターンに合わせて数字キー ([1]〜[10/0])が光ります。 4.
トレーニングモードで練習する パートミュート ソングにおけるドラムパートの各音色(ハイハット、スネア、キック、タム、シンバル)や、ドラム以外の伴奏パートを ミュート(消音)します。なお、このトレーニングには採点機能はありません。 5 1 5 2 3,6 1. [TRAINING]ボタンを押して、トレーニングモード に入ります。 パッドを叩いてトレーニングします。 2. 4. 5. 数字キーの[9]を押します。 [>/■]ボタンが点滅して、スタンバイ状態になり ます。 6. トレーニングを終了するには、[>/■]ボタンを押し ます。 3.
トレーニングモードで練習する ファストブラスト 制限時間内にどれだけ激しく叩けるかを競うトレーニングです。ゲーム感覚で楽しく高得点を狙いましょう。また、ト レーニング後に採点結果が数字キー ([1]〜[10/0])の点灯表示と音声ガイドで確認できます。 NOTE ファストブラストのみ、他のトレーニングと採点方式が異なります。 2 1 1. 2. [TRAINING]ボタンを押して、トレーニングモード 3,4 • 制限時間が過ぎると、採点結果が数字キー ([1]〜 に入ります。 [10/0])の点灯表示と英語の音声ガイドで確認で 数字キーの[10/0]を押します。 きます。 [>/■]ボタンが点滅して、スタンバイ状態になり 例: 採点結果が980点の場合、数字キーは[9]→ ます。 [8]→[0]の順に光ります。 3. [>/■]ボタンを押します。 4.
応用編 メニューモードで詳細な設定をする 応用編 メニューモードには、この製品をより細かく設定できる7つの項目があります。 z クリック設定 1-1. パターン............................................................... 41ページ メニューモードの基本操作 1-2. 拍子 ...................................................................... 41ページ ここでは、メニューモードに入り、設定したい項目を選 1-3. 音色 ...................................................................... 41ページ ぶ基本的な手順を説明します。各設定項目の詳しい内容 1-4. 数字キーの光り方 ............................................... 42ページ については、次ページ以降の説明をご覧ください。 x キット設定 1.
メニューモードで詳細な設定をする 1-2. 拍子 z クリック設定 手順: MENU ([KIT] + [SONG]) → [1] → [2] → 設定値 1-1. パターン 手順: MENU ([KIT] + [SONG]) → [1] → [1] → 設定値 設定値 設定値 クリックの拍子を、1拍子から9拍子まで設定できます。 1. [KIT]ボタンを押しながら[SONG]ボタンを押して、 2. 数字キーの[1]を押して メニューモードに入ります。 クリックのパターンを、8種類のテンプレートから選べ ます。 1. [KIT]ボタンを押しながら[SONG]ボタンを押して、 メニューモードに入ります。 2. 数字キーの[1]を押して クリック設定 を選びま 3. 4. を選びま 数字キーの[2]を押して 拍子 を選びます。 お好みの拍子を、数字キーの[1]〜[9]から1つ選ん で押します。設定値は、下の表をご覧ください。 す。 3. 4.
メニューモードで詳細な設定をする 4. お好みのクリックの音色を、数字キーの[1]〜[6]か ら1つ選んで押します。設定値は、下の表をご覧く ださい。 数字キー 2-1. 各パッドの音色 設定値 [1] メトロノーム 1 [2] メトロノーム 2 [3] カウベル [4] スティック [5] ヒューマン 1 [6] ヒューマン 2 x キット設定 手順: MENU ([KIT] + [SONG]) → [2] → [1] → 設定値 設定値 キットに割り当てられている各パッドの音色をお好みの 音に変更できます。あなただけのオリジナルキットを作 成しましょう。 1-4. 数字キーの光り方 1. 手順: MENU ([KIT] + [SONG]) → [1] → [4] → 設定値 設定値 [KIT]ボタンを押しながら[SONG]ボタンを押して、 メニューモードに入ります。 2. 3.
メニューモードで詳細な設定をする 2-3. 各パッドのパン(ステレオ定位) 手順: MENU ([KIT] + [SONG]) → [2] → [3] → 設定値 2-5. リバーブ(残響効果) 手順: MENU ([KIT] + [SONG]) → [2] → [5] → 設定値 設定値 設定値 キットに割り当てられている各パッドのパン(ステレオ コンサートホールやライブハウスで演奏しているような 定位)をお好みの状態に調節しましょう。 リバーブ(残響効果)を設定できます。 1. 1. [KIT]ボタンを押しながら[SONG]ボタンを押して、 2. 3. 数字キーの[2]を押して [KIT]ボタンを押しながら[SONG]ボタンを押して、 メニューモードに入ります。 2. 3. 数字キーの[2]を押して メニューモードに入ります。 キット設定 を選びます。 数字キーの[3]を押して 各パッドのパン を選びま す。 4. 5. キット設定 を選びます。 数字キーの[5]を押して リバーブ(残響効果) を選 びます。 4.
メニューモードで詳細な設定をする 3-2. ノートナンバー c MIDI設定 手順: MENU ([KIT] + [SONG]) → [3] → [2] → 設定値 3-1. ローカルコントロール 手順: MENU ([KIT] + [SONG]) → [3] → [1] → 設定値 設定値 設定値 各パッドを叩いたときにMIDI出力されるノートナンバー を設定できます。 パッドやソングによる演奏に対して内蔵音源が発音する (オン) かしない(オフ) かを設定できます。通常は オ ン に設定します。 オフ にすると、本体のパッド/コ ントローラー部と音源部が内部的に切り離され、パッド を叩いても音が出なくなります。シーケンサーやDAW ソフトウエアなどに、ドラムの演奏をMIDIデータとして 記録するときには、 オフ 1. にするとよいでしょう。 [KIT]ボタンを押しながら[SONG]ボタンを押して、 メニューモードに入ります。 2. 3. 数字キーの[3]を押して MIDI設定 2. 3.
メニューモードで詳細な設定をする 4-3. フットクローズの位置 v ハイハット設定 手順: MENU ([KIT] + [SONG]) → [4] → [3] → 設定値 4-1. ハイハットクラッチの位置 手順: MENU ([KIT] + [SONG]) → [4] → [1] → 設定値 設定値 設定値 ハイハットコントローラーを踏んだときに、オープン音 からクローズ音に切り替わる位置を調節できます。値が 小さいほどトップとボトムの開きが狭い感じになります。 ハイハットクラッチの位置を調節した効果が得られます。 値を大きくしていくとトップとボトムの開きが広くなり、 設定値が小さいほどハイハットオープン音が速く減衰し ます。 ペダルを踏みこんでもフットクローズ/フットスプラッ 1. 2. [KIT]ボタンを押しながら[SONG]ボタンを押して、 この設定項目は、ハイハットコントローラー HH65使 メニューモードに入ります。 用時のみ有効です。 数字キーの[4]を押して ハイハット設定 を選びま 1. す。 3. 数字キーの[1]を押して 置 4.
メニューモードで詳細な設定をする 4-5. キックのベロシティー b トリガー設定 手順: MENU ([KIT] + [SONG]) → [4] → [5] → 設定値 設定値 5-1. パッドのベロシティーカーブ 手順: MENU ([KIT] + [SONG]) → [5] → [1] → 設定値 設定値 ハイハットコントローラーを踏んだときに発音される キック音のベロシティ (音の強さ)を調節できます。この パラメーターは、 ツーバス の設定(43ページ)が オ ン に設定されたキットが選ばれているときのみ有効と なります。 この設定項目は、DTX400K付属のハイハットコント パッドを叩いたときに入力される信号(トリガー入力レ ベル)の変化に対する音の強さ(ベロシティー )の変化の 仕方(ベロシティーカーブ)を設定できます。 1. ローラー使用時のみ有効です。 1. [KIT]ボタンを押しながら[SONG]ボタンを押して、 メニューモードに入ります。 2. 数字キーの[4]を押して ハイハット設定 を選びま す。 3.
メニューモードで詳細な設定をする 5-2. クロストーク ベロシティー 11 12 13 手順: MENU ([KIT] + [SONG]) → [5] → [2] → 設定値 14 15 設定値 パッドを叩いたとき、共振やパッド間の干渉により他の パッドからトリガー信号が発生してしまうことをクロス トリガー入力レベル トークといいます。このパラメーターを調節することに よってクロストークの発生を防止できます。 1. [KIT]ボタンを押しながら[SONG]ボタンを押して、 2. 数字キーの[5]を押して ベロシティー メニューモードに入ります。 16 17 18 19 20 3. を選びま 数字キーの[2]を押して クロストーク を選びま す。 4. 5.
メニューモードで詳細な設定をする 5-3. スネアパッドの種類 5-4. ペダルの種類 手順: MENU ([KIT] + [SONG]) → [5] → [3] → 設定値 手順: MENU ([KIT] + [SONG]) → [5] → [4] → 設定値 設定値 スネアパッドの種類を設定できます。 1. [KIT]ボタンを押しながら[SONG]ボタンを押して、 メニューモードに入ります。 2. 3. ハイハットコントローラーとキックの種類を設定できま す。 1. [KIT]ボタンを押しながら[SONG]ボタンを押して、 2. 3. 4. 数字キーの[5]を押して トリガー設定 を選びます。 メニューモードに入ります。 数字キーの[5]を押して トリガー設定 を選びます。 数字キーの[3]を押して スネアパッドの種類 を選 びます。 4.
メニューモードで詳細な設定をする 5-5. ゲイン n トレーニング設定 手順: MENU ([KIT] + [SONG]) → [5] → [5] → 設定値 設定値 6-1. タイマー 手順: MENU ([KIT] + [SONG]) → [6] → [1] → 設定値 設定値 パッドごとに入力されるトリガー信号のゲイン(増幅率) を設定します。この値を大きくするほど、パッドを弱く 叩いても発音しやすくなります。 1. トレーニングの練習時間を設定できます。トレーニング [KIT]ボタンを押しながら[SONG]ボタンを押して、 メニューモードに入ります。 2. 数字キーの[5]を押して トリガー設定 を選びま す。 3. 4. 5. を開始してから設定した時間が経過すると、トレーニン グが自動的に停止します。 1. [KIT]ボタンを押しながら[SONG]ボタンを押して、 メニューモードに入ります。 数字キーの[5]を押して ゲイン を選びます。 2.
メニューモードで詳細な設定をする 4. 6-2. 難易度 設定値を、数字キーの[1]〜[2]から1つ選んで押し ます。設定値は、下の表をご覧ください。 手順: MENU ([KIT] + [SONG]) → [6] → [2] → 設定値 数字キー 設定値 設定値 説明 [1] オフ タイミング外では発音しま せん。 [2] オン タイミング外でも発音しま す。 テンポアップ/ダウン(33ページ)、チェンジアップ (34 ページ)、パッドゲート(37ページ)において、トレーニ NOTE ングの難易度を設定できます。 1. [KIT]ボタンを押しながら[SONG]ボタンを押して、 メニューモードに入ります。 2. 数字キーの[6]を押して トレーニング設定 を選び ます。 3. 4. ここでの設定値は、テンポアップ/ダウン、チェンジ アップ、パッドゲートのみに有効です。他のトレーニ ングには効果ありません。 数字キーの[2]を押して 難易度 を選びます。 6-4.
メニューモードで詳細な設定をする 6-5. グルーブトラッカーのリード種類 手順: MENU ([KIT] + [SONG]) → [6] → [5] → 設定値 6-6. グルーブトラッカーのリード拍数 手順: MENU ([KIT] + [SONG]) → [6] → [6] → 設定値 設定値 設定値 グルーブトラッカー (36ページ)において、お手本のド グルーブトラッカー (36ページ)において、パッドを叩 ラムパターンをリードする(進める)ために叩くパッドを くたびにリードする(進む)お手本のドラムパターンの拍 選択できます。 数を設定できます。 1. 1. [KIT]ボタンを押しながら[SONG]ボタンを押して、 2. 数字キーの[6]を押して トレーニング設定 を選び [KIT]ボタンを押しながら[SONG]ボタンを押して、 メニューモードに入ります。 2. メニューモードに入ります。 数字キーの[6]を押して トレーニング設定 を選び ます。 3. 数字キーの[5]を押して グルーブトラッカーのリー ド種類 4.
メニューモードで詳細な設定をする 6-7. パッドゲートのグループ設定 6-8. ファストブラストのタイマー 手順: MENU ([KIT] + [SONG]) → [6] → [7] → 設定値 手順: MENU ([KIT] + [SONG]) → [6] → [8] → 設定値 設定値 設定値 パッドゲート(37ページ)において、お手本のドラムパ ファストブラスト(39ページ)において、練習する時間 ターンと同じフレーズを叩かなかったときの当たり/は を設定できます。設定した時間になると、トレーニング ずれの判定方法を設定できます。 が自動的に停止します。 1. 1. [KIT]ボタンを押しながら[SONG]ボタンを押して、 2. 数字キーの[6]を押して トレーニング設定 を選び [KIT]ボタンを押しながら[SONG]ボタンを押して、 メニューモードに入ります。 2. メニューモードに入ります。 数字キーの[6]を押して トレーニング設定 を選び ます。 3. 数字キーの[7]を押して パッドゲートのグループ設 定 4.
メニューモードで詳細な設定をする 7-3. オートパワーオフ時間 m その他設定 手順: MENU ([KIT] + [SONG]) → [7] → [3] → 設定値 7-1. キットロック 手順: MENU ([KIT] + [SONG]) → [7] → [1] → 設定値 設定値 設定値 オートパワーオフ(20ページ)するまでの時間を設定し たり、オートパワーオフをしない設定ができます。 通常、ソングを選ぶとキットもソングに最適なものに自 動で切り替わります。お好みのキットのまま、さまざま な内蔵曲に合わせて練習したいときはキットロックを オン 1. にすると便利です。 4. [KIT]ボタンを押しながら[SONG]ボタンを押して、 2. 3. 数字キーの[7]を押して メニューモードに入ります。 4.
メニューモードで詳細な設定をする 7-5. キットの初期化 7-6. ソングの初期化 手順: MENU ([KIT] + [SONG]) → [7] → [5] → [1] → [1] 手順: MENU ([KIT] + [SONG]) → [7] → [6] → [1] → [1] 設定を変更したキットを購入時の状態に戻すことができ 設定を変更したソングを購入時の状態に戻すことができ ます。キットを元の状態に戻したいときは初期化を行な ます。ソングを元の状態に戻したいときは初期化を行な います。 います。 注 記 1. 2. キットの初期化を実行すると、キットの元の内容は消 去されます。よく確認してから実行してください。 [KIT]ボタンを押します。 数字キーの[1]〜[10/0]で、初期化したいキットを 注 記 1. 2. 選びます。 3. [KIT]ボタンを押しながら[SONG]ボタンを押して、 6. 数字キーの[7]を押して その他設定 [KIT]ボタンを押しながら[SONG]ボタンを押して、 4. 5.
メニューモードで詳細な設定をする 7-7. 電源オン時の状態に復元 7-8. ファクトリーセット 手順: MENU ([KIT] + [SONG]) → [7] → [7] → [1] → [1] 手順: MENU ([KIT] + [SONG]) → [7] → [8] → [1] → [1] すべてのデータ(キット、ソング、メニュー )を電源オン すべてのデータ(キット、ソング、メニュー )を初期の状 時の設定に戻します。 態(工場出荷時)の設定に戻します。 注 記 1. 電源オン時の状態に復元を実行すると、電源を入れて から設定した内容は消去されます。よく確認してから 実行してください。 [KIT]ボタンを押しながら[SONG]ボタンを押して、 注 記 1. メニューモードに入ります。 2. 3. 4. [KIT]ボタンを押しながら[SONG]ボタンを押して、 メニューモードに入ります。 数字キーの[7]を押して その他設定 を選びます。 数字キーの[7]を押して 電源オン時の状態に復元 2. 3.
応用編 別売品を取り付ける 別売品を本体に接続して楽しむ方法を紹介します。 DTX400Kをお買い求めのお客様 ■ ハイハットコントローラーをHH65(別売 品)にグレードアップする DTX400Kに付属のキックユニットKU100やハイハッ 1. トコントローラーをグレードアップすることで、より生 接続する前に、本体の電源が切れていることを確認 ドラムに近い打感で演奏を楽しめます。 ■ キックユニットKU100をキックパッド KP65(別売品)にグレードアップする 1. KP65を組み立てます。組み立て方法は17ページの 手順13をご覧ください。 2. 3. してください。 2. 本体のハイハットコントローラーにつながれていた プラグをHH65のOUTPUT端子に差しかえます。 3. 4.
応用編 コンピューターに接続する ■ ヤマハUSB-MIDIドライバー コンピューターに接続する 本体とコンピューターをUSBケーブルで接続することで 通常は上記手順で通信できるようになります。ただし、 動作が不安定だったり不具合が発生した場合は、下記 MIDIデータを送受信でき、音楽制作ソフトウェアの入力 URLからヤマハ標準のUSB-MIDIドライバーをダウン 機器として使えます。ここでは、本体とコンピューター ロードし、インストールしてください。 の接続方法について説明します。 NOTE • 音を鳴らすには、本体にスピーカーやヘッドフォン を接続する必要があります。詳しくは、19ページを ご覧ください。 http://download.yamaha.
資料 困ったときは 資料 お困りの際は、別冊のMIDIリファレンスマニュアル(PDF)も併せてご覧ください。 MIDIリファレンスマニュアルのダウンロードについては、57ページをご覧ください。 パッドを叩いても音が鳴らない、または音量が小さい ■ 正しく接続されていますか? • • • • パッドが正しく本体のトリガー入力端子に接続されていますか? ヘッドフォンやアンプ/スピーカーなどの外部機器が正しく接続されているか確認してください。 本体に接続しているアンプ/スピーカーの電源は入っていますか?またボリュームは下がっていませんか? ハイハットコントローラーとキックユニットのケーブルを逆に差していないですか? (DTX400Kの場合。17 ページ) • KP65をお使いの場合は、KP65のLEVELツマミを調節してください。 • KU100をお使いの場合には、電源を入れる前にハイハットコントローラーを接続してください。また電源オン 時は、ハイハットコントローラーを踏まないでください。ペダルの自動判別がうまく作動せずに、キックの音が 出にくくなる場合があります。 ■ 本体の設定は正しいですか? • • •
困ったときは パッドを叩いたときに二度鳴りする/叩いていないパッドの音が鳴る/音抜けする ■ ダブルトリガー (二度鳴り)を起こす • パッドやトリガーに出力や感度コントロールボリュームなどがある場合は、(下げる方向で)調節してください。 • メニューモードの ゲイン の値が大きすぎないか確認してください。(49ページ) ■ クロストーク(叩いたパッド以外のパッドが発音してしまう)を起こす • メニューモードの クロストーク を適切な値に設定してください。(47ページ) クロストーク を適切な値に設定してください。(47ページ) ■ 音抜けを起こす • メニューモードの その他 ■ 本体の設定が保存されない • 本体の設定は、[ ](スタンバイ/オン)スイッチで電源を切るときに自動的に保存されます。(20ページ) ■ 本体の設定を購入時の状態に戻したい • ファクトリーセット(初期化)を行なってください。(20ページ) ■ 本体の設定を電源投入時の状態に戻したい • メニューモードの 電源オン時の状態に復元 を行なってください。(55ページ) ■ 1キットだけ購入時の状態に戻したい •
資料 データリスト ■ キットリスト 1. Maple Custom 2.
データリスト ■ ボイスリスト Kick Tom 1 2 3 4 5 6 7 8 9 10 11 12 13 14 15 16 17 18 19 20 21 45 46 47 48 49 50 51 52 53 54 55 56 57 58 59 60 61 62 63 64 65 66 67 68 69 70 71 72 73 74 75 76 77 78 79 80 MapleCustom OakCustom Oak 22 Birch 22 HardRock Vintage 24 Vintage 18 Jazz T8-1 T8-2 T8-3 T9-1 T9-2 T9 Hard Electric ElectricComp ElectricClick HipHop 1 HipHop 2 Break DnB Snare 22 23 24 25 26 27 28 29 30 31 32 33 34 35 36 37 38 39 40 41 42 43 44 MapleCustom OakCustom DeepOak HardRock Funk Vintage Jazz FieldSnare T8-1
データリスト ■ ドラム譜の見方 以下に示すドラム譜は市販の楽譜でよく使用されている記譜例です。 ハイハット・シンバル(H.H.) ライド・シンバル(RIDE) ハイハット(H.H.
データリスト t Heavy Metal リード種類:キック 256 y 16beat Rock リード拍数: リード種類:スネア+ハイハット 148 u Funk Rock リード拍数: リード種類:キック 107 i 8beat Funk リード拍数: リード種類:シンバル+ハイハット 1 116 o Slow Blues リード拍数: リード種類:シンバル+ハイハット 1 56 !0 4beat Jazz リード拍数: 3 リード種類:キック 132 リード拍数: DTX400K/DTX430K/DTX450K 取扱説明書 63
資料 仕様 ■ 音源モジュール 音源部 クリック 音源方式 AWM2 最大同時発音数 32音 ボイス数 ドラム/パーカッション : 169音色 キーボード : 128音色 ドラムキット数 10キット(すべて編集/上書き保存可能) ソング数 10ソング リバーブ 9タイプ テンポ 30〜300/分(タップテンポ機能、音声ガイド機能) ビート 1/4〜9/4 接続端子 SNARE (ステレオミニフォーン端子) TOM1 (モノラルミニフォーン端子) TOM2 (モノラルミニフォーン端子) TOM3 (モノラルミニフォーン端子) RIDE (モノラルミニフォーン端子) CRASH (モノラルミニフォーン端子) HI-HAT (モノラルミニフォーン端子) HI-HAT CTL (ステレオミニフォーン端子) KICK/PAD (ステレオミニフォーン端子) USB (TO HOST) AUX IN (ステレオミニフォーン端子) PHONES/OUTPUT (ステレオ標準フォーン端子) DC IN 消費電力 5W 電源アダプター PA-3Cまたは同等のヤマハ推奨品 寸法、
資料 索引 Symbols ク [ ]端子....................................22 [ ](クリック)ボタン.....................................21 [ ](スタンバイ/オン)スイッチ...................21 [>/■]ボタン ................................................21 [AUX IN](外部入力)端子...............................22 [DRUM MUTE](ドラムミュート)ボタン ....21 [KIT](キット)ボタン ......................................21 [PHONES/OUTPUT]端子............................22 [SONG](ソング)ボタン.................................21 [TEMPO](テンポ)ボタン ..............................
保証とアフターサービス サービスのご依頼、お問い合わせは、お買い上げ店、またはヤマハ修理ご相談センターにご連絡ください。 ● 保証書 本機には保証書がついています。 保証書は販売店がお渡ししますので、必ず「販売店印・お買 い上げ日」などの記入をお確かめのうえ、大切に保管してく ださい。 ● 保証期間 保証書をご覧ください。 ● 保証期間中の修理 保証書記載内容に基づいて修理いたします。詳しくは保証書 をご覧ください。 ● 保証期間経過後の修理 修理すれば使用できる場合は、ご希望により有料にて修理さ せていただきます。 有寿命部品については、使用時間や使用環境などにより劣化 しやすいため、消耗劣化に応じて部品の交換が必要となりま す。有寿命部品の交換は、お買い上げ店またはヤマハ修理ご 相談センターへご相談ください。 【有寿命部品の例】 ボリュームコントロール、スイッチ、ランプ、リレー類、 接続端子、鍵盤機構部品、鍵盤接点、ドラムパットなど ● 補修用性能部品の最低保有期間 製品の機能を維持するために必要な部品の最低保有期間は、 製造打切後8年です。 ● 持込み修理のお願い まず本書の「困ったときは」をよくお読
ヤマハ電子ドラム製品ウェブサイト http://jp.yamaha.com/dtx/ ヤマハダウンロード http://download.yamaha.com/jp/ Manual Development Department © 2012 Yamaha Corporation 2015年12月 改訂 POZC*.