ELECTRONIC DRUM RACK RS502 Manual do Proprietário PT
Português PRECAUÇÕES Antes de usar, leia este manual de montagem e use este produto de maneira segura e apropriada. * Mantenha este manual em lugar seguro para consultas futuras. ADVERTÊNCIAS Se este símbolo for ignorado e o equipamento for utilizado inadequadamente, poderão ocorrer ferimentos fatais ou graves danos. • Não permita que crianças pequenas montem ou instalem este produto sozinhas, pois elas podem se ferir. Este produto deve ser montado sempre sob a supervisão de um adulto.
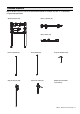
Conteúdo do pacote Depois de abrir o pacote com seu rack de bateria eletrônica, verifique se todos os componentes a seguir estão presentes.
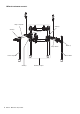
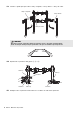
Rack totalmente montado Braço esquerdo Garra w Garra r Garra q Braço direito Perna esquerda Garra t Perna direita Garra e 4 RS502 - Manual do Proprietário Quadro principal
Montagem do Rack 1. Coloque o quadro principal sobre uma superfície nivelada sólida e solte os parafusos das garras q e w usando a chave de afinação. Garra q Garra w Chave de afinação Parafuso Parafuso Chave de afinação OBSERVAÇÃO A chave de afinação pode ser encontrada na embalagem do jogo de blocos. 2. Solte os parafusos das garras q, w e e e mova as garras totalmente para a estrutura central. Depois disso, aperte levemente os parafusos das garras.
4. Empurre o braço esquerdo o máximo possível na garra q no quadro principal. Quando inserido, verifique se o adesivo da seta ( ) no braço esquerdo está alinhado com a fenda da garra q. Braço esquerdo Seta Garra q Fenda Braço esquerdo Garra q Parafuso 5. Aperte bem o parafuso na garra q usando a chave de afinação. 6. Pegue a perna esquerda da embalagem e empurre-a o máximo possível na garra r. As pernas esquerda e direita são muito parecidas, mas a perna esquerdo é mais curta.
8. Pegue o braço direito da embalagem e empurre-o o máximo possível na garra w. Quando inserido, verifique se o adesivo da seta ( ) no braço direito está alinhado com a fenda da garra w. Garra t Braço direito Braço direito Seta Garra w Fenda Garra w Parafuso 9. Aperte bem o parafuso na garra w usando a chave de afinação. 10. Solte o parafuso da garra t. Garra t Parafuso 11. Pegue a perna direita da embalagem e insira-a o máximo possível na garra t.
13. Levante o quadro principal e abra o braço esquerdo, o braço direito e o braço de caixa. Braço esquerdo Braço direito Braço de caixa CUIDADO Não abra as pernas esquerda e direita do rack mais do que o mostrado na figura abaixo. A não observação desta precaução pode fazer com que o rack tombe e provoque lesões. 130° 130° 1.100 mm 14. Aperte bem os parafusos das garras q, w e e. Garra q Garra w Parafuso Parafuso Garra e Parafuso 15.
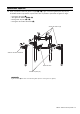
Encaixe dos suportes 1. Solte os parafusos das sete garras a seguir (A a G) e gire ou mova as garras para as posições mostradas abaixo. Depois disso, aperte bem todos os parafusos para travar as garras no lugar. • Uma garra da caixa (A) • Três garras do tambor (B, C e D) • Duas garras do prato (E e F) • Uma garra do módulo de bateria (G) Garras do tambor (x3) E B G C A F D Garra do módulo de bateria Garra da caixa Garras do prato (x2) OBSERVAÇÃO A garra do tambor D não deve ser movida nem girada.
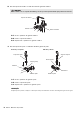
2. Fixe um suporte de tambor a cada uma das três garras do tambor. CUIDADO Tenha cuidado com os suportes de tambor, pois eles possuem pontas afiadas que podem causar lesões. Suporte de tambor Parafuso Garra do tambor 2-1. Solte o parafuso da garra do tambor. 2-2. Insira o suporte de tambor. 2-3. Aperte bem o parafuso na garra do tambor. 3. Fixe um suporte de prato a cada uma das duas garras do prato.
4. Prenda o suporte de caixa à garra da caixa. CUIDADO Tenha cuidado com o suporte de caixa, pois a haste possui uma ponta afiada que pode causar lesões. Suporte de caixa Garra da caixa Parafuso 4-1. Solte o parafuso da garra da caixa. 4-2. Insira o suporte de caixa. 4-3. Aperte bem o parafuso na garra da caixa. Se você for montar um kit de bateria eletrônica Yamaha, consulte o folheto Manual de Montagem fornecido com seu jogo de blocos.
Para obter detalhes de produtos, entre em contato com o representante mais próximo da Yamaha ou com o distribuidor autorizado relacionado a seguir. NORTH AMERICA CANADA Yamaha Canada Music Ltd. 135 Milner Avenue, Scarborough, Ontario, M1S 3R1, Canada Tel: 416-298-1311 U.S.A. Yamaha Corporation of America 6600 Orangethorpe Ave., Buena Park, Calif. 90620, U.S.A.
Yamaha web site http://www.yamaha.com/ Yamaha Downloads http://download.yamaha.com/ U.R.G., Digital Musical Instruments Division © 2013 Yamaha Corporation 211PO***.