00cv_DVD-S661_U.fm Page 1 Wednesday, January 31, 2007 6:54 PM U DVD PLAYER LECTEUR DE DVD DVD-S661 ©2007 YAMAHA YAMAHA YAMAHA YAMAHA YAMAHA YAMAHA YAMAHA ELECTRONICS CORPORATION, USA 6660 ORANGETHORPE AVE., BUENA PARK, CALIF. 90620, U.S.A. CANADA MUSIC LTD. 135 MILNER AVE., SCARBOROUGH, ONTARIO M1S 3R1, CANADA ELECTRONIK EUROPA G.m.b.H. SIEMENSSTR. 22-34, 25462 RELLINGEN BEI HAMBURG, GERMANY ELECTRONIQUE FRANCE S.A.
IMPORTANT SAFETY INSTRUCTIONS CAUTION RISK OF ELECTRIC SHOCK DO NOT OPEN CAUTION: TO REDUCE THE RISK OF ELECTRIC SHOCK, DO NOT REMOVE COVER (OR BACK). NO USER-SERVICEABLE PARTS INSIDE. REFER SERVICING TO QUALIFIED SERVICE PERSONNEL.
FCC INFORMATION (for US customers) 1. IMPORTANT NOTICE: DO NOT MODIFY THIS UNIT! This product, when installed as indicated in the instructions contained in this manual, meets FCC requirements. Modifications not expressly approved by Yamaha may void your authority, granted by the FCC, to use the product. 2. IMPORTANT: When connecting this product to accessories and/or another product use only high quality shielded cables. Cable/s supplied with this product MUST be used. Follow all installation instructions.
CAUTION: READ THIS BEFORE OPERATING THIS UNIT. 1 To assure the finest performance, please read this manual carefully. Keep it in a safe place for future reference. 2 Install this unit in a well ventilated, cool, dry, clean place — away from direct sunlight, heat sources, vibration, dust, moisture, or cold. In a cabinet, allow about 2.5 cm (1 inch) of free space all around this unit for adequate ventilation.
Contents Playback Operation ................... 15 Supplied accessories ................................. 3 Region codes .............................................. 3 Playable disc formats ................................. 3 Cleaning discs ............................................. 4 Patent information ...................................... 4 Basic operation ......................................... 15 Selecting a track/chapter ..................................15 Searching backward/forward ........
Contents Setup Menu ................................. 22 General setup menu ................................. 22 Locking/Unlocking the disc for viewing ..........22 Dimming the front panel display ......................22 Programming disc tracks (except MP3/ WMA/JPEG/DivX) ..........................................22 OSD language ..................................................23 Setting the screen saver ....................................23 Setting the sleep timer ......................................
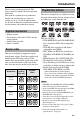
Introduction Introduction This unit can play the disc types associated Playable disc formats This unit is designed for use with discs having the logos shown below. Do not attempt to load any other type of disc into this unit. Supplied accessories • Remote control • Two batteries (AAA, R03, UM-4) for the remote control • Audio/Video pin cable • Owner’s manual Region codes This unit is designed to support the region management system. Check the regional code number on the DVD disc package.
Introduction Cleaning discs • When a disc becomes dirty, clean it with a cleaning cloth. Wipe the disc from the center out. Do not wipe in a circular motion. • Do not use solvents such as benzine, thinner, commercially available cleaners, or antistatic spray intended for analog records. Patent information Manufactured under license from Dolby Laboratories. “Dolby”, “Pro Logic” and the double-D symbol are trademarks of Dolby Laboratories. “DTS” and “DTS Digital Out” are registered trademarks of DTS, Inc.
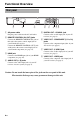
Functional Overview Functional Overview English Front panel 1 2 3 45 1 STANDBY/ON Turns on this unit or sets it to the standby mode. 2 Disc tray Loads a disc in the disc tray. 6 Shows the current status of this unit. 7 PLAY ( p ) Starts playback. 8 PAUSE ( 4 HDMI indicator 9 STOP ( s ) Lights up when an HDMI component is connected, and signals output via the HDMI jack of this unit. 5 PROGRESSIVE indicator 0 6 Front panel display 3 OPEN/CLOSE ( ) Opens or closes the disc tray.
Functional Overview Rear panel PR COMPONENT Y VIDEO REMOTE CONTROL IN OUT AUDIO OUT HDMI 1 2 3 1 AC power cable Plug the power cable into the AC wall outlet. 2 REMOTE CONTROL (IN, OUT) jacks Connect the REMOTE CONTROL (IN) jack of this unit to the remote control output jack of your Yamaha AV receiver. Connect the REMOTE CONTROL (OUT) jack of this unit to the remote control input jack of your Yamaha component (see page 11).
Functional Overview English Remote control 5 l22 Moves to the previous chapter or track. Searches backward.* 6 7 1 2 0 Stops playback. Opens the disc tray.* 7 Numeric buttons (0-9) Selects numbered items in the currently displayed menu. 3 8 SUBTITLE 4 5 6 7 8 9 q w e r Selects the subtitle language (see pages 18 and 20). 9 ZOOM Enlarges the video image (see pages 16 and 19). 0 ON SCREEN t y u Accesses or exits from the on-screen display (OSD) menu of this unit (see page 17).
Connections Connections General notes on connections Be sure to turn off this unit and unplug the power cable before you make or change connections. • Depending on the component you want to connect, there are various ways to make connections. Possible connections are described below. • Refer to the manuals supplied with your other components as necessary to make the best connections. • Do not connect this unit via your VCR. The video quality could be distorted by the copy protection system.
Connections If your AV receiver has video output jacks, connect your receiver and then your TV so that you can use one TV for several different video sources (LD, VCR, etc.) by simply switching the input source selector of your receiver. This unit has several types of video output jacks. Use the one that corresponds to the input jacks of the component to be connected.
Connections HDMI connection Notes HDMI jack HDMI provides high quality digital audio and video on a single connection. Connect the HDMI jack of this unit to an HDMI input jack of your AV receiver, and then to that of your TV using a commercially available HDMI cable. If your receiver does not have an HDMI input jack, you can achieve a better video image by connecting the HDMI jack of this unit directly to the HDMI input jack of your TV.
Connections USB port This unit has a USB port and can access MP3, WMA, DivX and JPEG files saved on your USB device. Connect the USB port on the front panel of this unit to a USB port of your USB device. Remote control jacks This unit has remote control input/output jacks. If your AV receiver is a Yamaha product and has the capability to transmit of SCENE control signals, you can use the SCENE function.
Getting Started Getting Started Step 1: Inserting batteries into the remote control Using the remote control Use the remote control within 6 m (approximately 20 ft) of this unit and point it toward the remote control sensor. 3 1 Within 6 m (approximately 20 ft) 2 1 Open the battery compartment. 2 Insert the two supplied batteries (AAA, R03, UM-4) following the indications (+/–) inside the compartment. 3 Close the cover. Notes • Insert batteries correctly according to the polarity markings (+/–).
Getting Started You can customize this unit using the setup menu displayed on the TV screen. Notes • Unless stated otherwise, all operations described here are carried out using the supplied remote control. • To return to the previous menu, press 2. • To exit from the menu, press SET UP. NTSC Select this if the connected TV is an NTSC system TV. It will change the video signals of PAL discs and output them in NTSC format.
Getting Started Setting the audio, subtitle and disc menu languages (DVD-Video only) VIDEO SETUP PAGE TV TYPE TV DISPLAY PROGRESSIVE PICTURE SETTING BLACK LEVEL CLOSED CAPTION HDMI SETUP 4:3 PAN SCAN 4:3 LETTER BOX 16:9 You can select your own preferred language for the audio, subtitle and disc menu. This unit automatically switches to the selected language whenever you load a disc. If the selected language is not available on the disc, the default language of the disc will be used instead.
Playback Operation Playback Operation Selecting a track/chapter • If the prohibited icon ( ) appears on the TV screen when a button is pressed, the function for that button is not available on the current disc or at the current time. • Unless stated otherwise, all operations described here are carried out using the supplied remote control. • Depending on the disc, some operations may operate differently or be restricted. Refer to the instruction supplied with the disc.
Playback Operation MP3/WMA/DivX ➜ RPT ONE (repeat track) ➜ RPT FLD (repeat folder) ➜ SHUFFLE (shuffle) ➜ RPT OFF (repeat off) Playback in slow motion Note 2 During slow motion, press 5/a repeatedly For VCD, repeat playback is not available when the PBC mode is on. 3 To resume normal playback, press 3 / 8 or You can play back video in slow motion. 1 Press 5 for reverse slow motion or a for forward slow motion. to select the desired speed. ENTER.
Playback Operation The OSD menu shows disc playback information (e.g., the title or chapter number, elapsed playing time or audio/subtitle language). A number of operations are possible without interrupting disc playback. 1 During playback, press ON SCREEN. ➜ A list of available disc information appears on the TV screen. 02/14 02/14 5.1CH ENG TITLE ELAPSED 0:02:25 the numeric buttons (0-9). ■ Time search (DVD/VCD) 2 Press ENTER. to right using the numeric buttons (0-9) (e.g. 0:34:27).
Playback Operation ■ Repeat/Time Display (DVD/VCD) 1 Press 5/a to select [REPEAT] or [TIME DISP.]. Special VCD/SVCD features Using the playback control (PBC) menu 2 Press ENTER. 3 Press 5/a to highlight your selection, and then press ENTER. ■ Time display (CD) For a VCD with a playback control (PBC) feature (version 2.
Playback Operation 3/8 . 3 Press l22 / 33l to select another track/file in the current folder. Notes English 2 Playback starts automatically. If not, press Using the preview function This function displays the content of the current folder or the entire disc. 1 Press 7 during playback. ➜ 12 thumbnails appear on the TV screen. • It may not be possible to play certain MP3/ WMA/JPEG/DivX discs due to the configuration and characteristics of the discs or the recording conditions.
Playback Operation Playback with multi-angles During playback, press 2 / 3/5/a to rotate the picture on the TV screen. 2: rotates the picture counter-clockwise 3: rotates the picture clockwise 5: flips the picture vertically a : flips the picture horizontally Note For HD JPEG, the 5/a key is not available. Playing MP3 music and JPEG pictures simultaneously 1 Load a disc that contains both MP3 music and JPEG picture data. ➜ The disc menu appears on the TV screen. 2 Select an MP3 music track.
Playback Operation You can play back MP3, WMA, JPEG and DivX files saved on your supported USB device. Supported USB devices This unit supports USB mass storage class devices (e.g., flash memories, card readers, portable audio players) using FAT16 or FAT32 format. Notes • Some devices may not work properly even if they meet the requirements. • If “Device not supported” appears on the TV screen when you connect the USB device, follow the procedure below.
Setup Menu Setup Menu Setup is carried out on the TV screen, enabling you to customize this unit to suit your own particular requirements. Notes • Unless stated otherwise, all operations described here are carried out using the supplied remote control. • To return to the previous menu, press 2. • To exit from the menu, press SET UP. LOCK Select this to lock playback of the current disc. Subsequent access to a locked disc requires a six-digit password.
Setup Menu ➜ The input menu appears on the TV screen. PROGRAM: TRACK (01-17) 1 2 3 4 5 6 __ 04 10 __ __ __ 7 8 9 10 EXIT __ __ __ __ START the program menu, and then press ENTER. ➜ Playback starts for the selected tracks in the programmed sequence. ■ To exit from program playback 9 Use 2 / 3/5/a to highlight [EXIT] on NEXT ■ To input your favorite tracks/ chapters 3 Use the numeric buttons (0-9) to enter a valid track/chapter number. 4 Use 2 / 3/5/a to move the cursor to the next position.
Setup Menu Setting the sleep timer This feature automatically sets this unit to the standby mode after a certain elapsed period. 1 In “GENERAL SETUP PAGE”, press 5/a to highlight [SLEEP], and then press 3. 2 Press 5/a to select a setting. • You can select from 30, 60, 90, 120 and 150 minutes. Select [OFF] to cancel the sleep timer function. 3 Press ENTER.
Setup Menu Setting the digital output 1 Press SET UP. The [DIGITAL AUDIO] options are: [DIGITAL OUTPUT] and [LPCM OUTPUT]. 2 Press 2 / 3 to select “AUDIO SETUP 1 In “AUDIO SETUP PAGE”, press 5/a to PAGE”. 3 Press ENTER. highlight [DIGITAL AUDIO], and then press 3. 2 Press 5/a to highlight an option. AUDIO SETUP PAGE ANALOG OUTPUT DIGITAL AUDIO HDMI AUDIO NIGHT MODE LIP SYNC 3 Press 3 to open a submenu. DIGITAL OUTPUT Set the digital output according to your optional audio component connections.
Setup Menu 48KHz Select this to play back discs recorded at the sampling rate of 48 kHz. All 96 kHz PCM data streams (if available) are converted to the sampling rate of 48 kHz. 96KHz Select this to play back discs recorded at the sampling rate of 96 kHz. If the 96 kHz disc is copy protected, the digital output is automatically converted to the sampling rate of 48 kHz. 4 Press 5/a to select a setting, and then press ENTER.
Setup Menu TV type This feature allows you to delay the sound output in order to synchronize it with the video image. This may be necessary when you use certain LCD monitors or projectors. This menu contains the options for selecting the color system that matches your TV. For details, see “Setting a color system for your TV” on page 13. 1 In “AUDIO SETUP PAGE”, press 2 / 3 to highlight [LIP SYNC], and then press 3. 2 Press 2 / 3 to adjust the delay time (between 00 ms and 200 ms), and then press ENTER.
Setup Menu ■ The relationship between the setting of this unit and the TV display When the aspect ratio of your TV is 4:3: Setting Playback disc TV display 16:9 *1 4:3 PAN SCAN Turning the progressive scan function on/off This feature is only available if you have connected this unit to a progressive scan TV through the component video jacks (see “Component video jacks ” on page 9). 1 In “VIDEO SETUP PAGE”, press 5/a to highlight [PROGRESSIVE], and then press 3.
Setup Menu This unit comes with three predefined sets of picture color settings and one personal setting that you can define yourself. 1 In “VIDEO SETUP PAGE”, press 5/a to highlight [PICTURE SETTING], and then press 3. Increase or decrease the value to brighten or dim the picture. Zero (0) is the average brightness setting value. CONTRAST Increase or decrease the value to sharpen or dull the picture. Zero (0) is the average contrast setting value.
Setup Menu Turning the closed caption on/off Closed captions are data hidden in the video signals of specific discs and are invisible without the use of a special decoder. The difference between subtitles and captions is that subtitles are intended for hearing persons and captions are for the hearing impaired. Subtitles rarely show all of the audio. For example, captions show sound effects (e.g., “phone ringing”, “footsteps”), while subtitles do not.
Setup Menu 1 Press OPEN/CLOSE ( ) on the front panel to open the disc tray. 2 Press 2. 3 Press SUBTITLE. Do not perform this operation while playing back a disc on this unit. • You cannot set [TV TYPE] and [PROGRESSIVE] when making HDMI connections. • When disconnecting the HDMI cable, the setting of [TV TYPE] may be changed. If the component video, S-video or composite video signal is not output correctly, see “Troubleshooting” on page 36 to set the correct TV type again.
Setup Menu 1 In “PREFERENCE PAGE”, press 5/a to highlight [PARENTAL], and then press 3. PREFERENCE PAGE AUDIO SUBTITLE DISC MENU PARENTAL VR LIST MP3/JPEG NAV DIVX SUBTITLE PBC 1 KID SAFE 2G 3 PG 4 PG 13 5 PGR 6R 7 NC 17 8 ADULT Selecting playback of VR format There are two ways to play back a disc in VR (Video Recording) format: ORIGINAL and PLAY LIST. This feature is not available with non-VR format discs. 1 In “PREFERENCE PAGE”, press 5/a to highlight [VR LIST], and then press 3.
Setup Menu The font sets listed below are available for DivX external subtitle files. This setting allows you to see the proper font set on-screen to match the subtitle file. 1 In “PREFERENCE PAGE”, press 5/a to highlight [DIVX SUBTITLE], and then press 3.
Setup Menu Changing the password The same password is used for both parental control and disc lock. Enter your six-digit password when prompted on the screen. The default password is 000 000. 1 In “PREFERENCE PAGE”, press 5/a to highlight [PASSWORD], and then press 3 to select [CHANGE]. 4 Enter the new six-digit password. 5 Enter the new six-digit password again to confirm the password. 6 Press ENTER to confirm your new password. ➜ The new six-digit password is now valid.
Language Codes Language Codes Abkhazian 6566 Gaelic 7168 Macedonian 7775 Sardinian Afar 6565 Gallegan 7176 Malagasy 7771 Scottish Gaelic 8367 7168 Afrikaans 6570 Georgian 7565 Malay 7783 Serbian 8382 Albanian 8381 German 6869 Malayalam 7776 Shona 8378 Amharic 6577 Gikuyu 7573 Maltese 7784 Sindhi 8368 Arabic 6582 Greek 6976 Manx 7186 Sinhalese 8373 Armenian 7289 Guarani 7178 Maori 7773 Slovak 8375 Assamese 6583 Gujarati 7185 Marathi 7782 Slovenia
Troubleshooting Troubleshooting Refer to the chart below when this unit does not function properly. If the problem you are experiencing is not listed below or if the instruction below does not help, set this unit to the standby mode, disconnect the power cable, and contact the nearest authorized Yamaha dealer or service center. Problem No power Solution Connect the AC power cable properly. Press STANDBY/ON on the front panel to turn on the power.
Troubleshooting English Problem No sound or distorted sound Solution Adjust the volume. Check that the speakers are connected correctly. For MP3/WMA, check that the sampling rate and bit rate are compatible with this unit (see “Specifications” on page 41). No audio at digital output Check the digital connections. If you are playing a DTS source, check that your receiver can decode DTS, and that [DIGITAL OUTPUT] is set to [ALL] (see page 25).
Troubleshooting Problem Solution “NO DISC” appears in the front panel display Check that the disc is placed in the disc tray correctly. “UN DISC” appears in the front panel display The disc being loaded is not supported by this unit. Check the disc type (see “Playable disc formats” on page 3). Menu items cannot be selected Press 7 twice on the remote control before selecting the setup menu. Depending on the disc availability, some menu items cannot be selected.
Glossary ■ Aspect ratio The ratio of vertical and horizontal sizes of a displayed image. The horizontal vs. vertical ratio of conventional TVs is 4:3, and that of widescreens is 16:9. ■ Audio output jacks Jacks on the back of the DVD player that send audio to another system (TV, Stereo, etc.). ■ Bit rate The amount of data used to hold a given length of music, measured in kilobits per seconds, or kbps. Or, the speed at which you record.
Glossary ■ Interactive menu Interactive video menus offer unprecedented convenience and control so you can quickly navigate between various scenes or bonus features, and select from audio track and subtitle options. ■ JPEG A very common digital still picture format. A stillpicture data compression system proposed by the Joint Photographic Expert Group, which features small decrease in image quality in spite of its high compression ratio. ■ MP3 A file format with a sound data compression system.
Specifications Specifications TV STANDARD • • • • • • • • • Number of lines ............................. PAL: 625, NTSC: 525 • Vertical frequency...................PAL: 50 Hz, NTSC: 60 Hz • Playback................................ Multistandard (PAL/NTSC) DVD-Video DVD-R, DVD-RW, DVD-R DL DVD+R, DVD+RW, DVD+R DL Video CD, SVCD CD PICTURE CD CD-R, CD-RW MP3 (ISO 9660) ................................. fs 32, 44.1, 48 kHz / 96, 128, 256, 320 kbps (CBR only) • WMA ...................fs 44.
00cv_DVD-S661_U.fm Page 1 Wednesday, January 31, 2007 6:54 PM U DVD PLAYER LECTEUR DE DVD DVD-S661 ©2007 YAMAHA YAMAHA YAMAHA YAMAHA YAMAHA YAMAHA YAMAHA ELECTRONICS CORPORATION, USA 6660 ORANGETHORPE AVE., BUENA PARK, CALIF. 90620, U.S.A. CANADA MUSIC LTD. 135 MILNER AVE., SCARBOROUGH, ONTARIO M1S 3R1, CANADA ELECTRONIK EUROPA G.m.b.H. SIEMENSSTR. 22-34, 25462 RELLINGEN BEI HAMBURG, GERMANY ELECTRONIQUE FRANCE S.A.