P DVD PLAYER DVD-S661 i
CAUTION: READ THIS BEFORE OPERATING THIS UNIT. 1 2 3 4 5 6 7 8 9 10 11 12 13 14 15 16 17 18 To assure the finest performance, please read this manual carefully. Keep it in a safe place for future reference. Install this unit in a well ventilated, cool, dry, clean place — away from direct sunlight, heat sources, vibration, dust, moisture, or cold. In a cabinet, allow about 2.5 cm (1 inch) of free space all around this unit for adequate ventilation.
Contents Playback Operation ................... 15 Supplied accessories ................................. 3 Region codes .............................................. 3 Playable disc formats ................................. 3 Cleaning discs ............................................. 4 Patent information ...................................... 4 Basic operation ......................................... 15 Selecting a track/chapter ..................................15 Searching backward/forward ........
Contents Setup Menu ................................. 22 General setup menu ................................. 22 Locking/Unlocking the disc for viewing ..........22 Dimming the front panel display ......................22 Programming disc tracks (except MP3/ WMA/JPEG/DivX) ..........................................22 OSD language ..................................................23 Setting the screen saver ....................................23 Setting the sleep timer ......................................
Introduction Introduction This unit can play the disc types associated Playable disc formats This unit is designed for use with discs having the logos shown below. Do not attempt to load any other type of disc into this unit. Supplied accessories • Remote control • Two batteries (AAA, R03, UM-4) for the remote control • Audio/Video pin cable • Owner’s manual Region codes This unit is designed to support the region management system. Check the regional code number on the DVD disc package.
Introduction Cleaning discs • When a disc becomes dirty, clean it with a cleaning cloth. Wipe the disc from the center out. Do not wipe in a circular motion. • Do not use solvents such as benzine, thinner, commercially available cleaners, or antistatic spray intended for analog records. Patent information Manufactured under license from Dolby Laboratories. “Dolby”, “Pro Logic” and the double-D symbol are trademarks of Dolby Laboratories. “DTS” and “DTS Digital Out” are registered trademarks of DTS, Inc.
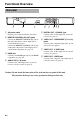
Functional Overview Functional Overview English Front panel 1 2 3 45 1 STANDBY/ON Turns on this unit or sets it to the standby mode. 2 Disc tray Loads a disc in the disc tray. 6 Shows the current status of this unit. 7 PLAY ( p ) Starts playback. 8 PAUSE ( 4 HDMI indicator 9 STOP ( s ) Lights up when an HDMI component is connected, and signals output via the HDMI jack of this unit. 5 PROGRESSIVE indicator 0 6 Front panel display 3 OPEN/CLOSE ( ) Opens or closes the disc tray.
Functional Overview Rear panel PR COMPONENT Y VIDEO REMOTE CONTROL OUT IN AUDIO OUT HDMI 1 2 3 1 AC power cable Plug the power cable into the AC wall outlet. 2 REMOTE CONTROL (IN, OUT) jacks Connect the REMOTE CONTROL (IN) jack of this unit to the remote control output jack of your Yamaha AV receiver. Connect the REMOTE CONTROL (OUT) jack of this unit to the remote control input jack of your Yamaha component (see page 11).
Functional Overview English Remote control 5 l22 Moves to the previous chapter or track. Searches backward.* 6 7 1 2 0 Stops playback. Opens the disc tray.* 7 Numeric buttons (0-9) Selects numbered items in the currently displayed menu. 3 8 SUBTITLE 4 5 6 7 8 9 q w e r Selects the subtitle language (see pages 18 and 20). 9 ZOOM Enlarges the video image (see pages 16 and 19). 0 ON SCREEN t y u Accesses or exits from the on-screen display (OSD) menu of this unit (see page 17).
Connections Connections General notes on connections Be sure to turn off this unit and unplug the power cable before you make or change connections. • Depending on the component you want to connect, there are various ways to make connections. Possible connections are described below. • Refer to the manuals supplied with your other components as necessary to make the best connections. • Do not connect this unit via your VCR. The video quality could be distorted by the copy protection system.
Connections If your AV receiver has video output jacks, connect your receiver and then your TV so that you can use one TV for several different video sources (LD, VCR, etc.) by simply switching the input source selector of your receiver. This unit has several types of video output jacks. Use the one that corresponds to the input jacks of the component to be connected.
Connections HDMI connection Notes HDMI jack HDMI provides high quality digital audio and video on a single connection. Connect the HDMI jack of this unit to an HDMI input jack of your AV receiver, and then to that of your TV using a commercially available HDMI cable. If your receiver does not have an HDMI input jack, you can achieve a better video image by connecting the HDMI jack of this unit directly to the HDMI input jack of your TV.
Connections USB port This unit has a USB port and can access MP3, WMA, DivX and JPEG files saved on your USB device. Connect the USB port on the front panel of this unit to a USB port of your USB device. Remote control jacks This unit has remote control input/output jacks. If your AV receiver is a Yamaha product and has the capability to transmit of SCENE control signals, you can use the SCENE function.
Getting Started Getting Started Step 1: Inserting batteries into the remote control Using the remote control Use the remote control within 6 m of this unit and point it toward the remote control sensor. 3 1 Within 6 m 2 1 Open the battery compartment. 2 Insert the two supplied batteries (AAA, R03, UM-4) following the indications (+/–) inside the compartment. 3 Close the cover. Notes • Insert batteries correctly according to the polarity markings (+/–).
Getting Started You can customize this unit using the setup menu displayed on the TV screen. Notes • Unless stated otherwise, all operations described here are carried out using the supplied remote control. • To return to the previous menu, press 2. • To exit from the menu, press SET UP. NTSC Select this if the connected TV is an NTSC system TV. It will change the video signals of PAL discs and output them in NTSC format.
Getting Started Setting the audio, subtitle and disc menu languages (DVD-Video only) VIDEO SETUP PAGE TV TYPE TV DISPLAY PROGRESSIVE PICTURE SETTING HDMI SETUP 4:3 PAN SCAN 4:3 LETTER BOX 16:9 You can select your own preferred language for the audio, subtitle and disc menu. This unit automatically switches to the selected language whenever you load a disc. If the selected language is not available on the disc, the default language of the disc will be used instead. 1 Press SET UP.
Playback Operation Playback Operation Selecting a track/chapter • If the prohibited icon ( ) appears on the TV screen when a button is pressed, the function for that button is not available on the current disc or at the current time. • Unless stated otherwise, all operations described here are carried out using the supplied remote control. • Depending on the disc, some operations may operate differently or be restricted. Refer to the instruction supplied with the disc.
Playback Operation MP3/WMA/DivX ➜ RPT ONE (repeat track) ➜ RPT FLD (repeat folder) ➜ SHUFFLE (shuffle) ➜ RPT OFF (repeat off) Playback in slow motion Note 2 During slow motion, press 5/a repeatedly For VCD, repeat playback is not available when the PBC mode is on. You can play back video in slow motion. 1 Press 5 for reverse slow motion or a for forward slow motion. to select the desired speed. 3 To resume normal playback, press 3 / 8 or ENTER.
Playback Operation The OSD menu shows disc playback information (e.g., the title or chapter number, elapsed playing time or audio/subtitle language). A number of operations are possible without interrupting disc playback. 1 During playback, press ON SCREEN. ➜ A list of available disc information appears on the TV screen. 02/14 02/14 5.1CH ENG TITLE ELAPSED 0:02:25 the numeric buttons (0-9). ■ Time search (DVD/VCD) 2 Press ENTER. to right using the numeric buttons (0-9) (e.g. 0:34:27).
Playback Operation ■ Repeat/Time Display (DVD/VCD) 1 Press 5/a to select [REPEAT] or [TIME DISP.]. Special VCD/SVCD features Using the playback control (PBC) menu 2 Press ENTER. 3 Press 5/a to highlight your selection, and then press ENTER. ■ Time display (CD) For a VCD with a playback control (PBC) feature (version 2.
Playback Operation 3/8 . 3 Press l22 / 33l to select another track/file in the current folder. Notes English 2 Playback starts automatically. If not, press Using the preview function This function displays the content of the current folder or the entire disc. 1 Press 7 during playback. ➜ 12 thumbnails appear on the TV screen. • It may not be possible to play certain MP3/ WMA/JPEG/DivX discs due to the configuration and characteristics of the discs or the recording conditions.
Playback Operation Playback with multi-angles During playback, press 2 / 3/5/a to rotate the picture on the TV screen. 2: rotates the picture counter-clockwise 3: rotates the picture clockwise 5: flips the picture vertically a : flips the picture horizontally Note For HD JPEG, the 5/a key is not available. Playing MP3 music and JPEG pictures simultaneously 1 Load a disc that contains both MP3 music and JPEG picture data. ➜ The disc menu appears on the TV screen. 2 Select an MP3 music track.
Playback Operation Playing data files You can play back MP3, WMA, JPEG and DivX files saved on your supported USB device. Yamaha and suppliers accepts no liability for the loss of data saved on the USB devices connected to this unit. As a precaution, it is recommended that the files are tested after they have been saved on. Supported USB devices 1 Connect your USB device to the USB port This unit supports USB mass storage class devices (e.g.
Setup Menu Setup Menu Setup is carried out on the TV screen, enabling you to customize this unit to suit your own particular requirements. Notes • Unless stated otherwise, all operations described here are carried out using the supplied remote control. • To return to the previous menu, press 2. • To exit from the menu, press SET UP. LOCK Select this to lock playback of the current disc. Subsequent access to a locked disc requires a six-digit password.
Setup Menu ➜ The input menu appears on the TV screen. PROGRAM: TRACK (01-17) 1 2 3 4 5 6 7 8 9 10 04 10 __ __ __ EXIT __ __ __ __ __ START the program menu, and then press ENTER. ➜ Playback starts for the selected tracks in the programmed sequence. ■ To exit from program playback 9 Use 2 / 3/5/a to highlight [EXIT] on NEXT ■ To input your favorite tracks/ chapters 3 Use the numeric buttons (0-9) to enter a valid track/chapter number. 4 Use 2 / 3/5/a to move the cursor to the next position.
Setup Menu Setting the sleep timer This feature automatically sets this unit to the standby mode after a certain elapsed period. 1 In “GENERAL SETUP PAGE”, press 5/a to highlight [SLEEP], and then press 3. 2 Press 5/a to select a setting. • You can select from 30, 60, 90, 120 and 150 minutes. Select [OFF] to cancel the sleep timer function. 3 Press ENTER.
Setup Menu Set the analog output to match the playback capability of this unit. 1 In “AUDIO SETUP PAGE”, press 5/a to highlight [ANALOG OUTPUT], and then press 3. STEREO Select this to change channel output to stereo, which only delivers sound from the two front speakers. LT/RT Select this if this unit is connected to a Dolby Pro Logic decoder. 2 Press 5/a to select a setting, and then press ENTER. Setting the digital output The [DIGITAL AUDIO] options are: [DIGITAL OUTPUT] and [LPCM OUTPUT].
Setup Menu Notes • If you are not using the HDMI audio output, set this to [OFF]. • If the monitor/receiver connected to this unit using HDMI does not support HDMI audio signal input, set this to [OFF]. • This unit can output the following audio signals using HDMI: 32/44.1/48 kHz, 2ch linear PCM signals and bitstream signals (Dolby Digital, DTS and MPEG). • When audio signals are being output by HDMIcompatible components, digital output signals are muted.
Setup Menu Set the aspect ratio of this unit to match your TV. The format you select must be available on the disc. Otherwise, the TV display setting will not affect the picture during playback. When the aspect ratio of your TV is 16:9 (widescreen): Setting Playback disc TV display 16:9 1 In “VIDEO SETUP PAGE”, press 5/a 16:9 to highlight [TV DISPLAY], and then press 3. *2 4:3 2 Press 5/a to highlight one of the following options.
Setup Menu Notes on activating progressive scan: • Ensure that your TV is equipped with progressive scan. • Connect using a component video cable. • When making HDMI connections, you cannot select [PROGRESSIVE]. CONSUMERS SHOULD NOTE THAT NOT ALL HIGH DEFINITION TELEVISION SETS ARE FULLY COMPATIBLE WITH THIS PRODUCT AND MAY CAUSE ARTIFACTS TO BE DISPLAYED IN THE PICTURE.
Setup Menu When you connect this unit to an HDMI compatible component via the HDMI jack, select the following video output settings depending on the connected component. 1 In “VIDEO SETUP PAGE”, press 5/a to highlight [HDMI SETUP], and then press 3. 2 Press 5/a to highlight an option. 3 Press 3 to enter a submenu. WIDE SCREEN FORMAT Set the aspect ratio of the projected images on the screen. This feature is only available when making HDMI connections and [TV DISPLAY] is set to [16:9] (see page 27).
Setup Menu Preference setup menu 1 In “PREFERENCE PAGE”, press 5/a to highlight [PARENTAL], and then press 3. 1 Press 7 twice to stop playback (if necessary), and then press SET UP. PREFERENCE PAGE 2 Press 2 / 3 to select “PREFERENCE AUDIO SUBTITLE DISC MENU PARENTAL VR LIST MP3/JPEG NAV DIVX SUBTITLE PBC PAGE”. 3 Press ENTER.
Setup Menu Select this to play the originally recorded titles on the disc. 1 In “PREFERENCE PAGE”, press 5/a to highlight [DIVX SUBTITLE], and then press 3. PLAY LIST GROUP1: Select this to play the edited version of the disc. This feature is only available when a play list has been created.
Setup Menu Selecting the PBC (playback control) function You can set playback control (PBC) to on or off. This function is available only on Video CD 2.0 with the playback control (PBC) feature. 1 In “PREFERENCE PAGE”, press 5/a to highlight [PBC], and then press 3. 2 Press ENTER to enter the “Password Change Page”. OLD PASSWORD NEW PASSWORD CONFIRM PWD OK ON Select this to display a disc menu. OFF Select this to not display a disc menu. Playback starts from the beginning of a disc.
Language Codes Language Codes Abkhazian 6566 Gaelic 7168 Macedonian 7775 Sardinian Afar 6565 Gallegan 7176 Malagasy 7771 Scottish Gaelic 8367 7168 Afrikaans 6570 Georgian 7565 Malay 7783 Serbian 8382 Albanian 8381 German 6869 Malayalam 7776 Shona 8378 Amharic 6577 Gikuyu 7573 Maltese 7784 Sindhi 8368 Arabic 6582 Greek 6976 Manx 7186 Sinhalese 8373 Armenian 7289 Guarani 7178 Maori 7773 Slovak 8375 Assamese 6583 Gujarati 7185 Marathi 7782 Slovenia
Troubleshooting Troubleshooting Refer to the chart below when this unit does not function properly. If the problem you are experiencing is not listed below or if the instruction below does not help, set this unit to the standby mode, disconnect the power cable, and contact the nearest authorized Yamaha dealer or service center. Problem No power Solution Connect the AC power cable properly. Press STANDBY/ON on the front panel to turn on the power.
Troubleshooting English Problem No sound or distorted sound Solution Adjust the volume. Check that the speakers are connected correctly. For MP3/WMA, check that the sampling rate and bit rate are compatible with this unit (see “Specifications” on page 39). No audio at digital output Check the digital connections. If you are playing a DTS source, check that your receiver can decode DTS, and that [DIGITAL OUTPUT] is set to [ALL] (see page 25).
Troubleshooting Problem Solution “NO DISC” appears in the front panel display Check that the disc is placed in the disc tray correctly. “UN DISC” appears in the front panel display The disc being loaded is not supported by this unit. Check the disc type (see “Playable disc formats” on page 3). Menu items cannot be selected Press 7 twice on the remote control before selecting the setup menu. Depending on the disc availability, some menu items cannot be selected.
Glossary ■ Aspect ratio The ratio of vertical and horizontal sizes of a displayed image. The horizontal vs. vertical ratio of conventional TVs is 4:3, and that of widescreens is 16:9. ■ Audio output jacks Jacks on the back of the DVD player that send audio to another system (TV, Stereo, etc.). ■ Bit rate The amount of data used to hold a given length of music, measured in kilobits per seconds, or kbps. Or, the speed at which you record.
Glossary ■ Interactive menu Interactive video menus offer unprecedented convenience and control so you can quickly navigate between various scenes or bonus features, and select from audio track and subtitle options. ■ JPEG A very common digital still picture format. A stillpicture data compression system proposed by the Joint Photographic Expert Group, which features small decrease in image quality in spite of its high compression ratio. ■ MP3 A file format with a sound data compression system.
Specifications Specifications TV STANDARD • • • • • • • • • Number of lines ............................. PAL: 625, NTSC: 525 • Vertical frequency...................PAL: 50 Hz, NTSC: 60 Hz • Playback................................ Multistandard (PAL/NTSC) DVD-Video DVD-R, DVD-RW, DVD-R DL DVD+R, DVD+RW, DVD+R DL Video CD, SVCD CD PICTURE CD CD-R, CD-RW MP3 (ISO 9660) ................................. fs 32, 44.1, 48 kHz / 96, 128, 256, 320 kbps (CBR only) • WMA ...................fs 44.
PRECAUCIÓN: LEA LAS INDICACIONES SIGUIENTES ANTES DE UTILIZAR ESTE APARATO. 1 2 3 4 5 6 7 8 9 10 11 12 13 14 15 16 17 18 Para asegurar el mejor rendimiento de este aparato, lea atentamente este manual. Y luego guárdelo en un lugar seguro para poder consultarlo en el futuro en caso de ser necesario. Instale la unidad en un lugar bien ventilado, fresco, seco y limpio — lejos de la luz solar directa, fuentes de calor, vibraciones, polvo, humedad, o frío.
Índice Operación de reproducción ...... 15 Accesorios suministrados ......................... 3 Códigos de región ...................................... 3 Formatos de discos reproducibles ........... 3 Limpieza de discos ..................................... 4 Información de patente .............................. 4 Operación básica ...................................... 15 Selección de una pista/capítulo ........................15 Búsqueda hacia atrás/adelante .........................
Índice Menú de preparación ................. 22 Menú de preparación general .................. 22 Bloqueo/desbloqueo del disco para reproducirlo ..............................................22 Control de brillo del visualizador del panel delantero ...........................................................22 Programación de pistas de discos (excepto MP3/WMA/JPEG/DivX) ..................22 Idioma OSD ......................................................23 Ajuste del salvapantallas .........................
Introducción Introducción Formatos de discos reproducibles Esta unidad ha sido diseñada para reproducir los discos que tengan los logotipos indicados más abajo. No intente cargar ningún otro tipo de disco en esta unidad. Accesorios suministrados • Mando a distancia • Dos pilas (AAA, R03, UM-4) para el mando a distancia • Cable con clavijas de audio/vídeo • Manual de instrucciones Códigos de región Esta unidad ha sido diseñada para soportar el sistema de administración de regiones.
Introducción Limpieza de discos • Cuando se ensucie un disco, límpielo con un paño de limpieza. Limpie el disco desde el centro hacia afuera. No lo limpie en sentido circular. • No utilice disolventes como bencina, diluyente, limpiadores de venta en el comercio o aerosoles antiestáticos para discos analógicos. Información de patente Fabricado bajo licencia de Dolby Laboratories. “Dolby”, “Pro Logic” y el símbolo con una doble D son marcas registradas de Dolby Laboratories.
Controles de funcionamiento Controles de funcionamiento Panel delantero 2 3 45 1 STANDBY/ON Enciende esta unidad o la pone en el modo de espera. 2 Bandeja de disco Carga un disco en su bandeja. 3 OPEN/CLOSE ( ) Abre o cierra la bandeja del disco. 4 Indicador HDMI Se enciende cuando se conecta un componente HDMI y cuando salen señales por el jack HDMI de esta unidad. 6 7 8 9 Español 1 0 6 Visualizador del panel delantero Muestra el estado actual de esta unidad.
Controles de funcionamiento Panel trasero PR COMPONENT Y VIDEO REMOTE CONTROL OUT IN AUDIO OUT HDMI 1 2 3 1 Conector de alimentación Conecte el cable de alimentación a una toma de CA. 2 Jacks REMOTE CONTROL (IN, OUT) Conecte el jack REMOTE CONTROL (IN) de esta unidad al jack de salida del mando a distancia de su receptor AV Yamaha. Conecte el jack REMOTE CONTROL (OUT) de esta unidad al jack de entrada del mando a distancia de su componente Yamaha (vea la página 11).
Controles de funcionamiento Mando a distancia 5 l22 Retrocede al capítulo o pista anterior. Busca hacia atrás.* 6 7 0 Detiene la reproducción. Abre la bandeja del disco.* Español 1 2 7 Botones numéricos (0-9) Selecciona elementos numerados en el menú actualmente visualizado. 3 8 SUBTITLE 4 5 6 7 8 9 q w e r t y u Selecciona el idioma de subtítulos (vea las páginas 18 y 20). 9 ZOOM Aumenta la imagen de vídeo (vea las páginas 16 y 19).
Conexiones Conexiones Notas generales sobre las conexiones Asegúrese de apagar esta unidad y desenchufar el cable de alimentación antes de cambiar las conexiones. • Dependiendo del componente que quiera conectar, hay varias formas de hacer conexiones. Las conexiones posibles se describen más abajo. • Consulte los manuales suministrados con sus otros componentes para hacer las mejores conexiones. • No conecte esta unidad a través de su videograbadora.
Conexiones Jacks de vídeo componente Conexiones de vídeo PR AUDIO OUT Esta unidad COMPONENT Y COAXIAL DIGITAL OUT S VIDEO PB VIDEO OUT PB PR VIDEO S Y V PB PR Cable con clavijas de vídeo (suministrada) Las conexiones de vídeo componente logran una reproducción en color de más alta fidelidad que las conexiones S-vídeo al transmitir señales de vídeo por cables separados para la luminancia (Y: verde) y crominancia (PB: azul, PR: rojo).
Conexiones Conexión de HDMI Notas Jack HDMI HDMI proporciona audio y vídeo digital de alta calidad con una sola conexión. Conecte el jack HDMI de esta unidad a un jack de entrada HDMI de su receptor AV y luego al de su TV utilizando un cable de HDMI de venta en el comercio. Si su receptor no tiene un jack de entrada HDMI, podrá obtener una imagen de vídeo mejor conectando directamente el jack HDMI de esta unidad al jack de entrada HDMI de su TV.
Conexiones Otras conexiones Puerto USB Esta unidad tiene jacks de entrada/salida de mando a distancia. Si su receptor AV es un producto Yamaha capaz de transmitir señales de control SCENE, usted podrá usar la función SCENE. Conecte el jack REMOTE CONTROL (IN) de esta unidad a un jack de salida de control remoto de su receptor utilizando un cable con minijack monofónico de venta en el comercio para que esta unidad inicie automáticamente la reproducción pulsando simplemente un botón de su receptor.
Primeros pasos Primeros pasos Paso 1: Introducción de las pilas en el mando a distancia Utilización del mando a distancia Use el mando a distancia dentro de una distancia de 6 m de esta unidad y apúntelo hacia el sensor de mando a distancia. 3 1 2 Dentro de 6 m 1 Abra el compartimiento de las pilas. 2 Introduzca las pilas suministradas (AAA, R03, UM-4) siguiendo las indicaciones (+/–) del interior del compartimiento. 3 Cierre la tapa.
Primeros pasos Paso 3: Ajuste de un tipo/ visualización e idioma de TV Notas • A menos que se indique lo contrario, todas las operaciones aquí descritas se realizarán con el mando a distancia suministrado. • Para volver al menú anterior, pulse 2. • Pulse SET UP para salir del menú. Ajuste de un sistema de color para su TV Esta unidad es compatible con los formatos de vídeo NTSC y PAL. Seleccione el sistema de color para su TV. PÁG. CONF.
Primeros pasos Ajuste de idioma de audio, subtítulos y menú de disco (DVD-Video solamente) PÁG. CONF. VÍDEO TIPO TV PANTALLA TV PROGRESIVA AJUSTE COLOR CONFIGURACIÓN HDMI 4:3 PANORÁMICO 4:3 BUZÓN 16:9 Puede seleccionar su idioma preferido para audio, subtítulos y menú de disco. Esta unidad cambiará automáticamente al idioma preferido siempre que se introduzca un disco. Si el idioma seleccionado no se encuentra en el disco, en su lugar se utilizará el idioma predeterminado que tenga el disco.
Operación de reproducción Operación de reproducción Notas Selección de una pista/capítulo • Si aparece el icono de prohibición ( ) en la pantalla del televisor cuando se pulsa un botón, la función de ese botón no estará disponible en el disco actual en ese momento. • A menos que se indique lo contrario, todas las operaciones aquí descritas se realizarán con el mando a distancia suministrado. • Dependiendo del disco, algunas operaciones pueden ser diferentes o tal vez no se puedan hacer.
Operación de reproducción MP3/WMA/DivX ➜ RPT ONE (repetición de una pista) ➜ RPT FLD (repetición de carpeta) ➜ SHUFFLE (aleatoria) ➜ RPT OFF (repetición apagada) Nota Para VCD no se dispone de repetición de reproducción cuando está activado el modo PBC. Repetición de una sección dentro de un capítulo/pista 1 Mientras reproduce, pulse REPEAT A-B en el punto de inicio deseado. ➜ “SET A” aparece en el visualizador del panel delantero. 2 Pulse de nuevo REPEAT A-B en el punto de finalización deseado.
Operación de reproducción Utilización de la visualización en pantalla (OSD) 1 Pulse ON SCREEN durante la reproducción. ➜ En la pantalla del TV aparece una lista de información del disco disponible. DVD MENÚ TÍTUL CAPÍTULO AUDIO SUBTÍTULOS VELOC. 16 02/14 02/14 5.1 C ING 3 Seleccione un número de título, capítulo o pista con los botones numéricos (0-9). ■ Búsqueda con tiempo (DVD/VCD) 1 Pulse 5/a para seleccionar [TIEMPO TÍTULO] / [TPO. CAPÍTULO] (DVD) o [TPO. PISTA] / [TPO. DISCO] (VCD).
Operación de reproducción ■ Visualización de repetición/tiempo (DVD/VCD) 1 Pulse 5/a para seleccionar [REPETIR] o Funciones especiales de VCD/SVCD [CONTADOR]. Utilización del menpu de control de reproducción (PBC) 2 Pulse ENTER. 3 Pulse 5/a para resaltar su selección y luego pulse ENTER. ■ Visualización de tiempo (CD) Cada vez que pulsa ON SCREEN, la visualización de tiempo cambia de la forma siguiente: TRANSC. TOTAL RESTANTE TOTAL REST. INDIVIDUAL TRANSC. INDI.
Operación de reproducción 2 La reproducción empieza automáticamente. Si no, pulse 3 / 8 . 3 Pulsar l22 / 33l para seleccionar otra pista/archivo en la carpeta actual. • Puede no ser posible reproducir ciertos discos MP3/WMA/JPEG/DivX debido a la configuración y características de los discos o a las condiciones de la grabación. • Las imágenes JPEG de HD puede que no se visualicen correctamente al visualizarse la primera vez o al expulsarse el disco.
Operación de reproducción Reproducción con múltiples ángulos Funciones especiales de DivX Durante la reproducción, pulse 2 / 3/5/a para girar la imagen en la pantalla del TV. Archivos DivX que incluyen funciones DMF (DivX Media Format) solamente 2: gira la imagen hacia la izquierda 3: gira la imagen hacia la derecha 5: da vuelta a la imagen verticalmente a : da vuelta a la imagen horizontalmente Utilización del menú interactivo Nota Para JPEG de HD no está disponible la tecla 5/a .
Operación de reproducción Utilización de un dispositivo USB Yamaha y los proveedores no aceptan ninguna responsabilidad por la pérdida de datos guardados en los dispositivos USB conectados a esta unidad. Como medida de precaución se recomienda que estos archivos sean verificados después de haber sido guardados. 1 Conecte su dispositivo USB al puerto USB de Dispositivos USB compatibles Esta unidad es compatible con dispositivos de almacenamiento USB (p. ej.
Menú de preparación Menú de preparación Esta preparación se realiza mediante la pantalla del TV, permitiéndose personalizar esta unidad según sus necesidades particulares. Notas • A menos que se indique lo contrario, todas las operaciones aquí descritas se realizarán con el mando a distancia suministrado. • Para volver al menú anterior, pulse 2. • Pulse SET UP para salir del menú. BLOQUEAR Seleccione esto para bloquear la reproducción del disco actual.
Menú de preparación 2 Pulse ENTER. ➜ El menú de introducción aparece en la pantalla del TV. SALIR __ __ __ __ __ INICIAR SGTE ■ Para introducir sus pistas/capítulos favoritos 3 Utilice el botones numéricos (0-9) para introducir un número válido de pista/ capítulo. 4 Utilice 2 / 3/5/a para mover el cursor a la posición siguiente. • Si el número de pista/capítulo es superior al diez, pulse 33l para ir a la página siguiente y seguir con la programación.
Menú de preparación Ajuste del temporizador para dormir Visualización del código de registro DivX® VOD Esta función pone automáticamente esta unidad en el modo de espera después de pasar cierto tiempo. Yamaha le proporciona el código de registro DivX® VOD (vídeo sobre demanda) que le permite alquilar o comprar vídeos utilizando el servicio DivX® VOD. Para más información, visite https:// vod.divx.com/. 1 En “PÁGINA CONFIGURACIÓN GENERAL”, pulse 5/a para resaltar [DORMIR] y luego pulse 3.
Menú de preparación Ajuste de la salida analógica Ajuste la salida analógica para que concuerde con la capacidad de reproducción de esta unidad. AUDIO”, pulse 5/a para resaltar [SALIDA ANALÓGICA] y luego pulse 3. Seleccione esto si ha conectado esta unidad a un receptor compatible con PCM a través de un terminal digital, como el terminal coaxial. En este caso, puede tener que ajustar [SALIDA LPCM]. Los discos se graban a cierta frecuencia de muestreo.
Menú de preparación Notas • Si no está utilizando la salida de audio HDMI ponga esto en [DESACTIVAR]. • Si el monitor/receptor conectado a esta unidad usando HDMI no soporta la entrada de señal de audio HDMI, ponga esto en [DESACTIVAR]. • Esta unidad puede dar salida a las señales de audio siguientes usando HDMI: Señales de 32/ 44,1/48 kHz, PCM lineal de 2 anales y señales de serie de bits (Dolby Digital, DTS y MPEG).
Menú de preparación Ajuste de la visualización del TV Disco de Configuración reproducción Pantalla del TV 16:9 16:9 1 En “PÁG. CONF. VÍDEO”, pulse 5/a 4:3 para resaltar [PANTALLA TV] y luego pulse 3. 2 Pulse 5/a para resaltar una de las opciones siguientes. 4:3 PANORÁMICO Seleccione esto si la relación de aspecto de su TV es 4:3 y usted quiere que ambos lados de la imagen queden recortados o formateados para ajustarse a la pantalla de su TV.
Menú de preparación Acerca de activación de la exploración progresiva: 2 Pulse 5/a para seleccionar un ajuste y • Asegúrese de que su TV esté equipado con exploración progresiva. • Conecte con un cable de vídeo componente. • Cuando haga conexiones HDMI no podrá seleccionar [PROGRESIVA]. 3 Si selecciona [PERSONAL] en el paso 1, LOS CONSUMIDORES DEBERÁN NOTAR QUE NO TODOS LOS TELEVISORES DE ALTA DEFINICIÓN SON TOTALMENTE COMPATIBLES CON ESTE PRODUCTO Y QUE PUEDEN APARACER ARTEFACTOS EN LA IMAGEN.
Menú de preparación Ajuste de vídeo HDMI 1 En “PÁG. CONF. VÍDEO”, pulse 5/a para resaltar [CONFIGURACIÓN HDMI] y luego pulse 3. 2 Pulse 5/a para resaltar una opción. 3 Pulse 3 para introducir un submenú. FORM. PANT. ANCHA Ajuste la relación de aspecto de las imágenes proyectadas en la pantalla. Esta función no está disponible cuando se hacen conexiones HDMI y [PANTALLA TV] se pone en [16:9] (vea la página 27).
Menú de preparación Menú de preparación de preferencias 1 En “PÁGINA PREFERENCIAS”, pulse 5/a para resaltar [PADRES] y luego pulse 3. 1 Pulse dos veces 7 para detener la reproducción (si es necesario) y luego pulse SET UP. PÁGINA PREFERENCIAS AUDIO SUBTÍTULOS MENÚ DE DISCO PADRES LISTA VR NAV MP3/JPEG SUBTÍTULO DIVX PBC 2 Pulse 2 / 3 para seleccionar “PÁGINA PREFERENCIAS”. 3 Pulse ENTER.
Menú de preparación LISTA ORIGINAL Seleccione esto para reproducir los títulos grabados originalmente en el disco. 1 En “PÁGINA PREFERENCIAS”, pulse 5/a para resaltar [SUBTÍTULO DIVX] y luego pulse 3. GRUPO1: Seleccione esto para reproducir la versión editada del disco. Esta función sólo está disponible cuando se ha creado una lista de reproducción.
Menú de preparación Selección de la función PBC (control de reproducción) Puede activar o desactivar el control de reproducción (PBC). Esta función sólo está disponible en Vídeo CD 2.0 con control de reproducción (PBC). 1 En “PÁGINA PREFERENCIAS”, pulse 2 Pulse ENTER para entrar en la “Página de cambio de contraseña”. CONTRSÑ ANT. NUEVA CONTRSÑ CONFIRMAR 5/a para resaltar [PBC] y luego pulse 3. OK ACTIVAR Seleccione esto para ver un menú de disco.
Códigos de idiomas Códigos de idiomas Estos códigos se pueden utilizar para seleccionar otros idiomas. Eso no afecta a las opciones de in “AUDIO”, “SUBTÍTULOS” o “MENÚ DE DISCO”.
Solución de problemas Solución de problemas Consulte la tabla de abajo cuando esta unidad no funcione correctamente. Si el problema que usted tiene no está en la lista de abajo o las instrucciones no sirven de ayuda, ponga esta unidad en el modo de espera, desconecte el cable de alimentación y póngase en contacto con el centro de servicio o concesionario Yamaha autorizado más cercano. Problema No se conecta la alimentación Solución Conecte correctamente el cable de alimentación de CA.
Solución de problemas Problema No hay sonido o éste está distorsionado Solución Ajuste el volumen. Verifique que los altavoces estén conectados correctamente. No hay audio en la salida digital Verifique las conexiones digitales. Si está reproduciendo una fuente DTS, compruebe que su receptor pueda decodificar DTS y que [SALIDA DIGITAL] esté en [TODO] (vea la página 25). Si está reproduciendo una fuente MPEG-2, compruebe que su receptor pueda decodificar MPEG-2.
Solución de problemas Problema Solución “NO DISC” aparece en el visualizador del panel delantero Compruebe que el disco esté colocado correctamente en su bandeja. “UN DISC” aparece en el visualizador del panel delantero El disco cargado no es compatible con esta unidad. Compruebe el tipo del disco (vea “Formatos de discos reproducibles” en la página 3). No se pueden seleccionar los elementos del menú Pulse dos veces 7 en el mando a distancia antes de seleccionar el menú de preparación.
Glosario ■ Analógico Sonido que no ha sido convertido a valores numéricos. El sonido analógico cambia, mientras que el digital tiene valores digitales específicos. Estos jacks envían audio por dos canales, el derecho y el izquierdo. ■ Jacks de salida de audio Jacks en la parte posterior del reproductor DVD que envían audio a otro sistema (TV, estéreo, etc.). ■ Velocidad de bits La cantidad de datos usada para retener una cantidad dada de música, medida en kilobits por segundo, o kbps.
Glosario ■ Menú interactivo Los menús de vídeo interactivos ofrecen una comodidad y un control sin precedentes para que usted pueda navegar rápidamente entre varias escenas o funciones extra, y seleccionar opciones de pistas de audio o subtítulos. ■ JPEG Un formato de imagen fija digital muy común. Un sistema de compresión de datos de imagen fija propuesto por Joint Photographic Expert Group que sobresale por una ligera disminución en la calidad de la imagen a pesar de su alta relación de compresión.
Especificaciones Especificaciones NORMA DE TV • • • • • • • • • Número de líneas ........................... PAL: 625, NTSC: 525 • Frecuencia vertical ..................PAL: 50 Hz, NTSC: 60 Hz • Reproducción ........................ Multiestándar (PAL/NTSC) DVD-Vídeo DVD-R, DVD-RW, DVD-R DL DVD+R, DVD+RW, DVD+R DL Video CD, SVCD CD PICTURE CD CD-R, CD-RW MP3 (ISO 9660) ................................. fs 32, 44,1, 48 kHz / 96, 128, 256, 320 kbps (CBR solamente) • WMA..........
©2007 YAMAHA YAMAHA YAMAHA YAMAHA YAMAHA YAMAHA YAMAHA ELECTRONICS CORPORATION, USA 6660 ORANGETHORPE AVE., BUENA PARK, CALIF. 90620, U.S.A. CANADA MUSIC LTD. 135 MILNER AVE., SCARBOROUGH, ONTARIO M1S 3R1, CANADA ELECTRONIK EUROPA G.m.b.H. SIEMENSSTR. 22-34, 25462 RELLINGEN BEI HAMBURG, GERMANY ELECTRONIQUE FRANCE S.A. RUE AMBROISE CROIZAT BP70 CROISSY-BEAUBOURG 77312 MARNE-LA-VALLEE CEDEX02, FRANCE ELECTRONICS (UK) LTD. YAMAHA HOUSE, 200 RICKMANSWORTH ROAD WATFORD, HERTS WD18 7GQ, ENGLAND SCANDINAVIA A.B.