
User Manual
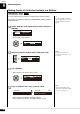
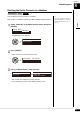

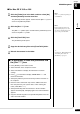
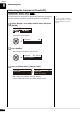
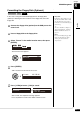
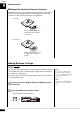
Table Of Contents
- Disklavier E3 Classic Operation manual
- SPECIAL MESSAGE SECTION
- IMPORTANT SAFETY INSTRUCTIONS
- Mounting the Control Unit to the Grand Piano
- Mounting an Optional USB Floppy Disk Drive to the Grand Piano
- Welcome to the Yamaha Disklavier™!
- Important Precautions
- Table of Contents
- Quick Reference
- Chapter 1 Introduction
- Chapter 2 Getting Started
- Connecting the Control Unit
- Connecting the AC Power Cable
- Using the Remote Control
- Turning On the Disklavier
- Setting the Internal Calendar
- Turning Off the Disklavier (Standby Mode)
- Shutting Down the Disklavier
- Compatible Media Format for the Removable Media
- Compatible File Format
- Basic Precautions for Using CDs
- Chapter 3 Basic Song Playback
- Chapter 4 Advanced Song Playback
- Changing the Playback Tempo
- Playing Back Songs in a Different Key (Transposition)
- Repeating Song Playback
- Repeating a Specific Section of a Song (A-B Repeat)
- Playing Back Only the Desired Piano Part
- Adjusting the Volume Balance among the Keyboard Playing, Ensemble Sound, and Software Playback
- Adjusting the Pitch of Audio
- Adjusting the L/R Balance of Audio
- Using the Timer Play
- Skipping the Blank Part at the Beginning of a Song
- Video Synchronized Playback
- Adding Disklavier Accompaniment to Commercial CD Songs (PianoSmart™ Playback)
- SmartKey™ Playback
- Chapter 5 Advanced Piano Playing
- Chapter 6 Basic Recording
- Chapter 7 Advanced Recording
- Chapter 8 Media Management
- Managing Albums
- Making Copies of Albums
- Deleting Albums
- Creating a New Album
- Renaming an Album
- Rearranging the Order of Albums
- Managing Songs
- Making Copies of Songs
- Deleting Songs
- Renaming a Song
- Rearranging the Order of Songs
- Converting Song Format
- Changing the Counter Display
- Converting MIDI Data to a Standard Form (Strip XP)
- Managing Playlists
- Adding Songs/Albums to the Playlist
- Deleting a Playlist
- Creating a New Playlist
- Renaming a Playlist
- Managing Media
- Making Copies of the Entire Contents in a Medium
- Deleting the Entire Contents in a Medium
- Copying Song File from a Personal Computer to the Disklavier
- Refreshing the Contents in [FromToPC]
- Formatting the Floppy Disk (Optional)
- Making Backups of Songs
- Restoring the Backups
- Chapter 9 Internet Direct Connection (IDC)
- What is Internet Direct Connection (IDC)?
- Obtaining an ID and Password for the IDC Service (IDC Registration)
- Connecting the Disklavier to the Internet
- Accessing the Internet
- Checking Your Account Information
- Updating the Disklavier Using the Internet
- Setting the Disklavier for the Internet Connection
- Initializing Internet Settings
- Chapter 10 Enhancing the Disklavier by Hooking Up Other Devices
- Chapter 11 Other Settings
- Tuning the Tone Generator (TG Master Tune)
- Assigning Frequently-used Functions to the Number Keypad on the Remote Control
- Setting the Passcode to Prevent Unauthorized Access
- Adjusting the Brightness of the Display
- Switching the Languages for the Screen
- Resetting the Disklavier
- Diagnosing the Disklavier (Maintenance Mode)
- Updating the Disklavier
- Chapter 12 Internal Tone Generator Voices
- Chapter 13 Troubleshooting
- Chapter 14 Error Messages
- Chapter 15 Glossary
- Chapter 16 Specifications
- Software License Notice
- MIDI Data Format
- MIDI IMPLEMENTATION CHART

Media Management
8
Chapter
94
■ Floppy Disk Accidental Erasure Protection
Floppy disks have an erasure protection tab located on the reverse side of
the disk in the bottom right-hand corner. When formatting a disk, make
sure that its erasure protection tab is set to “unprotected.”
Note:
Be sure to use the USB medium
described in Chapter 2 “Getting
Started – Compatible Media Format
for the Removable Media” on
page 18.
You can make a backup copy of the songs and playlists. In order to protect
your valuable music data, Yamaha strongly recommends that you backup
your memory on regular basis.
If the floppy disk is inserted to the optional floppy disk drive, eject it before
you start making backups.
Note:
Make sure that the USB medium has
enough space to save the backup
data.
Connect an external USB medium to the USB port on the
control unit.
Press [SYSTEM] on the remote control.
The system menu screen appears.
Protected
Unprotected
When the tab window is open,
formatting and recording are
not possible.
When the tab window is closed,
formatting and recording are
possible.
Making Backups of Songs
[SYSTEM] “Backup”
1
2