
User Manual


A
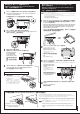
取り付け方法1
: 本ユニットを単体で取り付ける
Method 1: Installing only this unit to the Electone
ݱࡄ
1
͵эذޯ،ੇӰ
Electone
エレクトーンの鍵盤右下にあるネジ穴に、取り付けネジを1本軽く締めます。
1
Insert but do not fully tighten one of the screws to the right front
screw hole under the Electone.
ذ▁梂夊БܷҴӰ
Electone
ЇࣩӸݱ夊БͧѷЈੌ؎ҵ㝠ॻ澞
本ユニットの穴Aを、手順1で締めたネジに引っ掛けます。
Hook this unit (with hole A, shown below) onto the installed screw.
2
ذޯͣױЇےठࣩ
A
ͤܖӰ،ੇࣩ夊БІ澞
3
ܷҴٶӢ֠ؓӽѾࣩЅ梂
夊Б澞
դͧࢡ֠㝠ॻےޥ֙梂夊
Б澞
ほかの3つのネジも軽く締めます。
締め終わったら、4本すべてのネジをしっかり固定します。
Insert and partially fix
the remaining three
screws. Then, firmly
tighten all four screws.
USB ケーブルをエレクトーン本体のUSB TO DEVICE端子に挿します。
Connect the USB cable to the USB TO DEVICE terminal.
4
ذ
USB
ࣔধܯ২
USB TO DEVICE
ॏՌ澞
For Japanese users only
э҇ݺޯ࣐ې
5
コードクランプをMIDI端子の右側
に取り付けます。
コードクランプは、エレクトーンの分
解の際に使用します。
分解の際は本ユニットのUSBケーブル
を抜き、コードクランプにはさみます。
キーボードユニットを外したときに
ケーブルが破損するのを防ぐため、確実
にコードクランプにはさんでください。
USB機器の接続 / Connecting USB storage devices
ܯ
USB
Ҥ੦ה
ボタンを押しながら、手前にスライドさせる
While holding this button, pull the unit toward you.
按住该按钮,朝外将本装置拉出。
ሼUSBᆎ۞䇴༽䘔ࡦUSB TO DEVICEᰬθ⺤䇚䇴༽рѰ䘸⭞Ⲻཪᒬъ➝↙⺤ᯯੇ䘔Ⱦ
USB TO DEVICE端子の形状に合うプラグを上下の向きに注意して差し込んでください。
When connecting a USB storage device to the USB TO DEVICE, make sure that the connector
on the device is appropriate and that it is connected in the proper direction.
൞╊྅䗽ぁѣθ䈭ࣗᗻ┇ࣞ䭤ⴎсⲺ
USB
ঋݹȾྸ᷒ሼެؓᤷ൞ੇࢃⲺփ㖤θࡏਥ㜳Ր⻦ࡦᛞⲺᢁᒬᦕඅ
USB
䇴༽Ⱦ
演奏中は、USB機器を奥へスライドさせておいてください。手前に引き出したままだと、手などがぶつかってけが
をしたり、USB機器が破損するおそれがあります。
During your performance, make sure to slide the USB unit under the keyboard. If you leave it in the
forward position, there is a danger of hitting it with your hand and breaking the USB device.
4
Follow step 4 in Method 1.
ଇݱࡄ
1
ࣩࠖற
4
澞
このあとの手順は取り付け方法1と同じです。取り付け方法1の手順4へ進んで
ください。
Temporarily install these
two units together with
screw A.
Insert and partially fix the
remaining three screws.
Then, firmly tighten all four
screws.
3
ほかの3つのネジも軽く締めます。締め終わったら、4本すべてのネジをしっかり固定します。
࣐夊Б
A
ޗݿذГী،ੇӰ▁ફ澞
ᨈޛᒬ䜞࠼രᇐ࢟֏Ⲻп仍㷰ѓȾ❬
θ⢘രᤝ㍝ᡶᴿ仍㷰ѓȾ
フロッピーディスクと本ユニットを重ねた状態で、手前右側のネジAを軽く締め、
エレクトーンに固定します。
2
フロッピーディスクドライブの上に、本ユニットを重ねます。
4か所の穴が重なるようにします。
ױ֢ےठͧذޯݚ֧ࣶԇࣩ֗
Іݱ澞
❬θሼњ㘻ⲺѠᆊሯ喆Ⱦ
Then, align the four holes of
these two units.
Put this unit on top of the
floppy disk drive as shown.
1
ё
Electone
ԲЇࣶԇ֗ͣױ߈ٜ،ੇࣶԇ֗ͤ澞ܘ
Electone
࣐҄ރЯЗ
،ੇރࣩࣼՅஎٽͧԮՔذࣶԇ֗۽Բ澞
Remove the floppy disk drive from the Electone (if the floppy disk drive
has already been installed.) The floppy disk drive can be removed by
reversing the order of the installation instructions described in the
Owner’s Manual of the Electone.
すでにフロッピーディスクドライブがエレクトーンに取り付けられている場合は、
エレクトーンの取扱説明書の手順を参照して(取り付けと逆の手順で)、フロッピー
ディスクドライブを外します。
取り付け方法2
: フロッピーディスクドライブUD-FD01と一緒に
本ユニットを取り付ける
Method 2: Installing both this unit and the UD-FD01 floppy
disk drive to the Electone
ݱࡄ
2
͵բݿذޯո
UD-FD01
ࣶԇ֗،ੇӰ
Electone
䘏〃ᯯ⌋у䴶㾷ֵ⭞Ա䱺ᑜⲺ㷰ѓȾ
ᵢᵰૂ䖥ⴎ傧ࣞಞൽֵ⭞䖥ⴎ傧ࣞಞⲺ㷰ѓᆿ㻻Ⱦ
None of the included screws are necessary in this method.
Both this unit and the floppy disk drive are installed by using the screws for the floppy disk drive.
本ユニットに付属のネジは使用しません。
フロッピーディスクドライブの取り付けネジを使用して、本ユニットとフロッピーディスクを一緒に取り付けます。
A
EN
ZH
JA