
Owner's Manual


Recording
ELS-02/ELS-02C Owner’s Manual
115
7
Music Data Recorder (MDR)
2 Press the [R] (Play) or [CUSTOM PLAY]
button to begin rerecording the Song.
Re-recording starts from the beginning of the Song
and replaces the previously recorded performance
with the newly recorded performance.
NOTE
Pressing the [J] (Stop) button cancels the re-recording
and records the previous performance.
You can also record the parts of your performance
independently. This function lets you record Keyboard
Percussion and performance control data, such as
Registration changes and expression pedal operation,
separately from the other parts of the Song.
Even Keyboard Percussion 1 and Lead Voice 1 Voices can
be recorded separately, though, the Lead Voice 2 Voices
will be included in the performance data of the Upper
Keyboard. The following instruction is an example: First,
record the chords and bass to the Song using the Lower
and Pedalboard, and then record the melody using the
Upper Keyboard.
NOTE
The Lead Voice 2 and the Keyboard Percussion 2 cannot be
recorded to each part separately.
1 Follow steps 1 – 3 on page 114 to call up
the Rec Standby display.
2 Select the parts for recording.
Each pressing of a part button switches the status:
PLAY, OFF, and REC.
PLAY: Playback the parts that have been recorded.
OFF: Recording or playback is not active.
REC: Records the part.
If you set the Upper part to “REC,” the performance
on the Upper Keyboard (including Lead Voice 1
Voices) is recorded. Setting Lead to “REC,” however,
records only the Lead Voice 1 Voices. You cannot set
both Upper and Lead to “REC” at the same time;
neither can the Lower and Keyboard Percussion
parts be recorded at the same time.
NOTE
When you record the Keyboard Percussion, make sure that
the KEYBOARD PERCUSSION [1] button is set to on.
The following setting lets you record only Lower
Keyboard and Pedalboard parts.
NOTE
You should also set the Control button to “REC,” in order to
record Registration changes and expression pedal
operation.
3 Press the [R] (Play) button, and start
playing after the hourglass icon
disappears.
4 Press the [J] (Stop) button when you
are finished with your performance to
stop recording.
Now you’ve recorded the first parts of your
performance.
5 Press the [I] (Record) button to set up
recording of the next part — Upper part
in this case.
A message appears prompting confirmation of
operation. Select [OVERWRITE] to overwrite and
the Rec Standby display appears.
6 Select the parts for recording.
Set the next parts you want to record (in this case,
the Upper part) to “REC.”
Also set the part already recorded (in this case
Lower and Pedal parts) to “PLAY,” so you can hear
the previously recorded parts as you record new
ones.
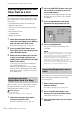
7 Change the playback tempo for the
selected part.
The playback tempo can be set over a range of 50%
to 200% of the original.
The original recorded tempo is 100%; values less
than 100% result in a slower tempo while values
greater than 100% result in a faster tempo.
NOTE
Use the TEMPO [RESET] button in the display to reset the
tempo to its original value (100%).
Recording specified parts only