
Owner's Manual


Rhythm Pattern Program
ELS-02/ELS-02C Owner’s Manual
156
“loop”) for a certain number of measures as set in
the SETTING Page.
Reference page
• Metronome (page 149)
5 Repeat steps 2 through 4 above to layer
each instrument and complete your own
rhythm.
You can erase an instrument while the rhythm is playing
back.
To erase an instrument/key assignment:
While holding down the [CLEAR] button, press the key
on the keyboard corresponding to the instrument you
wish to erase. All instances of the selected instrument will
be erased from the pattern.
When you want to erase all instruments, or edit entered
percussion notes, you need to stop the rhythm before
editing. See page 152, “Editing entered percussion notes.”
The Rhythm Pattern Program allows you to use one of
the Electone’s Accompaniment patterns with your
original rhythm. You can select and save the
Accompaniment pattern that best matches the rhythm
that you have created. Moreover, Rhythm Pattern
Program features a Rhythmic Chord function that lets
you add your own backing patterns to the rhythms you
create.
To select an appropriate
Accompaniment pattern for your newly
created rhythm:
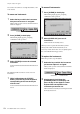
1 Press the [SETTING] button at the top of
the display to call up the SETTING Page.
2 Press the [ASSEMBLE] button.
A pop-up menu appears, letting you select the copy
source and destination parts.
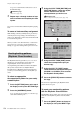
3 Using the COPY FROM [RHYTHM] and
[SECTION] buttons, select the rhythm
and the section which has the
accompaniment you wish to use.
Reference page
• Basic settings for the rhythm pattern (page 148)
4 Using the COPY FROM [PART] button,
select the accompaniment part you
want to copy.
5 Using the COPY TO [PART] button,
select the desired accompaniment part
(CHORD 1 or CHORD 2) to be used for
the Rhythmic Chord pattern.
6 Press the [EXECUTE] button to execute
the copy.
The desired accompaniment part (Rhythmic Chord
pattern) has been copied.
To create your own backing patterns
with the Rhythmic Chord function:
The Rhythmic Chord pattern can be entered by the same
methods as the rhythm: Step Write and/or Real Time
Write.
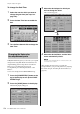
1 Press the [INPUT] button at the top of
the display to call up the INPUT Page.
Creating backing patterns
(Rhythmic Chord function)